background image

Electrical Precautions

CAUTION:  Do NOT apply electrical power to the spa
unless it is filled with water to the normal water level,
which is approximately 7" below the spa rim (refer to
location of water level indicator on face of skimmer).  If
the spa’s motor/pumps are actuated when there is not
sufficient water in the unit, the circulation pump could be
irreparably damaged.  Not heeding this caution will
nullify the warranty.  In addition to damaging the unit,
operating the unit with insufficient water could cause a
fire.

Do NOT locate lighting fixtures directly above the

spa; lighting and electrical receptacles must be located
at least 5 feet from the spa.  Lighting located between 5
and 10 feet from the spa must be on a circuit protected
by a GFCI.  (Refer to National Electrical Code, 680-6.)

Do NOT use electrically connected devices, such as

television, radio, telephones, stereo speakers, light or
cooking devices within 5 feet of the spa when the spa is
being used.

All fixed metal objects located within 5 feet of the

spa, such as fence posts, railings, door frames, green-
house structures, gutters, etc., must be attached to the
bonding bar on the outside of the spa electrical cabinet
using #8 solid copper wire.  With #8 solid copper wire,
bond the spa to the house electrical panel or ap-
proved local bond.

An approved ground may be an 8 foot long ground

rod, a plate electrode, or a buried metal water pipe with
at least 10 feet of buried pipe.  Check your local building
code for requirements. Bonding lugs are available at
your local electrical supply store. (Bond bar location is
shown below.)

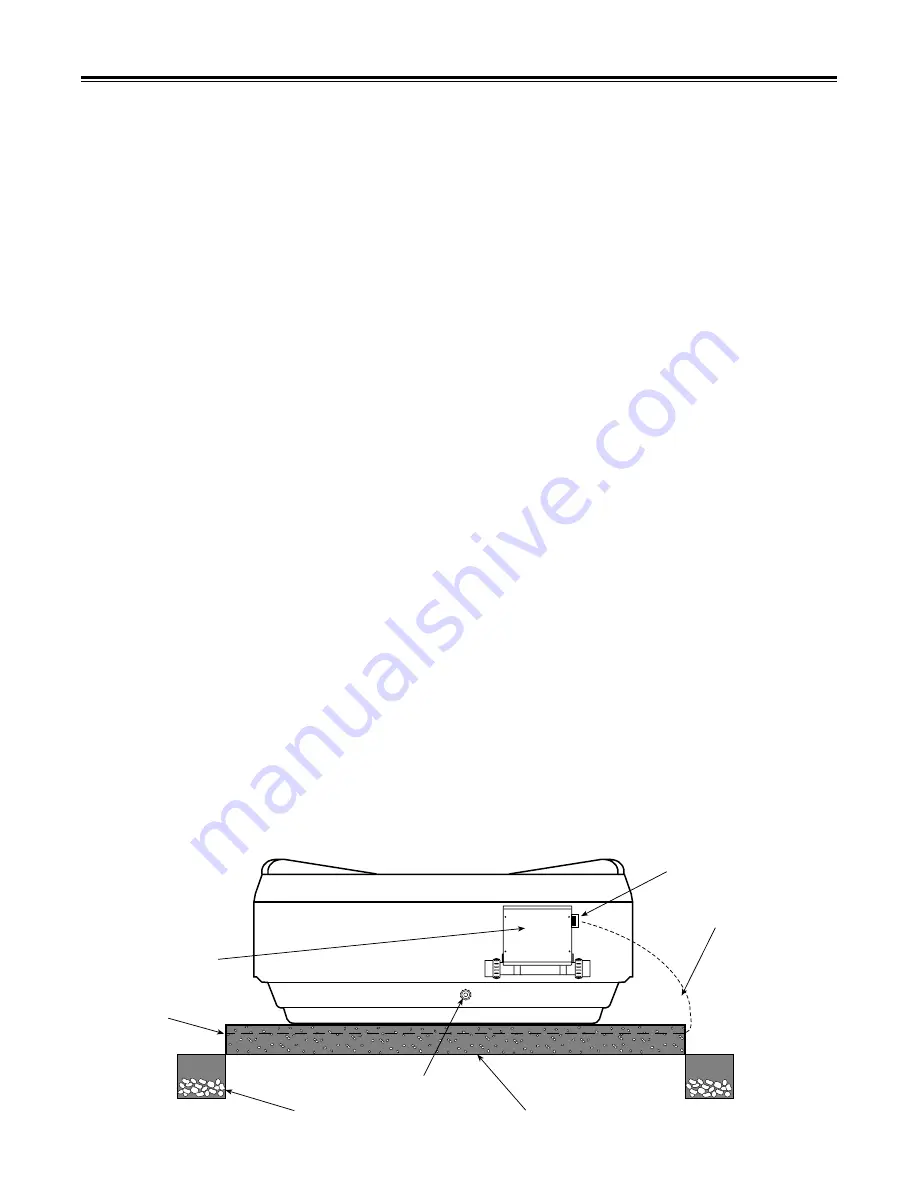
Outdoor Installation

If you install the spa outdoors, we recommend that

you provide a concrete pad for it to rest on.  To do this,
construct forms for a 4" thick level pad.  Install a #10
gauge wire mesh 6" x 6" steel reinforced grid.  Attach a
#8 solid copper wire to the grid with a ground clamp.  This
wire should be long enough to reach the bond bar on the
spa electrical cabinet (minimum 36"), but should NOT be
located under the base of the spa.  Then pour the
concrete pad.

Indoor Installation

Water that splashes on the floor during spa use may

cause a walking hazard and/or structural damage.  Good
drainage must be provided and proper waterproof build-
ing materials must be used in the area surrounding and
beneath the spa.  Take into consideration that high room
humidity will exist due to high spa water temperatures.
Providing natural or forced ventilation of the room will
help maintain comfort and minimize moisture damage to
the building.  Jacuzzi Whirlpool Bath is not responsible
for damages resulting from excess moisture or water
spillage.  Consult an architect or engineer for aid in
designing your indoor installation.

Drainage

Whether you install your spa indoors or outdoors,

you can drain it completely by attaching a garden hose
to the fill and drain valve located on the pan of the spa.
Simply run the hose to the house sewer line or drain field
and open the drain valve.

Make sure the area surrounding the spa has good

drainage to keep water from collecting at the base of the
spa—especially near the equipment area.  If drainage is
poor, install a drain line and/or gravel drain field.  (Refer
to illustration below.)

SUPPORT, DRAINAGE AND BONDING

6

WIRE
MESH
GRID

GRAVEL DRAIN FIELD

4" THICK CONCRETE PAD

BOND BAR

#8 BOND WIRE
(TO LOCAL BOND)

(SKIRTS
REMOVED)

ELECTRICAL
CABINET

DRAIN/FILL VALVE

INSTALLATION

Summary of Contents for Laser

Page 1: ...Platinum Series Spas WHIRLPOOL BATH R Owner s Manual...

Page 2: ...ery Use care when entering and exiting DANGER Risk of child drowning Do not permit children to use this product unless they are closely supervised The use of a locked cover is highly recommended to pr...

Page 3: ...Pinnacle Triton Only __________________________________________ 14 Maintenance Water Quality and Water Chemistry __________________________________________ 15 Filtration _____________________________...

Page 4: ...950 lb 432 kg ELECTRICAL REQUIREMENTS 230 VAC 4 Wire 50 AMP 60 Hz GFCI Protected Dedicated Separate Circuit OPERATING GALLONAGE 550 U S gal 2082 liters TOTAL WEIGHT FLOOR LOADING 6732 lb 3060 kg 105 l...

Page 5: ...dicated Separate Circuit OPERATING GALLONAGE 375 U S gal 1419 liters TOTAL WEIGHT FLOOR LOADING 4771lb 2169 kg 105 lb sq ft 512 kg m2 Product specifications are subject to change without notice 3 PLAT...

Page 6: ...GFCI Protected Dedicated Separate Circuit OPERATING GALLONAGE 390 U S gal 1477 liters TOTAL WEIGHT FLOOR LOADING 5335 lb 2420 kg 104 lb sq ft 509 kg m2 TRITON Product specifications are subject to ch...

Page 7: ...Spa Because your spa is portable you can locate it just about anywhere you wish on a deck patio or even indoors Just be sure to position it above ground in an area with good drainage and on a level co...

Page 8: ...Outdoor Installation If you install the spa outdoors we recommend that you provide a concrete pad for it to rest on To do this construct forms for a 4 thick level pad Install a 10 gauge wire mesh 6 x...

Page 9: ...s normal operating level which is to the water level indicator mark on the skimmer frame Turn ON the circuit breakers at the main electrical panel At the control panel on the spa rim press the JETS bu...

Page 10: ...on pump and heater could be irreparably damaged Not heeding this caution will nullify the warranty In addition to damaging the unit operating the spa with insufficient water could cause a fire 8 Initi...

Page 11: ...is started with this button it will automatically stop after 30 minutes of operation Blower Starts or stops the blower for aeration in the spa Blower operates in all functions The blower will also au...

Page 12: ...ill not be activated Panel Lock The panel lock is provided to prevent tampering with the control panel When the panel lock is engaged all the automatic spa functions will operate normally Press these...

Page 13: ...tonsaredeactivated Whenpressed the set temperature will appear with a double arrow next to it Display Messages These are some of the messages you will see on the center display Message Meaning Battery...

Page 14: ...urth press of the button will turn the light OFF The lights automatically turn OFF after 4 hours of operation The remote batteries have an anticipated life of 3 years depending on usage If batteries n...

Page 15: ...im For maximum air induction rotate each control knob fully counter clockwise to the largest circle For fewer air bubbles decrease the amount of air induction by rotating the control knobs clockwise W...

Page 16: ...installation instructions NOTE the quality of AM reception will vary by locality Jacuzzi Whirlpool Bath is not responsible for the quality of AM reception PUSH DOOR CLOSED TO LATCH PUSH HERE OPEN OUTE...

Page 17: ...tured in the filters may bring about various undesirable water quality conditions These conditions can be corrected with the use of spa treatment chemicals which are available from your Jacuzzi Whirlp...

Page 18: ...150 gallons of spa water Scrub the spa surfaces with this solution to remove any oily deposits This will ensure that any bacteria or algae which are resistant to the normal disinfectant level are kil...

Page 19: ...k for collection of debris such as leaves hair etc and cleaned as necessary To clean the basket remove it from the skimmer by pulling it out then backflush it with water from a garden hose and reinsta...

Page 20: ...d unscrew it Separate the union from the cycle valve and remove the strainer Clean by flushing any debris After cleaning replace the strainer by reversing the above procedure Refill the spa Before rei...

Page 21: ...this page as long periods without maintenance of water quality could be detrimental to the spa Another means of maintaining minimum water qual ity while away for less than two weeks is to follow the...

Page 22: ...t cloth and wiped clean Use sparingly in small amounts to avoid contaminating the spa water If the water line is heavily soiled it may be advisable to lower the water level 2 3 inches before cleaning...

Page 23: ...h content of solids in water F Filter motor plug not connected to the electrical cabinet A Leak in suction line discharge line or connections B Excessive evaporation and or splashing A Low water level...

Page 24: ...line C Vibrating parts attached to motor or support brackets D Low water level E Damaged or worn motor bear ings F Impeller rubbing inside case G Debris inside pump A Worn or damaged pump seal A Power...

Page 25: ...SPA SHELL SAVE FOR LATER REINSTALLATION IF DESIRED CUT PIPE HERE INSTALL AND CEMENT 3 4 PVC CAP HERE TEE LOCATED ON DISCHARGE PIPING SUGGESTED MODIFICATION REFER TO LOCAL CODES FOR REQUIREMENTS 1 1 2...

Page 26: ...24...

Page 27: ...e time of delivery All other spa components including the wood cabinet factory installed ozone generator and stereo system including CD player speakers grills etc are warranted against malfunction due...

Page 28: ...itation anyofthefollowing connections supplied by the installer of the equipment improper voltage supply or unauthorized electrical modification incorrect operation or lack of proper routine maintenan...

Reviews: