14
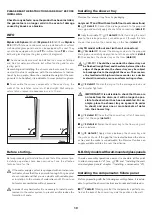
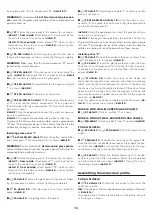
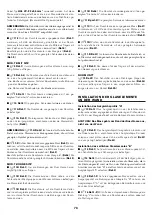
Insert glass panel “H” into compensator “G” (
detail 2-3
).
WARNING!
For models with
90-120 wall-mounted glass pan-
els
, check that the glass panel profile and the compensator are
perfectly lined up.
I
(
i
31
) Fasten the glass panel to the shower tray as shown:
- (
detail 1
):
from inside
, attach bracket “T”, which must be fas-
tened to the shower tray as shown (
detail 2
).
- (
detail 3
):
from outside
, attach bracket “T2”, which must be
fastened from the inside as shown (
detail 4
), without tighten-
ing the screw completely.
I
(
i
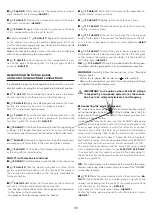
32-32A detail 1
) Fasten the glass panel to the spacer,
following the sequence as shown, without tightening completely.
WARNING!
Make sure that the shaped washers “R” are at-
tached in the correct direction.
I
(
i
32-32A detail 2
) If the glass panel is not level, adjust the
spacer (
detail 3
). Also check that it is straight as shown (
detail
2a
), and if necessary slightly move the glass panel.
I
(
i
32-32A detail 4
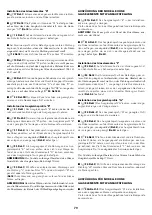
) Completely fasten the spacer and plate
“T”, as shown (
detail 5
).
I
(
i
32-32A detail 6
) Then press on the covers.
I
(
i
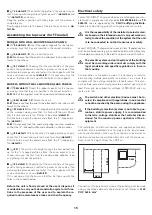
33-33A-33B-33C detail 1
) After checking that glass pan-
el “H” is level, use the holes in compensator “G” as a guide, and
then drill holes in the glass panel profile “H”. Then fasten the com-
pensator as shown.
(
detail 2
) Using the appropriate tool, insert the gasket as shown, us-
ing care in positioning it.
(
detail 3
) Then apply silicone between the profiles and the tray.
To prevent the silicone from being visible, remove glass panels
"F" and "H" and apply silicone to the shower tray, the area the
profiles are resting on, and the area where these line up.
Installing glass panel "I"
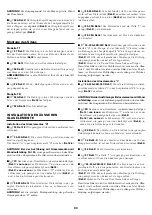
I
(
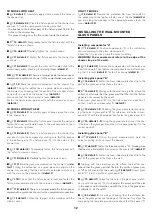
i
34-34A-34B-34C detail 1
) Attach the bottom seal and then
insert glass panel “I” into compensator “E”, as shown (
detail 2
).
WARNING!
For the model with
wall-mounted glass panels
,
before drilling holes check that the glass panel profile and the
compensator are perfectly lined up.
I
(
i
35
) Fasten the glass panel to the shower tray as shown:
- (
detail 1
):
from inside
, attach bracket “T”, which must be fas-
tened to the shower tray as shown (
detail 2
).
- (
detail 3
):
from outside
, attach bracket “T2”, which must be
fastened from the inside as shown (
detail 4
), without tighten-
ing the screw completely.
I
(
i
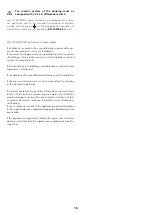
36 detail 1
) Fasten the glass panel to the spacer, follow-
ing the sequence as shown, without tightening completely.
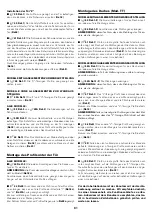
I
(
i
36 detail 2-3
) If the glass panel is not level, adjust the
spacer (
detail 4
).
I
(
i
36 detail 5
) Completely fasten the spacer.
I
(
i
37 detail 1
) Completely block plate “T”, as shown, and then
press on the covers.
I
(
i
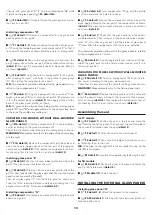
38-38A-38B-38C details 1-2
) Using the holes in com-
pensator “E” as a guide, then drill holes in the glass panel profile
and fasten the compensator.
(
detail 3
) Using the appropriate tool, insert the gasket as shown,
using care in positioning it.
(
detail 4
) Then apply silicone between the profiles and the tray.
To prevent the silicone from being visible, remove glass panels
"D" and "I" and apply silicone to the shower tray, the area the
profiles are resting on, and the area where these line up.
Installing door "P"
I
(
i
39 detail 1
) Attach the handles to the door as shown. Then
insert the bushes into the hinges (
detail 2
).
I
(
i
40 detail 1
) Insert the plastic protection under the door.
Then line it up with glass panel “H”, inserting the door hinges in-
to the ones on the glass panel, and fasten them with the thread-
ed pins (
detail 2
).
I
(
i
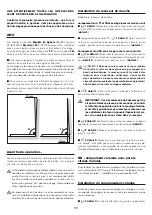
41 details 1-2
) Loosen the screws on the hinges and
check that the magnets close perfectly, and check the distance
(which must be the same) between the bottom of the door and
the shower tray (using the plastic protection). If they do not close
perfectly, slide the hinge unit so that the magnets match up, and
use a wood dowel and a rubber hammer so that the two magnetic
seals line up (
detail 3
).
Once this operation has been completed, tighten the screws (
de-
tail 4
). Then remove the protection (
detail 5
).
MODELS WITH WALL-MOUNTED GLASS PANELS
I
(
i
42 detail 1
) Click on profiles “U”, as shown.
MODELS WITHOUT WALL-MOUNTED GLASS PANELS
I
(
i
42A detail 1
) Click on profiles “J” and “U”, as shown (
detail 2
).
FOR ALL MODELS:
I
(
i
42 detail 2
and
i
42A detail 3
) Place the covers on the
hinges.
I
(
i
42B detail 1
) Assemble the two ends on the gasket. Re-
move the film from the double-faced tape and then apply the gas-
ket to the door (
detail 2
), ensuring that the profile with the mag-
net adheres perfectly to the double-faced tape of the end.
I
(
i
43 detail 1
) Fasten the flexible shower hose to the riser
rail, placing the mesh filter in between. Fasten the showerhead
and attach the shelves, as shown (
detail 2
), then put the lid on
the drainage column (
detail 3
).
Assembling the under-door profile
FOR ALL MODELS:
I
(
i
44 details 1-2
) Fasten the two heads to the end of the
under-door profile .
N.B.:
The shape of the two heads varies according to the mod-
el
(
detail 2a
).
Then apply a line of silicone to the bottom of the profile, along its
entire length, as shown.


