background image

12


Interruttore e dispositivi elettrici, nel rispetto del-
le norme, vanno collocati in zona non raggiungibile 
dall’utente che sta usando l’apparecchiatura.


Nel caso l’impianto elettrico dell’immobile non sia in 
grado di assicurare un’alimentazione costante, si con-
siglia d’installare uno stabilizzatore di tensione prima 
dell’apparecchiatura, opportunamente dimensionato 
per la potenza della stessa.

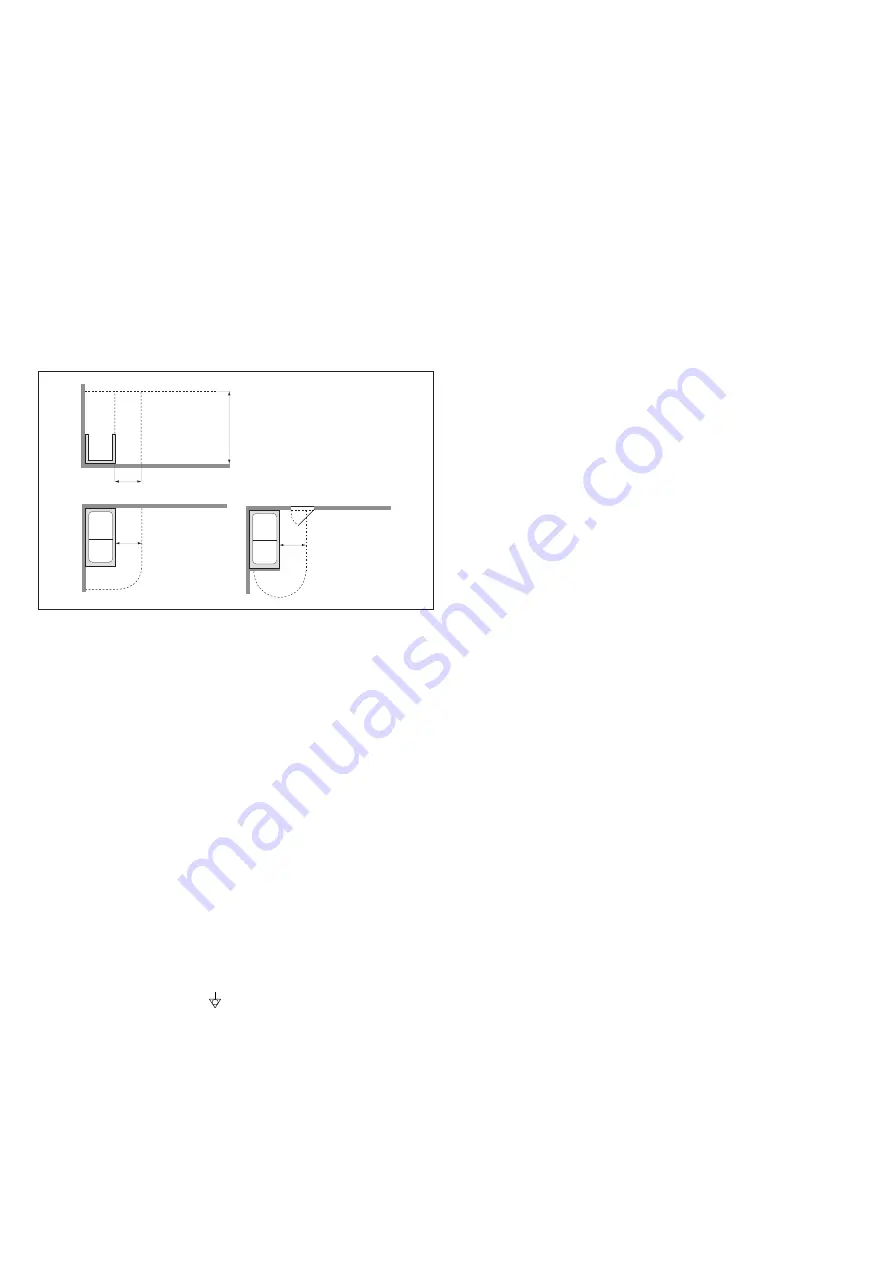
L’installazione di dispositivi elettrici ed apparecchi (prese, in-
terruttori, ecc.) nelle sale da bagno deve essere conforme alle 
disposizioni di legge e norme di ogni Stato; in particolare non 
è ammessa alcuna installazione elettrica nella zona circostante 
l’apparecchiatura per una distanza di 60 cm ed una altezza di 
225 cm.

2

2

3

3

0

1

3

0

1

0,6 m

0,6 m

0,6 m

2,25 m

Per il collegamento all’impianto elettrico dell’immobile, dovrà 
essere utilizzato un cavo con guaina avente caratteristiche non 
inferiori al tipo 

H 05 VV-F 3x2,5 mm

2

.


L’apparecchiatura è provvista di sistema d’illuminazione a led 
conforme alle norme 

EN 62471:2009

.  


L’impianto elettrico dell’immobile deve essere provvi-
sto di interruttore differenziale da 0,03 A.


Le parti contenenti dei componenti elettrici, ad ecce-
zione dei dispositivi di comando remoto, devono esse-
re posizionati o fissati in modo che non possano cadere 
dentro la vasca. Componenti e apparecchiature sotto 
tensione non devono essere accessibili a chi è immerso 
nella vasca.


Le vasche idromassaggio Jacuzzi® sono provviste di 
morsetto, posto nelle vicinanze della pompa e contrad-
distinto dal simbolo  , per il collegamento equipoten-
ziale delle masse metalliche circostanti, come previsto 
dalle norme EN 60335.2.60. 


ATTENZIONE! Scollegare l’apparecchiatura dalla linea 
di alimentazione elettrica prima di effettuare qualsiasi 
intervento di manutenzione.

Info

Access to the electric pump, electrical box and the area below 
the control panel must be provided for maintenance purpos-
es. This access space can be closed with removable panels (see 
specification sheet, ref. 

6, 6a, 6b

at least 45cm high,

 measured 

from the floor. Furthermore, adequate ventilation must be avail-
able for the bath unit, with vents between the bath covers and 
the removable panels, well distributed and non-obstructed.

We recommend installing the bathtubs to already tiled or laid 
walls and flooring, where the space available between the bath-
tub base and the floor itself allows for the attachment of si-
phons/siphon boxes of suitable dimensions. Make sure that the 
floor drainage hole (ref. 

1

) is correctly positioned for the bath 

drain, shown in the specification sheet, depending on the type 
of siphon to be used.

All models need to have the electrical box, fixed to the frame (ref. 

2

), 

connected to the electrical supply and correctly earthed. The cable 
may follow various routes as long as there are no free-hanging con-
nections. In all cases, refer to the ”

Electrical safety

” chapter.

It is recommended to prepare the electrical power supply with 
one single-phase line 

(voltage between phase and neutral: 

220-240V)

.

The device can be powered with a double phase line, 

providing 

that the voltage between phases is 220-240V

.

Hot/cold water preinstallation


Where “hard” water is present, it is advisable to install 
a decalcifier in the water system supplying water to the 
appliance, in order to reduce and/or avoid calcareous 
deposits.


ATTENTION: (IEC 60335-1) The pressure of the water 
system supplying water to the appliance must not ex-
ceed 600 kPa (6 bar).

The water can be supplied from an external tank unit with a wall 
outlet (minimum length 

X

), positioned at references 

3 or 3a

 in-

dicated in the specification sheet. 
Some models without brassware are also available with a  drain-
age outlet with spout. 

It will, however, be necessary to install a specific DB-type 
protection unit (standard EN 1717), located at least 15cm 
above the edge of the bath. Concerning system methods, we 
recommend you contact your water company and/or your 
plumber.

Summary of Contents for Nova Pure Air

Page 1: ...A preinstallation installation use maintenance KEEP CAREFULLY pre installation installation utilisation entretien CONSERVER AVEC SOIN Vorinstallationsblatt Installation Bedienung und Wartung SORGF LTI...

Page 2: ......

Page 3: ...maintenance 25 Sommaire Recommandations 6 Fichetecnique 10 Textdepre installation 14 S curit lectrique 14 Installation 21 Utilisation entretien 27 Inhaltsverzeichnis Hinweise 7 Vorinstallationsblatt 1...

Page 4: ...ressamente previsti Jacuzzi non risponde per eventuali danni derivati da utilizzi im propri Nel caso di interventi di manutenzione e o riparazione che com portino la sostituzione di componenti devono...

Page 5: ...tions which involve the replacement of components Jacuzzi original spare parts must be used otherwise the warranty shall no longer be valid and the Manufacturer will not be responsible for any dam age...

Page 6: ...e ceux express ment pr vus En cas d op rations d entretien et ou de r paration n cessitant le remplacement de composants utiliser des pi ces d tach es originales Jacuzzi en cas contraire le fabricant...

Page 7: ...ischtem Wasser f llen nicht zuerst hei es und danach kaltes Wasser einlaufen lassen damit die Rohrleitungen nicht besch digt werden und die Ablagerung von Kalkstein reduziert wird Es ist streng verbot...

Page 8: ...masaje Llene la ba era con agua ya mezclada es decir no primero agua muy caliente y luego fr a para no da ar las tuber as y para re ducir tambi n los dep sitos de cal Se proh be terminantemente usar e...

Page 9: ...9 8 Nova blower 40 C spa spa Jacuzzi Europe S p A...

Page 10: ...riportati non sono in scala The reference diagrams are not to scale Les dessins report s ne sont pas l chelle Die abgebildeten Zeichnungen sind nicht ma stabsgetreu Los dibujos facilitados no est n a...

Page 11: ...provvista di erogazione per necessario installare un unit di protezione specifica di tipo DB norma EN 1717 posizionata ad almeno 15 cm sopra il bordo vasca Per quanto riguarda le modalit d im pianto...

Page 12: ...control panel must be provided for maintenance purpos es This access space can be closed with removable panels see specification sheet ref 6 6a 6b at least 45cm high measured from the floor Furthermor...

Page 13: ...switch that provides full disconnection under overvoltage category III conditions and place it in an area that com plies with the safety prescriptions for bathrooms The switch and other electrical dev...

Page 14: ...isponibles avec colonne d vacuation pourvue de d bit Il est toutefois n cessaire d installer une unit de protection sp cifique de type DB norme EN 1717 positionn e au moins 15 cm au dessus du bord de...

Page 15: ...feldes f r Wartungen gew hrleistet sein Der Zugriff kann mit abnehmbaren Platten siehe technisches Datenblatt Punkt 6 6a 6b die vom Fu boden aus mindestens 45 cm hoch sind verschlossen werden Au erdem...

Page 16: ...rie ben der unter den Bedingungen der berspannungskategorie III die vollst ndige Abtrennung gew hrleistet diese Vorrichtung muss in einem Bereich untergebracht sein der den Sicherheitsvorschrif ten f...

Page 17: ...nistrar alimentaci n al equipo con una l nea que inclu ya2fasessiemprequelatensi nentrefaseyfaseseade220 240V Preinstalaci ndelaguacaliente fr a En caso de aguas duras conviene montar en la insta laci...

Page 18: ...y y las normas de cada pa s en especial no se admiteningunainstalaci nel ctricaenlazonaquerodeaelequipo hasta una distancia de al menos 60 cm y una altura de 225 cm 2 2 3 3 0 1 3 0 1 0 6m 0 6m 0 6m 2...

Page 19: ...19 6 6a 6b 45 c 1 2 220 240 2 220 240 IEC 60335 1 A2 600 a 6 X 3 3a DB EN 1717 15 EN 1717 15 cm DB 14 4 Jacuzzi EN 60335 2 60 EN 55014 EN 55014 2 Jacuzzi 1...

Page 20: ...20 III 60 225 c 2 2 3 3 0 1 3 0 1 0 6m 0 6m 0 6m 2 25 m H 05 VV F 3x2 5 2 EN 62471 2009 0 03 A Jacuzzi EN 60335 2 60...

Page 21: ...21 220 240V 50 60 Hz 3x LN 63 cm 10x TAST CAP RGB LED KEYBOARD 1 3 4 2...

Page 22: ...22 3x 6x40 mm 5 6 7...

Page 23: ...ndi questo per far uscire l acqua residua entrata durante la fase di scarico della vasca dalle tubazioni collegate con gli ugelli posizionati sul fondo vasca Se lo si desidera si pu attivare manualmen...

Page 24: ...al momento dell anomalia smette di lampeggiare se desiderato aggiungere ancora acqua e agire quindi nuovamente sul tasto per accendere il blower NOTA non premere il tasto mentre il faro lampeggia altr...

Page 25: ...mately 30 seconds This is to remove any remaining water which may have entered when draining the tub from the pipes connected to the nozzles on the bottom of the tub It can be activated manually if yo...

Page 26: ...esired add more water and press the button again to turn the blower on NOTE Do not press the button while the light is flashing otherwise the function is stopped and the blower circuit is drained see...

Page 27: ...on 30 secondes cela pour faire sortir l eau r siduelle entr e pendant la phase d vacuation des tuyaux raccord s aux gicleurs positionn s sur le fond de la baignoire Si on le souhaite il est possible d...

Page 28: ...s de l anomalie arr te de clignoter si souhait ajouter de l eau et agir de nouveau sur la touche pour allumer le blower REMARQUE ne pas appuyer sur la touche lorsque le spot clignote si non la fonctio...

Page 29: ...das beim Leeren der Wanne eingedrungen ist aus den Leitungen die mit den D sen am Wannenboden verbunden sind ausgesto en Wenn Sie m chten k nnen Sie diese Phase wie folgt manuell akti vieren warten S...

Page 30: ...rt auf zu blinken wenn gew nscht f gen Sie noch Wasser hinzu und bet tigen Sie dann erneut die Taste zum Einschalten des Blowers HINWEIS Dr cken Sie die Taste nicht w hrend der Scheinwerfer blinkt da...

Page 31: ...nos 30 se gundos de esta manera se evac a el agua que ha entrado durante el vaciado de la ba era que quede en las tuber as conectadas a los inyectores situados en el fondo de la ba era Si se desea se...

Page 32: ...lo deja de parpadear si lo desea a ada m s agua y vuelva a pulsar el bot n para encender el blower NOTA no pulse el bot n mientras parpadea el foco ya que de lo con trario se interrumpe la funci n y s...

Page 33: ...33 20 15 20 5 10 36 C 34 36 C 20 36 38 C 15 38 40 C 10 5 30 30 Cromodream Relax Energy...

Page 34: ...34 30 Jacuzzi Europe S p A Jacuzzi...

Page 35: ...35...

Page 36: ...ompany of Jacuzzi Brands Corp USA Jacuzzi Bathroom Espa a C Comte urgell 252 local 4 08036 Barcelona Phone 34 932 385 031 Fax 34 932 385 032 www jacuzzi es info es jacuzzi eu I dati e le caratteristic...

Reviews: