Soaker™ Bath Series
Page 8
www.jacuzzi.com
Installation and Operation
English
2
Place masking tape over the entire area of the
proposed hole to prevent chipping.
If you are installing the control panel on the acrylic
surface of the bathtub, the holes must be drilled from
the inside (glossy side) of the bathtub.
3
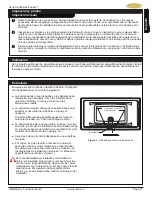
Mark the center line of the two-hole pattern
(Figure 3). It is critical that the ˝ diameter notch
hole be located correctly or the control panel will not
be centered and straight.
4
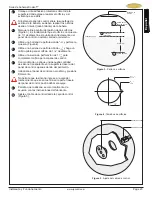
Use a ˝ drill bit and drill out the notch (Figure 4).
5
Use a ˝ drill bit and drill a pilot hole for the 1 ˝
diameter hole.
6
Use a 1
16
1
/
˝ hole saw to complete the hole for the
control panel.
7
Sparingly, apply a bead of clear silicone to the back
surface of the control panel, just inside the perimeter.
8
Insert the control panel into the hole and press firmly
into place.
Do not allow the silicone to enter the plug housing
on the back of the control panel; this could result in
damage to the equipment.
9
Allow the silicone to fully cure according to the
manufacturer’s instructions.
10
Attach the control cable from the control box
(Figure 5).
Rim of Bathtub
Light Hole
4˝ (minimum)
Overflow Drain
1˝
Control Panel
Hole
Water Line
Figure 3 - Hole Pattern
32
5
/
32
5
/
32
5
/
32
5
/
16
1
/
16
1
/
Figure 5 - Control Cable Attachment
Control Cable
Control Panel
Figure 4 - Hole Sizes
1 ˝
˝
½˝


