background image

6

SHUT OFF VALVE

WATER SUPPLY (3/8" COPPER TUBING)

Water Supply

Consult local authorities for plumbing code require-

ments in your area.  Connect house cold water supply to
steam generator supply tubing.

IMPORTANT:  Jacuzzi Whirlpool Bath does not

warrant connections of water supply fittings and
piping or drain systems.  Nor is it responsible for
damage to the shower base which occurs during
any installation procedure.
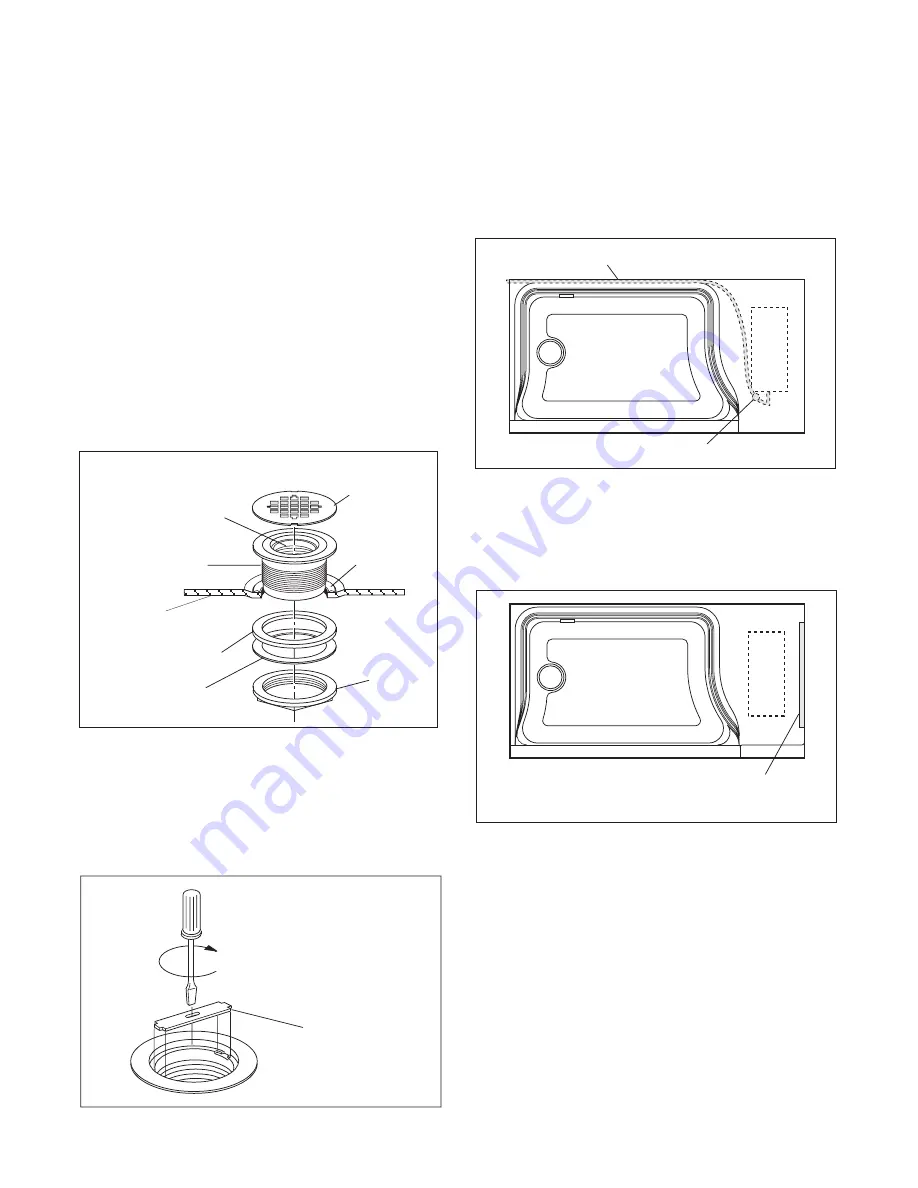
Base Drain

Remove the stainless steel strainer from the drain

assembly.  Disassemble the locknut and two gaskets
from the back of the drain assembly.  Apply a 1/4" bead
of caulking (silicone) to the drain hole and insert the drain
assembly.  Replace the rubber washer, fiber washer,
and lock nut in that order.  Hand  tighten the locknut.
Remove excess sealant from finished side.

Apply a lubricant (common household liquid soap

works well) to the inside of the rubber seal of the drain
assembly.
NOTE:  Watertight installation of the drain is the
installer's responsibility.  Drain leakage is excluded
from the Jacuzzi Whirlpool Bath warranty of this
product.

Slide the shower base into the framed opening and

attach the shower base flange to the stud wall and
blocking with screws provided.
NOTE:  If there is any gap between base flange and
stud or blocking, shims MUST be used to prevent
distortion or cracking of the flange.

STRAINER

DRAIN
ASSEMBLY

SILICONE
SEALANT

SHOWER
BASE

RUBBER WASHER

FIBER WASHER

NUT

APPLY
LUBRICANT

DRAIN ASSEMBLY

With a large screwdriver and the tool included with the

drain, tighten the inside compression nut to seal the
drain pipe connection.  After drain is fully installed, test
for proper drainage.  If the shower base does not drain
properly, rectify this condition before proceeding with
the installation.  Jacuzzi Whirlpool Bath is not respon-
sible for removal and/or reinstallation costs.

TIGHTEN SEALING NUT

TOOL
(INCLUDED)

Electrical Connections

A separate circuit is required.  Install a NEMA 6-50R

receptacle to the studwall at least 4 inches above the
floor.  The receptacle is not provided.

LOCATE RECEPTACLE IN THIS AREA.
RECPTACLE TO BE ACCESSIBLE
FROM SERVICE ACCESS

Summary of Contents for Steam & Shower Base SEDONA

Page 1: ...SEDONA Steam Shower Base INSTALLATION OPERATING INSTRUCTIONS...

Page 2: ...a steam enclosure shower or bath Read and follow manufacturer s safety information with all optional equipment The steam head is hot Do not touch the steam head or the steam within one foot distance...

Page 3: ..._________________________ 8 Finish Materials ______________________________________________________________________ 8 9 Service Access _________________________________________________________________...

Page 4: ...delivery of the products in good order to the carrier Refer any claims for damage to the carrier For definitions of warranty coverage and limitations refer to the published warranty information packa...

Page 5: ...lling the base The use of materials that shim or provide a level installation are allowed provided the method used will ensure a level base that is supported from the bottom Materials that may be used...

Page 6: ...sition when connecting to a drain line To allow steam generator removal for maintenance or service use a straight union DRAIN DOWN OUTLET OPTIONAL AUTOMATIC DRAIN DOWN VALVE DRAIN DOWN VALVE MOUNTED V...

Page 7: ...ing joists to the controller location Note Do not staple through or damage cable An option for tile rooms is to use the 1 gang rough in box provided and install at the desired control mounting locatio...

Page 8: ...installer s responsibility Drain leakage is excluded from the Jacuzzi Whirlpool Bath warranty of this product Slide the shower base into the framed opening and attach the shower base flange to the st...

Page 9: ...unting screws to draw the control housing securely against the finished wall Do not over tighten the mounting screws Install the decorative cover plate by sliding the top of the cover plate over the t...

Page 10: ...included with the sensor If the 7 8 holeisjaggedoriscuttoolargethetrimringmaybeused to cover the exposed edges Make sure that the sensor probe is pointing down once installed Tape the sensor in place...

Page 11: ...with a wood or plastic edge Metal tools will scratch the surface Spots left by plaster or grout can be removed if lightly rubbed with detergent on a damp cloth or sponge Paint tar or other difficult s...

Page 12: ...le element If the steam room temperature drops more than 5 degrees both elements will automatically engage Operation of Your Digital Time and Temperature Control 1 Be sure the power circuit and water...

Page 13: ...vice person For additional assistance or the factory authorized service person nearest you call the Service Department at 1 800 363 0251 This number is only for service for the steam generator The Tro...

Page 14: ...12 Troubleshooting...

Page 15: ...13 Wiring Diagram...

Page 16: ...ble on a national basis for products of this type It is the responsibility of the installer owner to determine specific local code compliance prior to installation of the product Jacuzzi Whirlpool Sho...

Page 17: ...those with manufacturing or workmanship defects for a period of five 5 years from the date of original installation except when the warranted product is installed in commercial locations such as clubs...

Page 18: ...e use or inability to use a warranted product Some States do not allow limitations on how long an implied warranty lasts or the exclusion or limitation of incidental or consequential damages so the ab...

Page 19: ...or acts of God such as lightning floods earthquakes etc In addition THE COMPANY WILL NOT BE RESPONSIBLE FOR INCIDENTAL OR CONSEQUENTIAL DAMAGES or losses arising from any cause e g water damage to car...

Page 20: ...zi Whirlpool Bath Warranty Service Department P O Drawer J Walnut Creek California 94596 Call 800 288 4002 To obtain warranty replacement for factory installed components for Company supplied options...

Reviews: