background image

Inspection and Shipping Claims

Check for shipping damage upon receipt of the spa.  Jacuzzi Whirlpool Bath is not responsible for damage to the spa sustained

during shipping.  If damage is evident before unpacking, see instructions regarding shipping claims on the outside of the carton and
immediately file a claim with the carrier.

Once the spa has been removed from the carton and before it is permanently installed (see below on this page for unpacking

instructions), check the spa completely for damage.  Fill the shell with water and operate the system (see Operating Instructions) to
check for leaks which have resulted from shipping or handling.  All Jacuzzi Whirlpool Bath spas are factory tested for proper operation
and water tight connections prior to shipping.  If leaks or other problems are detected, immediately notify your Jacuzzi Whirlpool Bath
dealer or Authorized Service Agent, or call Jacuzzi Whirlpool Bath, (510) 938-7070 or  (510) 938-7411 for Warranty Service.

Note:  Damage or defects which could have been discovered and repaired prior to installation and which are claimed
after final installation of the spa, are excluded from our warranty.

INSTALLATION

Unpacking

1.

Remove the outer carton by disassembling bracing     and
side panels.

2.

Remove the equipment pack from the pallet by removing
bolts and nuts securing the equipment pack base to the
pallet.

3.

The spa should be moved to its final location on a dolly
in its upright position while still attached to its shipping
pallet.

4.

When the spa has been  moved to its final location,
preferably a concrete pad or other supported surfaces,
place a 4 x 4 x72" wooden block beside the base side
(bottom end) of the spa so it is parallel with the pallet.

5.

Tip the spa over onto its bottom with the block supporting
the spa.   Do not handle the spa by its plumbing;
handle it by the shell only.

6.

Detach the spa from the shipping pallet by removing the
bolts from the pallet.

7.

Leave the remaining plastic sheet attached to the spa
shell to keep the shell clean and free from debris during
installation.

8.

Before installation begins, remove and retain the owner's
packet from the product accessory box.  This packet
contains the Specifications and Installation Instructions,
and Operating Instructions.  The accessory box also
contains filters cartridges, skimmer baskets, check valves,
and the equalizer tube assembly with installation hard-
ware and connections to be installed on the equipment
pack.  Set aside the filter cartridges in a dry place until it
is time to set up the spa equipment.  Read all instructions
contained in both manuals before beginning installation.

9.

Record the spa  and equipment pack serial number on
the inside front cover of the Owner's manual.  (See
illustration on page 2 for the serial number location.)

10. When unpacking optional equipment, keep enclosed

literature for owner's reference.

3

4  X 4 BLOCK

BOLTS

REMOVE
BOLTS

4  X 4  X 72"

BLOCK

PALLET

FIBERBOARD

Summary of Contents for The Cirrus IG

Page 1: ...The Cirrus IG Owner s Manual TM...

Page 2: ...be secured close to the head or a bathing cap should be worn Do not remove the suction grilles They are safety devices and must always be in place on the suction fitting to minimize the potential haz...

Page 3: ...Rainbow Operation Instructions Equipment Set up Priming Procedure I Priming Procedure II Spa Controls Normal Operation Spa Silent Air Induction Water Rainbow Spout Maintenance Water Quality and Water...

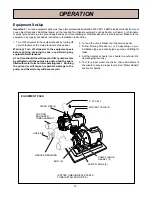
Page 4: ...BE ASSEMBLY TO BE INSTALLED ON SITE WHIRLPOOL MOTOR PUMP HEATER FILTER MOTOR PUMP 32 32 BLACK RECTANGLES IN ILLUSTRATION SHOW PLACE MENT OF WOOD SUPPORTS SEE PAGE 4 OF INSTALLATION INSTRUCTIONS LOCATE...

Page 5: ...3 The spa should be moved to its final location on a dolly in its upright position while still attached to its shipping pallet 4 When the spa has been moved to its final location preferably a concrete...

Page 6: ...e sewer line or to an outside storm drain Check local plumbing codes See Illustration below If you locate your equipment pack indoors provide drainage for that as well You can attach a garden hose on...

Page 7: ...th seat area and perimeter wetting the sand occasionally Important Use care when backfilling both to avoid system damage and to prevent sand from entering the air line system The backfill should fully...

Page 8: ...nd fit them under the spa seating area as instructed in indoor Installation Refer to Support Method illustration Draining the Spa The spa can be drained to the level of the suction fittings if connect...

Page 9: ...5 lbs which includes weight of spa occupants water and product Consult an architect or engineer to determine the adequacy of your floor or deck to support this amount of weight Build wooden seat suppo...

Page 10: ...set locate holes for bolts or anchors to secure the equipment pack based to the pad Refer to the hole locations on the flange of the equipment pack base Then secure the equipment pack base to the pad...

Page 11: ...e size minimum 12 gauge recommended See also sections on grounding and bonding You will need to purchase a means of controlling your spa equipment pack We recommend that you install an air switch time...

Page 12: ...nes between the equipment pack and the spa must not be longer than a total of 20 ft including vertical and horizontal dimensions Use 2 schedule 40 PVC pipe with as few fittings as possible and bond wi...

Page 13: ...ailed air blower instructions Automatic Chlorinators There are several brands and types of automatic chlorinators available Automatic chlorinators should be installed downstream of the heater all type...

Page 14: ...10 percent See the illustration on page 8 for its recommended location A bottom discharge blower should be mounted directly onto a vertical 2 diameter PVC pipe see illustration on this page Side disch...

Page 15: ...nd is positioned against the footwell wall and the hole is over one of the dimples Insert the drill bit provided into the drill chuck so that only 1 to 1 1 2 of the drill bit extends out of the chuck...

Page 16: ...care Stepping into the spa with shoes will scratch the acrylic surface Remove any packing materials from the spa Remove each filter cartridge and skimmer basket from plastic bags Pull open each skimme...

Page 17: ...ny equipment maintenance At no time should the whirlpool or filter pump motors be activated until the pumps are primed and the spa is filled with water to its normal operating level Running the pump d...

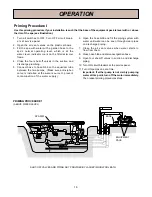
Page 18: ...e plumbing 5 Connect hose to hose bibb on the equalizer tube between the two pumps Make sure anti siphon valve is installed at the water source to prevent contamination of the water supply 6 Open the...

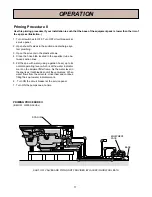
Page 19: ...charge sys tem plumbing 3 Open the air vents in the plastic elbows 4 Close the hose bibb located in the equalizer tube be tween suction lines 5 Fill the spa with water using a garden hose up to its no...

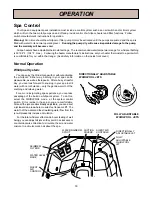
Page 20: ...e for you within that range See Safety Information on the inside front cover Normal Operation Whirlpool System You can enjoy the Cirrus IG spa with or without activating the whirlpool Either way bathi...

Page 21: ...sh water and therefore is not suitable for drinking Silent Air Induction The intensity of the whirlpool action is determined by how much air is induced into the water You have control of this by adjus...

Page 22: ...e spa water The interaction of these with hot water especially at high pH more alkaline levels will cause the water to foam See Water Quality Definitions Oil Film or Cloudy Water Add clarifier to cong...

Page 23: ...active film on the spa at the water line Sodium hypochlorite A liquid chlorine product that is inexpensive and effective but not recommended because the liquid is readily spilled onto the spa or a sur...

Page 24: ...s Follow the manufacturer s instructions for use Another method is to soak the filter cartridge in a plastic pail containing a mild solution of trisodium phos phate TSP and water An hour of soaking ti...

Page 25: ...be used Note If the spa is to be used during winter in a cold climate see warm climate instructions below 1 Turn off the power to the equipment pack 2 Drain the spa and equipment Note If your spa is...

Page 26: ...the spa water If the spa is heavily soiled it may be advisable to lower the water level 2 3 inches before cleaning then refill to normal level Covering Your Spa An optional rigid spa cover is availabl...

Page 27: ...unning B Only whirlpool pump running C Dirty filter s D Plugged strainers E Low water level F Shut off valves closed G Suction skimmer or discharge partially clogged H Worn or damaged pump seal I Fore...

Page 28: ...reaker tripped or in off position C Switch failure D Motor overload condition E Auxiliary switch malfunction A Turn to ON B Turn to ON C D Let cool for one hour Motor overload will reset then start ag...

Page 29: ...ational basis for products of this type It is the responsibility of the installer owner to determine specific local code compliance prior to installation of this product Jacuzzi Whirlpool Bath makes n...

Reviews: