background image

In a climate where winter  temperatures are below
freezing, follow this procedure when the spa will
NOT be used:

1. Select the OFF mode.

2. Turn off power to the unit at the house circuit breaker.

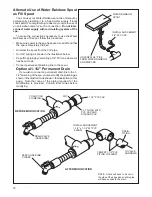
Drain the spa completely by attaching a garden hose
to the hose bibb on the suction plumbing. Then
remove the hose and leave the hose bibb open to
completely drain the spa. Close the drain valve.

3. Remove the filter cartridges, clean them, and store

them dry.

4. Keep water and debris out by covering  with a rigid spa

cover.

5. Before using the spa again, review the  Operating

Instructions.

CAUTION: 

 Not winterizing will cause irreversible

damage (at freezing temperatures) to the pump and/
or plumbing lines.

Automatic Filtration/Maintenance

If you plan to be away, you should maintain minimum water quality by running the filter system.  To do this, set the

timer to turn the system on for at least two hours each day.  This will cause the filter system to turn on at a desired time.
Set the timer according to instructions on page  7 with the SYSTEM switch OFF.   If you do not want the water to be
heated, turn the HEATER knob to its minimum setting.

If you will be away for an extended period, however, we recommend that you drain the spa (following the procedure

described under Winterizing on this  page), as long periods without maintenance of water quality could be detrimental
to the spa.

Another means of maintaining minimum water quality while away for less than  two weeks is to follow the procedure

outlined for winterizing your spa in a warm climate.  See Winterizing. Note:  We do not recommend using this procedure
if you are absent  during the summer, when algae build-up is most likely.)

Always keep your spa covered when not in use to reduce heat loss and evaporation and to prevent debris from

falling in.

Winterizing

14

Note: 

 If the spa is to be used during winter in a cold

climate, see warm climate instructions below.
In a warm climate where there are occasional freez-
ing temperatures, follow this procedure:

1. Select the HTR/FLTR mode.

2. Set the thermostat to its minimum temperature (45 -

50

°

  F.) by turning the dial all the way counter-

clockwise.

3. Maintain a chemical balance. (See Water Quality

section.)

4. Keep the spa covered.

MAINTENANCE

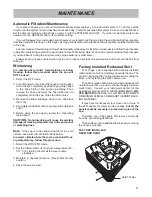
Factory Installed Redwood Skirt

Your Tirage  spa is supplied with a factory-installed

redwood skirt which completely surrounds the spa. The
door can be opened for routine maintenance, setting the
timer,  and for testing the GFCI before use.

The skirt is made of kiln-dried redwood and can be left

natural to weather, or you may choose to apply a stain or
clear finish.  Consult your local paint dealer for the
appropriate product. NOTE: WE RECOMMEND A WA-
TER BASED
 MATERIAL. OIL OR SOLVENT BASED
FINISHING MATERIALS DEGRADE THE SKIRT BACK-
ING MATERIAL.

It may become necessary to remove one or more of

the skirt panels for major service access, but all the
panels must be securely in place during use of the
spa.

To detach any of the panels, first remove all screws

from the panel being detached.

The panels can be re-attached to the spa by reversing

the above procedure.

FACTORY INSTALLED
REDWOOD SKIRT

SKIRT PANEL

Summary of Contents for Tirage Plus PORTABLE WHIRLPOOL SPA

Page 1: ...WHIRLPOOL BATH R THE TIRAGE PLUS PORTABLE WHIRLPOOL SP A OWNER S MANUAL...

Page 2: ...m See Installation Instructions to drain water away from electrical components Do not turn on power to the spa unless it is filled with water to the normal water level which is to the water level indi...

Page 3: ...___________________________________ 10 Silent Air Induction ____________________________________________________ 10 Filtration ____________________________________________________________ 10 Maintenan...

Page 4: ...t and is equipped with a ground fault circuit interrupter GFCI An optional gas heater is available as an alternate heating source and can be installed remotely The Tirage Plud is available in a wide r...

Page 5: ...p the spa over onto its bottom with the block supporting the spa 6 Remove the bolts attaching pallet to spa See Illustration D 7 Remove the pallet and carefully lower the spa to a horizontal position...

Page 6: ...ng copper connectors and must be in a separate circuit having no other appliance connected in that circuit If you do not have this kind of circuit a qualified electrician should be called in to instal...

Page 7: ...commend that you provide a concrete pad for it to rest on To do this construct forms for a 8 x 8 x 4 approx thick level pad Install a 10 gauge wire mesh 6 x 6 steel reinforced grid Attach a 8 solid co...

Page 8: ...Fill the spa with water to its normal operating level which is to the water level indicator mark on the skimmer filter frame Turn on circuit breakers at the main electrical panel Select JETS on the S...

Page 9: ...FETY SWITCH High temperatures above the thermostat range will cause the high temperature safety switch to trip and the system to turn off See operating instructions When water temperature is less than...

Page 10: ...ained at the mini mum temperature approx 50 degrees during the time period set on the timer Setting the Timer The built in 7 day timer is located in the System Control Module The tooth like tabs that...

Page 11: ...For best performance and increased equipment life pause a second or two between push button selections Not pausing may cause the switch to malfunction ACCESSORY The ACCESSORY switch controls these fun...

Page 12: ...when the heater has just turned off the indicator lamp on the control panel will turn off at this time 9 OPERATION TEMP CONTROL Turn on the heater by selecting the HTR FLTR mode with the SYSTEM switc...

Page 13: ...ever thewatertemperaturereachesthedesiredtemperature the pump will turn off For continuous filtration select FILTER on the SYS TEM switch In this mode the filter pump will run until it is manually dea...

Page 14: ...ty and water chemistry in your spa is extremely important and should be a regular part of your spa maintenance program as a neglected spa can be a breeding place for dangerous bacteria The water quali...

Page 15: ...m could be corro sive and damage your spa system Superchlorination also referred to as shock treatment The addition of an above normal level of disinfectant to kill any bacteria or algae that might ha...

Page 16: ...ols to OFF Then turn off circuit breakers at the main electrical panel Pass a garden hose through a hole in the pan and connect it to the hose bibb in the suction plumbing Turn the handle and drain th...

Page 17: ...ow the procedure outlined for winterizing your spa in a warm climate See Winterizing Note We do not recommend using this procedure if you are absent during the summer when algae build up is most likel...

Page 18: ...ace of acrylic is tough and durable and contains concentrated color This is sup ported by a substantial thickness of fiberglass rein forced polyester resin A catalyst causes a chemical reaction during...

Page 19: ...ndicator mark on skimmer filter frame C Clean strainers or skimmer baskets D Clean or replace E Open jet 1 Control Switches do not re spond A Actuated too rapidly B No power to the unit C High Tempera...

Page 20: ...ripped E GFCI tripped F Improper or defective wiring G High temperature safety switch tripped A Turn on power at service panel B Select FILTER HTR FLTR or JETS mode C Reset circuit breaker D Reset cir...

Page 21: ...reset if problem persists see Note B C D Consult electrician to correct wiring to unit E Reset button on heater after water has cooled see Note if switch continues to trip 12 Air Blower does not opera...

Page 22: ...cal plumbing codes may require the use of an anti siphon valve for such a connection Do not inter connect water supply with recirculating system of the spa To make the connections necessary to use the...

Page 23: ...product Jacuzzi Whirlpool Bath makes no representation or warranty regarding and will not be responsible for any code compliance PRODUCT SPECIFICATIONS ARE SUBJECT TO CHANGE WITHOUT NOTICE USE INSTALL...

Reviews: