background image

5

INSTALLATION

Equipment Set-Up

1.

Remove the plastic sheet covering the spa. Use
care; stepping into the spa with shoes will scratch
the acrylic surface.

2.

Remove any packing materials from the spa.

3.

Remove each filter cartridge from its plastic bag.

4.

Pull open each skimmer/filter door by the handle
located in the middle of the door and remove the
skimmer basket.   Then insert the filter cartridge into
the filter housing and re-insert the strainer so that it
fits in place over the filter cartridge and close the
skimmer/filter door. See illustration on page 13.

5.

Clean the interior of the spa of any remaining con-
struction debris.  Remove stubborn stains, paint, or
tar with turpentine, isopropyl alcohol or paint thin-
ner.  A mild liquid dishwashing detergent on a damp
cloth is fine for cleaning off other dirt.  Plaster can be
removed by scraping with a wooden edge; do not
use a metal scraper, wire brush, or other metal tools,
as they will damage the spa's surface.

6.

Install the skirt panel which was not installed on the
spa at the factory.  To do this, secure with the screws
provided in your spa accessory package and follow
instructions provided with panels.

7.

On initial start-up, it is necessary to purge and
sanitize the system.  Carefully follow the procedure
described here to purge and sanitize your spa.

• Remove the optional spa cover completely.

• Close the drain valve located on the suction tee.

• Fill the spa with water to its normal operating

level, which is to the water level indicator mark on
the skimmer/filter frame.

• Turn on circuit breakers at the main electrical

panel.

• Select JETS on the SYSTEM switch.

• Add 1/4 cup sodium dichlor (a fast dissolving

granular type of chlorine) to the water and let the
whirlpool run for 15-20 minutes only.

• Turn off JETS.

• Turn off circuit breakers.

• Immediately open the drain valve and drain

the spa completely.

CAUTION: 

 Leave the optional rigid cover off

the spa during this procedure.  Do not use the
spa during this procedure. Drain the spa imme-
diately afterward.

8.

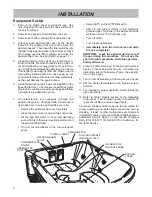
Close the drain valve and  fill the spa with water to
approx. 7 inches below the spa rim, or to water line
indicator mark on the skimmer frame. (See illustra-
tion on this page.)

9.

Turn on circuit breakers at the main service panel.

10. Set the heater thermostat for the maximum tem-

perature.

11. Test the spa for proper operation. (Refer to Operat-

ing Instructions.)

12. Refer to Water Quality section of the Operating

Instructions.  Test for water quality; then add treat-
ment chemicals to ensure proper levels.

All Jacuzzi Whirlpool Bath spas are factory tested for
proper operation and water tight connections prior to
shipping.  If leaks or other malfunctions are detected,
immediately notify your Jacuzzi Whirlpool Bath dealer or
Authorized Service Agent, or call Jacuzzi Whirlpool
Bath, (510) 938-7411 (510-938-7070 in California), for
Warranty Service.

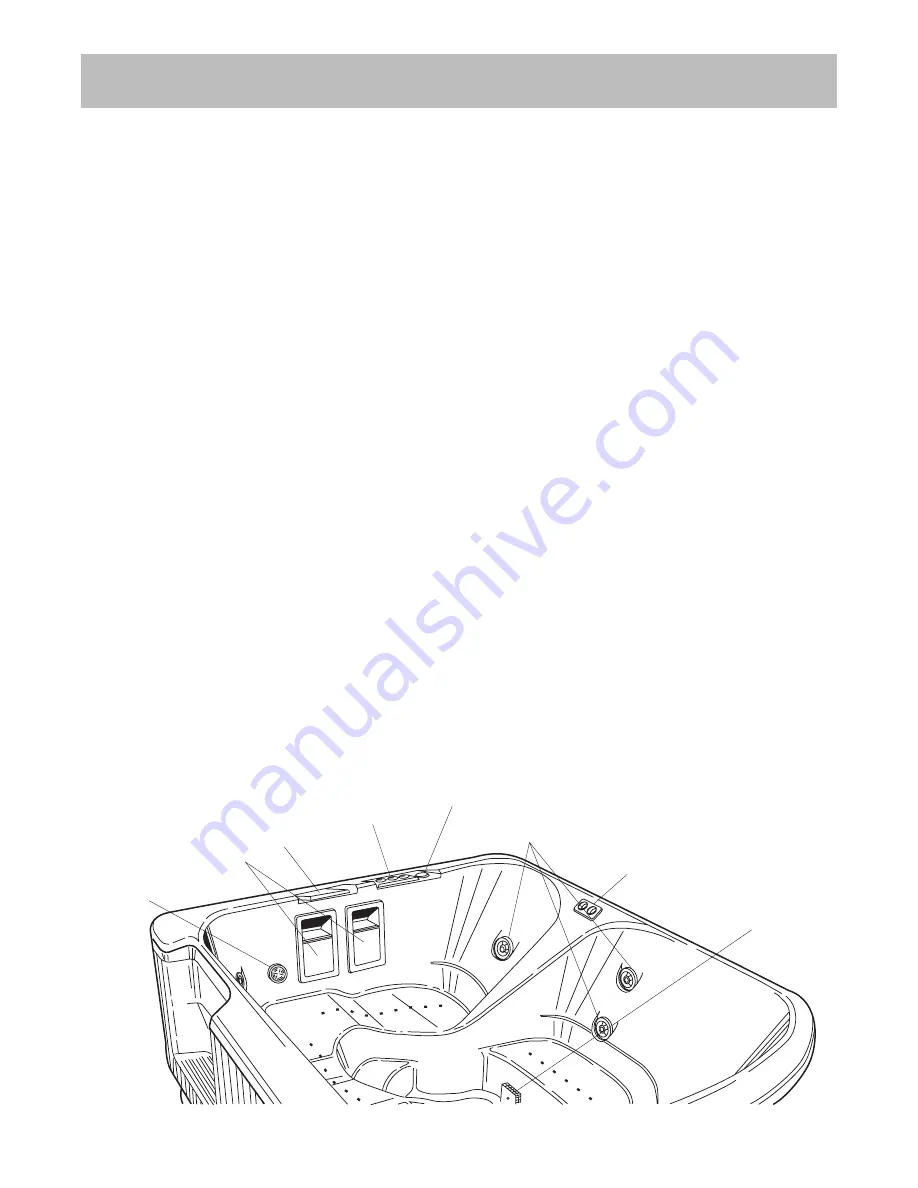
WATER RAINBOW
SPOUT

CONTROL PANEL

THERMOMETER

SKIMMER/FILTER
DOORS

UNDERWATER
LIGHT

FULLY ADJUSTABLE
WHIRLPOOL JETS

AIR INDUCTION
CONTROL KNOBS

SUCTION
COVER

Summary of Contents for Tirage Plus PORTABLE WHIRLPOOL SPA

Page 1: ...WHIRLPOOL BATH R THE TIRAGE PLUS PORTABLE WHIRLPOOL SP A OWNER S MANUAL...

Page 2: ...m See Installation Instructions to drain water away from electrical components Do not turn on power to the spa unless it is filled with water to the normal water level which is to the water level indi...

Page 3: ...___________________________________ 10 Silent Air Induction ____________________________________________________ 10 Filtration ____________________________________________________________ 10 Maintenan...

Page 4: ...t and is equipped with a ground fault circuit interrupter GFCI An optional gas heater is available as an alternate heating source and can be installed remotely The Tirage Plud is available in a wide r...

Page 5: ...p the spa over onto its bottom with the block supporting the spa 6 Remove the bolts attaching pallet to spa See Illustration D 7 Remove the pallet and carefully lower the spa to a horizontal position...

Page 6: ...ng copper connectors and must be in a separate circuit having no other appliance connected in that circuit If you do not have this kind of circuit a qualified electrician should be called in to instal...

Page 7: ...commend that you provide a concrete pad for it to rest on To do this construct forms for a 8 x 8 x 4 approx thick level pad Install a 10 gauge wire mesh 6 x 6 steel reinforced grid Attach a 8 solid co...

Page 8: ...Fill the spa with water to its normal operating level which is to the water level indicator mark on the skimmer filter frame Turn on circuit breakers at the main electrical panel Select JETS on the S...

Page 9: ...FETY SWITCH High temperatures above the thermostat range will cause the high temperature safety switch to trip and the system to turn off See operating instructions When water temperature is less than...

Page 10: ...ained at the mini mum temperature approx 50 degrees during the time period set on the timer Setting the Timer The built in 7 day timer is located in the System Control Module The tooth like tabs that...

Page 11: ...For best performance and increased equipment life pause a second or two between push button selections Not pausing may cause the switch to malfunction ACCESSORY The ACCESSORY switch controls these fun...

Page 12: ...when the heater has just turned off the indicator lamp on the control panel will turn off at this time 9 OPERATION TEMP CONTROL Turn on the heater by selecting the HTR FLTR mode with the SYSTEM switc...

Page 13: ...ever thewatertemperaturereachesthedesiredtemperature the pump will turn off For continuous filtration select FILTER on the SYS TEM switch In this mode the filter pump will run until it is manually dea...

Page 14: ...ty and water chemistry in your spa is extremely important and should be a regular part of your spa maintenance program as a neglected spa can be a breeding place for dangerous bacteria The water quali...

Page 15: ...m could be corro sive and damage your spa system Superchlorination also referred to as shock treatment The addition of an above normal level of disinfectant to kill any bacteria or algae that might ha...

Page 16: ...ols to OFF Then turn off circuit breakers at the main electrical panel Pass a garden hose through a hole in the pan and connect it to the hose bibb in the suction plumbing Turn the handle and drain th...

Page 17: ...ow the procedure outlined for winterizing your spa in a warm climate See Winterizing Note We do not recommend using this procedure if you are absent during the summer when algae build up is most likel...

Page 18: ...ace of acrylic is tough and durable and contains concentrated color This is sup ported by a substantial thickness of fiberglass rein forced polyester resin A catalyst causes a chemical reaction during...

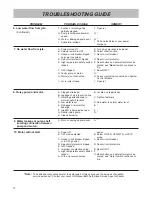
Page 19: ...ndicator mark on skimmer filter frame C Clean strainers or skimmer baskets D Clean or replace E Open jet 1 Control Switches do not re spond A Actuated too rapidly B No power to the unit C High Tempera...

Page 20: ...ripped E GFCI tripped F Improper or defective wiring G High temperature safety switch tripped A Turn on power at service panel B Select FILTER HTR FLTR or JETS mode C Reset circuit breaker D Reset cir...

Page 21: ...reset if problem persists see Note B C D Consult electrician to correct wiring to unit E Reset button on heater after water has cooled see Note if switch continues to trip 12 Air Blower does not opera...

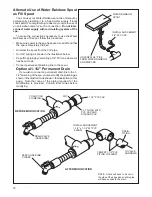
Page 22: ...cal plumbing codes may require the use of an anti siphon valve for such a connection Do not inter connect water supply with recirculating system of the spa To make the connections necessary to use the...

Page 23: ...product Jacuzzi Whirlpool Bath makes no representation or warranty regarding and will not be responsible for any code compliance PRODUCT SPECIFICATIONS ARE SUBJECT TO CHANGE WITHOUT NOTICE USE INSTALL...

Reviews: