31
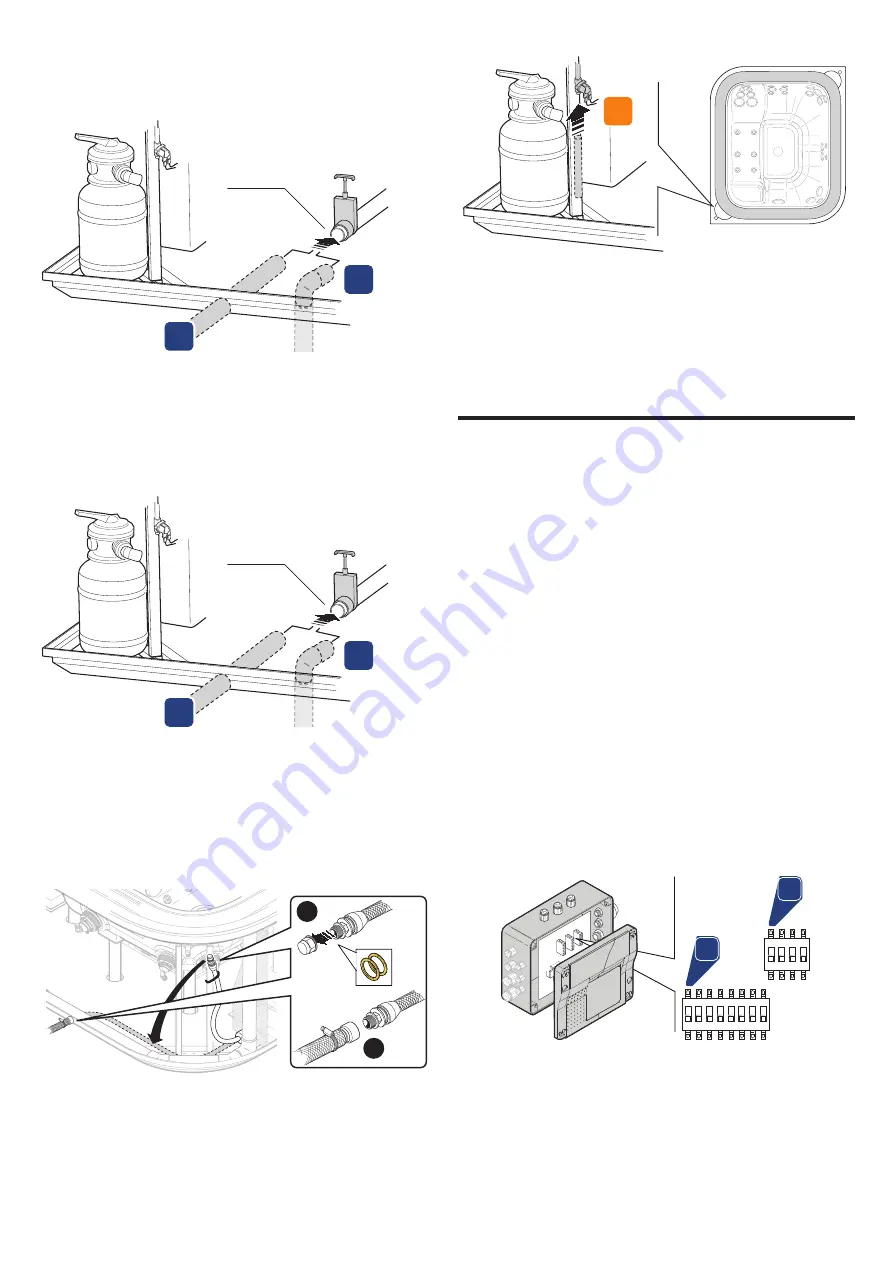
Refer to the pre-installation instructions for information on
connecting the drain. Also connect the overflow on the balance
tanks (position W or W1).
Ø 63 mm
V1
V
n
CAUTION: the overflow drain on the compensation
tanks must always be left open.
m
CAUTION: the two drain lines (hot tub drain, parts V/
V1 and overflow drain, parts W/W1) can be connect-
ed together but NOT BEFORE the respective sluice
valves, otherwise the entire system may not function.
Ø 63 mm
V1
V
Note on connecting the balance tank drain:
the factory in-
stalled pipe is fitted with a connector with gaskets, which the drain-
age system in the building can be connected to. Alternatively, the
balance tank can be connected directly to the drain (remove the
factory installed pipe) and the connector supplied (or a valve) can
be used to drain the water as necessary.
1
2
Connect the solenoid valve to the water mains
.
EV
■
M
odel
can
be
used
witH
J
acuzzi
®
Heat
puMp
(e
co
-H
eat
/
c
ool
p
ower
):
connect the tub to the heat pump (see the rele-
vant manual).
Install the locking system of the cover (
0
4).
Electric connections and safety
The installer is responsible for choosing wires with characteristics
and nominal section that are suitable for the specific current input
of the hot tub (see pre-installation instructions).
The cable path, choice of materials and most suitable installa-
tion solutions are left to the professional knowledge and experience
of the installer; it is his responsibility to guarantee and certify the
installation.
Connect to the terminal block as indicated in the following
wiring diagrams (
0
5).
n
IMPORTANT: for Countries where 220-240V voltage is
supplied by a two-phase system (L+L), the connection
has to be made on terminals L1 and N anyway.
NOTE: If the electrical system that powers the SPA consists of
two (or three) phases (+ neutral, 380-415 V 2-3N ~) before con-
necting, remove the jumper/s located near the terminal board.
Check the arrangement of the switches ("dip-switch"), based
on the spa model and the chosen settings.
b1
b2
1 2 3 4 5 6 7 8
ON
1 2 3 4
ON
SWITCHING BENCH "b1"
dip switch 1
Electric consumption limitation (OFF=16A; ON=32A).
dip switch 2
Pump 1 (check that it is in the OFF position).
dip switch 3
Pump 2 (check that it is in the ON position).
dip switch 4
Blower (OFF = present; ON = absent).
dip switch 5
Filtration pump (OFF = present; ON = absent).
Summary of Contents for VIRTUS
Page 2: ...2...
Page 9: ...9 1 2 3 1 0...
Page 10: ...10 click 2 3 clack 1 4 5x40 mm 2a 2b 1 2a 2b 1 6 6 4 5 2 0...
Page 12: ...12 2 1 3 6 7 8 10 9 PUMP POOL s s s 3b 0...
Page 13: ...13 2 9x19 mm 2 5 mm 1 2 3 1 2 2 3 3 4 0...
Page 92: ...92 16 dip switch 1 16A dip switch 1 V V V spa m m 1 2 m BACKWASH...
Page 100: ...100 ON smart winter...
Page 101: ...101 B2 dip switch 2 LL L1 L2...
Page 102: ...102 Jacuzzi Jacuzzi Jacuzzi Europe S p A Jacuzzi Eco Heat Cool Power b1 b2 b1 b2 b1 b2...
Page 103: ...103...


