6
INSTALLATION
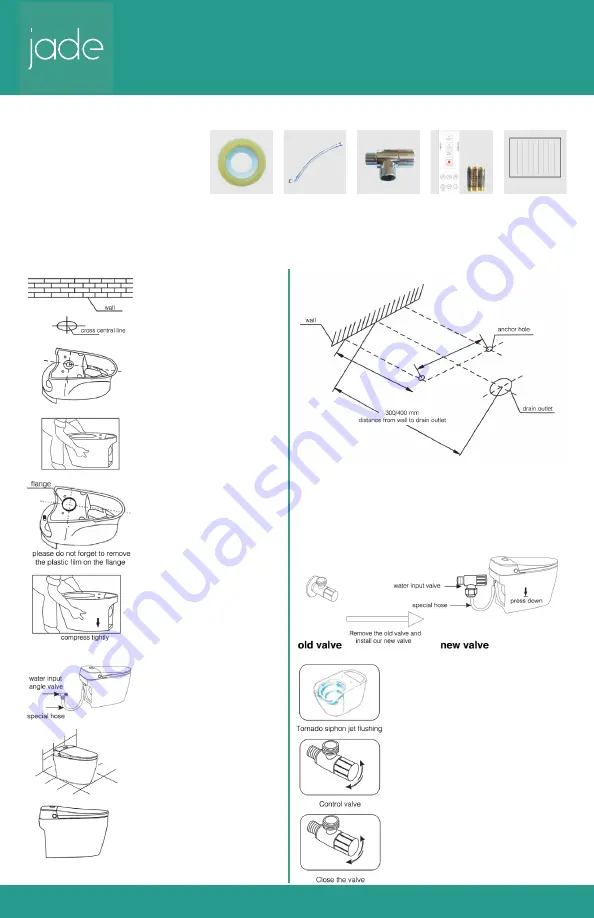
Required Tools:
- Monkey Wrench
- Phillips screwdriver
- Glass glue tape measure
- Pencil or marker pen
- Glass glue gun
Included:
Sealing flange
Special hose
Water input
angle valve
Remote with
3 batteries
Manual
1. Draw a cross central line on
the sewage pipe.
2. Put the toilet upside down
on cardboard or soft cushion.
Draw a cross central line on the
sewage outlet and extend.
3. Align the cross central line
on the toilet sewage outlet with
the mark on sewage pipe on the
ground.
4. Put toilet upside down the
toilet on the soft cushion. Coat
the glass glue on surface of
flange as well as the sewage
outlet and install the flange on
the sewage outlet solidly.
Water pipe connection and installation
1. Install the new angle valve and connect to the end
of special hose.
2. When power is on, adjust the valve and control the
water pressure under 7.5
kg
5. After flange installed, put the
toilet on the ground and make
sure the cross central line and
the sewage are aligned. Then
compress slowly until tight.
7. Coat anti-mildew sealants
on the circle of the toilet with
contact to the ground.
8. After sealants are solid, plug
in the power, slowly open the
angle valve. Control the water
pressure under 7.5 kg and check
the connection is well sealed.
6. Install the water input angle
valve and connect the hose.
Please release the water in the
pipe for 3-5 minutes in order to
ensure the pipe is clean before
connecting to the hose.
NOTE:
The toilet uses tornado siphon jet
flushing technology. If the water
pressure is high in your area (over
3 kg water pressure), there may be
some splash and noise when flushing.
If so, please control valve and adjust
the water pressure.
REMINDER:
It is normal that the nozzle flows
when angle valve is open for new
products and it will normalize after
recovering power supply.
Please stop power and water supply
when dismantling.
Installation steps
INSTALLATION
INSTALLATION


