background image

JADEVER


JCE/JWE


Service Manual - V05


As per the right of proprietary intellectual property, may not be reproduced in any form without written permission.   

18

Ø 

Printing mode


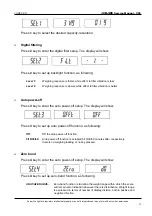
Printing mode is used to set the method of printing when connected with a printer.   

1. Press 

MC/SET 

until display shows 

Prt.Pr.


Prt.Pr


2. Press 

M+/MR

 to set the printing method, as following: 

Pr: 

Data will be sent to printer only when key is pressed. 

Co: 

Data will be sent to printer continuously. 

St: 

Data will be sent to printer when stable indicated.   


Ø 

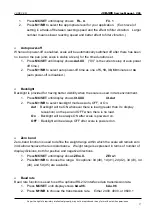
External printer/device 

External printer/device function is used to set the type of external connected device.   

1. Press 

MC/SET 

until display shows 

Peri.

 Wait for few seconds, display will show


PC


2. Press 

M+/MR

 to set the external printer/device, as following: 

PC: 

Personal computer 

SH: 

SH-24 printer 

TDP: 

TDP-643/BP-343D printer 

EZ: 

EZ-2 printer 


Ø 

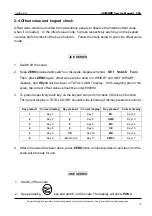
Weight-checking memorizing   

Weight-checking memorizing function is to determine whether or not to memorize the check 

weight. 

1. Press 

MC/SET 

until display shows 

M OFF.


M OFF


2. Press 

M+/MR

 to set whether or not to enable weight-checking memorizing. To select   

either 

ON

 or 

OFF


Ø 

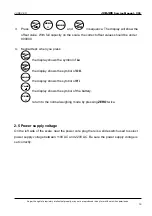
Weight-checking beep mode   

This is to set, in weight-checking mode, the condition at which buzzer is actuated to beep.   

1. Press 

MC/SET 

until display shows 

bEEP.Un.


bEEP.Un


2. Press 

M+/MR

 to set the condition, as following: 

Un: 

Buzzer will be actuated when measured weight is above the set high limit. 

ln: 

Buzzer will be actuated when measured weight is in-between the upper and lower 
set limits (including the upper and lower limits).   

no: 

Buzzer will be actuated when measured weight is outside the upper and lower 
limits. 

Lo: 

Buzzer will be actuated when measured weight is below the set low limit. 

Summary of Contents for JWE-3K

Page 1: ...scale 2 1 4 Preparation 3 1 5 Overview of display keys 4 CHAPTER 2 SET UP 2 1 Models 8 2 2 Calibration 8 2 3 Parameters setup mode 12 2 4 Offset value and keypad check 19 2 5 Power supply voltage 20 C...

Page 2: ...0002kg 12 lb x 0 0005 lb 15kg x 0 0005kg 30 lb x 0 001 lb 30kg x 0 001kg 60 lb x 0 002 lb Countable piece unit weight Applicable for JCE only 0 08g 0 16g 0 4g 0 8g Internal resolution 1 150 000 Pan s...

Page 3: ...right of proprietary intellectual property may not be reproduced in any form without written permission 2 1 3 Your JCE JWE scale JCE series illustrated here Top Bottom Front Back Right viewed from th...

Page 4: ...or to use Check whether power supply select switch is set correctly 1 Refer to the bottom view diagram below for the location of delivery protection screw 2 Prior to use always counter clockwise loose...

Page 5: ...ing 4 HI LO OK Indicators for checking function 5 Sample insufficient Indicate when sample is less than 10pcs or unit weight is smaller than 4 5 of min weighing capacity 6 Accumulation Indicate when a...

Page 6: ...able the checking function the indicator of HI LO OK will light up accordingly 3 Key for using in accumulating the weight and quantity the indicator of accumulation will light up while accumulating 4...

Page 7: ...l show the weight middle screen will show the unit weight and the right screen will show the quantity of counting 9 Key for cancelling the input n Press key to reset to zero when input by using numeri...

Page 8: ...ed indicating charging and light in green indicating charge completed k LCD display l Indicator LED of accumulation KEYS OF JWE series When weighing use this key for accumulation when 0 shown in displ...

Page 9: ...n circuited Shorted 15kg Shorted Open circuited 30kg Open circuited Open circuited 2 2 Calibration Note Metrological controls and or regulations The regulations and or metrological controls governing...

Page 10: ...2 Switch off the scale 3 Press and switch on the scale together then SET will be displayed 4 Leave weighing pan empty and then press again On0 will be displayed JCE starts zero calibration 5 Then On1...

Page 11: ...ayed in UNIT WEIGHT and TOTAL COUNT displays 3 Key in the number 11 then press SMPL to start zero calibration CAL 0 H9 4 When the symbol CAL blinks zero calibration is completed and scale is now waiti...

Page 12: ...l capacity onto the weighing pan when the display shows 6 Put the third calibration weight of full capacity onto the weighing pan when the display shows 7 When the display shows empty the weight pan P...

Page 13: ...p mode JCE series Follow the steps below to enter the parameters setup mode 1 Turn on the scale while keeping ZERO key pressed 2 SEt SCALE FunC will be shown respectively in three LCD display for indi...

Page 14: ...ter Auto power off Press 3 key to enter the auto power off setup The display will show Press 3 key to set up auto power off function as following Off Off the auto power off function 5 10 30 60 Auto po...

Page 15: ...the setting of Hi ln Beep sounds when quantities are within the setting of Hi and Lo including the Hi and Lo limits no Beep sounds when quantities are out of Hi and Lo setting Lo Beep sounds when quan...

Page 16: ...rinter device setup mode The display will show Press CK key to set up external printer device as following PC Personal computer SH SH 24 printer TDP TDP 643 BP 343D printer EZ EZ 2 printer Weighing un...

Page 17: ...on This function is provided for you to enable those weighing units you want to have in normal operation Those disabled units will not be shown when you press MODE in normal operation 1 Press MC SET u...

Page 18: ...vided for having better visibility when the scale is used in dark environment 1 Press MC SET until display shows Iit XXX Iit Aut 2 Press M MR to select backlight mode as Auto OFF or On Aut Backlight w...

Page 19: ...e as following PC Personal computer SH SH 24 printer TDP TDP 643 BP 343D printer EZ EZ 2 printer Weight checking memorizing Weight checking memorizing function is to determine whether or not to memori...

Page 20: ...n in WEIGHT and UNIT WEIGHT displays and KEy18 will be shown in TOTAL COUNT display With weighing pan on the scale the correct offset values should be under 800000 3 To press respectively each key on...

Page 21: ...d be under 800000 4 Keypad test when you press M MR the display shows the symbol of Lo MC SET the display shows the symbol of OK MODE the display shows the symbol of Hi TARE the display shows the symb...

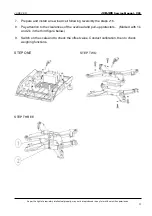
Page 22: ...rews at the bottom 6 Move up carefully the upper cover Pay attention that several wires are connected to the main PCB mounted on the upper cover Place the upper cover upside down for better handling d...

Page 23: ...the previous Section to remove the load cell wires 3 Rotate with hands the two rear support feet on the bottom of the scale to dismount them 4 Loosen and remove the four screws that fix the load cell...

Page 24: ...rmission 23 7 Prepare and install a new load cell following reversibly the steps 2 6 8 Pay attention to the clearances of the overload and pull up protectors Marked with 1 s and 2 s in the third figur...

Page 25: ...ound 9 Is there rapid temperature change within the environment 10 Are there any cooling and or heating sources around 4 2 Problems and Solutions Note Any intention to replace PCB and or to repair com...

Page 26: ...n in the related circuit of main board EEPROM Reset and recalibrate Err5 Over 9e than full capacity Remove the over weight Err6 The incorrect calibrating mass Use the correct mass OuEr1 for JWE Accumu...

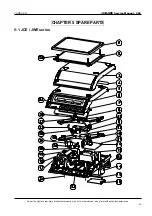
Page 27: ...JCE JWE Service Manual V05 As per the right of proprietary intellectual property may not be reproduced in any form without written permission 26 CHAPTER 5 SPARE PARTS 5 1 JCE JWE series kg pcs g pcs J...

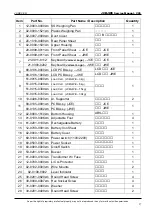
Page 28: ...Load Cell JCE JWE 3kg 51 0015 0400xm Load Cell JCE JWE 6kg 51 0015 0300xm Load Cell JCE JWE 15kg 9 51 0015 0700xm Load Cell JCE JWE 30kg 1 10 10 0406 0000xm Al Supporter 2 80 0135 0001xm PCB Assy JCE...

Page 29: ...crew 2 31 30 0601 0308xm Self Tapping Screw 4 32 30 0800 0560xm Cross Recess Screw 2 33 31 0100 0005xm Screw Nut 2 34 30 0601 0412xm Self Tapping Screw 11 52 0101 0001 LCD 3 3V JCE A1 52 0101 0200 LCD...

Reviews: