1
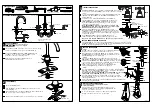
SPOUT ASSEMBLY
2
TEE ASSEMBLY
Insert SPOUT SHANK (1) through center hole of sink or mounting
surface. Seat O-RING (2) into groove in SPOUT BASE (3)
Assemble RUBBER WASHER (4), FIBER WASHER (5) and
LOCKNUT (6) onto threads of SPOUT SHANK (1) from
underside of lavatory or mounting surface.
Grease the 0-RINGS (1&2) .
Slide the TEE (3) onto SPOUT SHANK (4) until it makes contact
with the 0-RING (1).
Thread LOCK NUT (5) onto SPOUT SHANK (4). Rotate TEE (3) about
10 degrees from center and tighten securely.
Align SPOUT (7) and tighten LOCKNUT (6). Insert
LIFT ROD (8) through SPOUT (7).
1
2
4
5
3
Turn off hot and cold water
supplies before beginning.
CAUTION
LEVER HANDLE
CROSS HANDLE
1" D.
6" TO 12" MAX.
7
8
2
5
1
3
4
GROOVE IN TEE
5
3
WATER SUPPLY CONNECTIONS
Connect water supply to VALVE BODIES (1) with 1/2" IPS
FLEXIBLE SUPPLIES (3) or 3/8" O.D. BULL-NOSE RISERS (4).
Use wrench to tighten connections.
Do not over tighten. Be careful not to kink copper supply when
bending. Use tubing cutter to cut to proper length.
1
4
FERRULE
NOTE: FLEXIBLE SUPPLIES OR BULL-NOSE RISERS MUST BE
PURCHASED SEPARATELY.
COUPLING
NUT
5-1/2"
3/8" D.
2-1/8" D.
2" MAX.
7" MAX.
109711
109711
ROUGHING-IN DIMENSIONS
Plumbers' Putty or Caulking
Adjustable Wrench
Phillips Screwdriver
Channel Locks
TOOLS REQUIRED
Tubing Cutter
Regular Screwdriver
Basin Wrench
GROOVE
6
3
INSTALL VALVE BODIES
1-1/4'' MAX.
"O" RING
Thread LOCKNUT (8) to bottom of VALVE BODY (2). Make sure
FIBER WASHER (9) and RUBBER WASHER (10) are installed.
Insert VALVE BODY (2) through mounting hole from underside
of lavatory or mounting surface.
Note: VALVE BODY marked Hot is installed in the left mtg. hole,
VALVE BODY marked Cold in the right when facing front of fitting.
Maximum mounting surface thickness is 1-1/4".
HANDLE ASSEMBLIES (1) are installed on VALVE BODIES (2) and must
be removed to install VALVE BODIES (2) from under lavatory or mounting
surface.
To remove HANDLE ASSEMBLY (1), unthread HANDLE BASE (3) with
LEVER (4) from VALVE BODY (2). Pull HANDLE ASSEMBLY(1) off
VALVE STEM (5).
Unthread and remove MOUNTING RING (6) and SPACER (7).
From top install SPACER (7) onto VALVE BODY (2). Thread
MOUNTING RING (6) on VALVE BODY (2) until seated tightly against
SPACER (7). Set VALVE BODIES (2) so that their outlets are facing
toward SPOUT TEE (11) and then tighten LOCKNUT (8) using 35mm
or adjustable wrench.
Insert FIBER WASHERS (12) into COUPLING NUTS (13) of
SUPPLY HOSES (14) and tighten making water tight connection.
Important: Loop SUPPLY HOSES (14) as illustrated so they do not kink.
6
8
12
HOT
13
14
9
11
10
7
5
2
JADO
"O" RING
TUB DECK OR
MOUNTING SURFACE
HOT
1-1/4" MAX.
1-1/2" MAX.
COLD
APPLY SEALANT
OR TEFLON TAPE
4
A FOAM SEAL (1) is installed on underside of FLANGE (2). (Plumbers
Putty may be used in place of FOAM SEAL (1) if desired.)
Apply sealant or Teflon tape to threads of TAILPIECE (10) and
thread into DRAIN BODY (7) making a water tight seal.
Drop FLANGE (2) into LAVATORY DRAIN (3). From below assemble
RUBBER GASKET (4), PLASTIC WASHER (5) and LOCK NUT (6) onto
DRAIN FLANGE (2). Do not tighten fully.
INSTALL POP-UP DRAIN
FIG. 4a
FIG. 4b
FIG. 4c
FIG. 4c
FIG. 4a
FIG. 4b
1
4
3
2
5
6
7
8
6
9
2
Adjust STOPPER (13) height by repositioning POP-UP ROD (16) in SWIVEL (15)
and tightening SET SCREW (18).
Assemble POP-UP SWIVEL (15) to PIVOT ROD (11) but do not tighten.
Drop POP-UP ROD (16) through other hole in POP-UP SWIVEL (15) and
tighten SET SCREW (17)
Assemble PIVOT ROD (11), and PIVOT NUT (12) as shown. Install CONCAVE
WASHER (19) into PIVOT ROD OPENING (9) if not preinstalled. Hand tighten
PIVOT NUT (12). Drop STOPPER (13) into drain.
(
To vandal proof drain rotate STOPPER (13) so PIVOT ROD (11) goes
through EYE (14) of STOPPER (13)
. Make connection to "P" TRAP.
Inspect inside DRAIN BODY (7) that SEAL (8) is installed. Thread
DRAIN BODY (7) tight against FLANGE (2) to make a water tight seal.
10
9
7
6
12
19
16
15
17
18
2
10
14
13
11
The PIVOT ROD OPENING (9) in DRAIN BODY (7) should face the rear
of the lavatory. Tighten LOCK NUT (6) on FLANGE (2) to make a water
tight connection with channel locks. Do not over tighten.
INSTALL HANDLES (LEVER and CROSS)
Turn VALVE BODIES (2) to off position. Align HANDLES as shown or as desired and install
HANDLE ASSEMBLY(1, 1A) onto VALVE STEM (5). Thread HANDLE BASE (3) onto VALVE
BODY (2) until seated tightly against mounting surface.
1-1/4" O.D.
NOTE: ALL MOUNTING HOLES
ARE 1-1/4" D.
Ø 2-1/4"
Ø 2-1/4"
1
1A
3
4
Make sure both O-RINGS (1&2) are seated into grooves of TEE (3).
10 °
BACK


