3-5
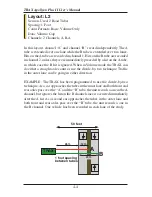
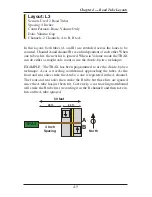
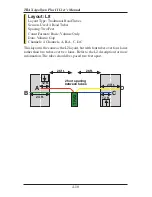
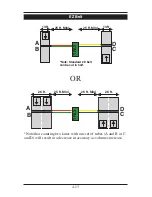
When installing a short tube, long tube configuration (L2) you may install
both tubes completely across the road and tie a knot midway of the half tube.
This eliminates nailing the half tube on the center line which can create a
safety problem for installation personnel.
Step 6 - Check for Accuracy
Once your tubes are installed and you are collecting data, observe the traffic
as it is being recorded to be sure everything is working correctly. If possible,
check the tubes periodically during the study to ensure they have not been
damaged and data is being recorded as programmed.
Upon completion of your data collection, remove the tubes, clamps, nails
and anything else that may be of danger to the motorists. The mastic may
be hard to remove in some instances, especially in hotter weather. In those
cases, it may be left on the highway and eventually it will blend into the
asphalt from the flow of traffic.
Chapter 3 — Road Tube Installation
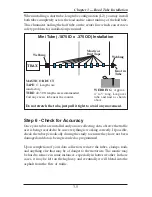
Mastic or
Duct Tape
MASTIC OR DUCT
TAPE:
6” Lengths are
satisfactory
TUBE:
40-50 ft. lengths are recommended.
Coil any excess tube near the counter.
Do not stretch the tube, just pull it tight to avoid any movement.
TRAX
Mini Tube (.1875 ID x .375 OD) Installation
Webbing
WEBBING:
Approx.
4” to 5” long. Loop over
tube and nail as shown
above.
Webbing
Knot in
Tube
Summary of Contents for TRAX Apollyon Plus II
Page 1: ...i Automatic Traffic Data Recorder User s Manual JAMAR Technologies Inc TRAX Apollyon Plus II ...
Page 24: ...TRAX Apollyon Plus II User s Manual 1 18 ...
Page 46: ...TRAX Apollyon Plus II User s Manual 2 22 ...
Page 47: ...3 1 Chapter 3 Road Tube Installation Chapter 3 Road Tube Installation ...
Page 52: ...TRAX Apollyon Plus II User s Manual 3 6 ...
Page 53: ...4 1 Chapter 4 Road Tube Layouts Chapter 4 Road Tube Layouts ...
Page 70: ...TRAX Apollyon Plus II User s Manual 4 18 ...
Page 71: ...5 1 Chapter 5 Troubleshooting FAQ Chapter 5 Troubleshooting FAQ ...
Page 75: ...A 1 Appendix Appendix ...

