background image

13

50 5116 

schwarz | black

50 5280

rot | red

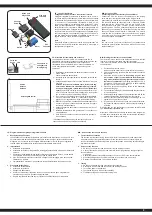
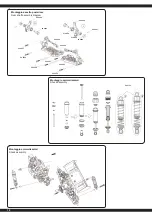
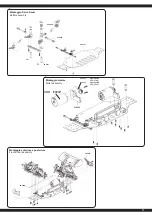
Montaggio anteriore e posteriore

Front & rear assembly

IT

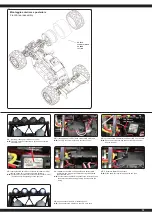
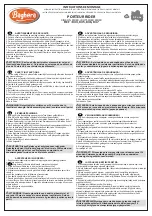
 - Appena acceso il veicolo, si attivano anche i

GB

 - If you activate the model now, the LED´s are activ.

IT


- In stato di consegna, i LED non sono attivi.

GB

 - The LED´s are not connected on delivery under certain

        circumstances.

IT

 - 

Il connettore per il LED si trova nella scatola della radio

GB

 - The LED connector is stored in the receiver box.

IT

 - 

Inserire la spina del LED nel ricevitore sul canale 3 (CH3).

       Inserire il cavo nero (meno) sulla destra esteriore

GB

 - Put the LED connector into the receiver to channel 3 (CH3). 

         The black line (minus) belongs to the right side.

IT

 - 

Aprire la scatola ed estrarre la spina dei LED ed il ricevitore.

GB

 - Open the receiver box and take out the LED connector 

         and the receiver.

LED-Stecker

LED-connector

Ricevitore canale 3

receiver-CH3

IT

 - 

Installare il ricevitore e cavi attentamente nella scatola.

      Assicurarsi che i cavi corrono attraverso la guida esterna.

      Non fratturare i cavi.

GB

 - Put the receiver and the wiring back to the receiver box and 

        take care to install the wiring proberly. Dont squeeze the 

        wiring. 

IT

 - 

Chiudere la scatola del ricevitore.

GB

 - Close again the receiver box with the two pins.

Summary of Contents for 05 3270 EP

Page 1: ...5 EU 2014 53 EU and 2011 65 EU Further information can also be found at www jamara shop com Conformity IT Attenzione Prima dell uso Accendete prima la trasmittente e poi il modello Dopo l uso Spegnere...

Page 2: ...ack A The LED will change the color to show it is charging If the battery pack is completely empty a full charge process will take approx 5 7 hours depending on the batteries capacity Once the LED cha...

Page 3: ...ergia del motore e lo passa all asse anteriore e posteriore Per questo le vite a brugola che tengono il giunto omocinetico sul asse di uscita prima del primo utilizzo e in intervalli regolari 5 7 inse...

Page 4: ...T Regolatore installato Dati technici Voltaggio 7 2 7 4 V Batterie 2 Lipo 6 NiCd NiMh Celle Resistenza interna Fwd 0 002 Ohm Bwd 0 004 Ohm Tensione BEC BEC 2A 5V Linear mode BEC Uso RC Car 1 10 Protez...

Page 5: ...and enter into the working condition b Connect the receiver with power and enter into the working condition the signal light on receiver will blink all the time c Control the throttle of transmitter a...

Page 6: ...riprogrammazione del punto neutro e o la corsa del servo del trasmettitore Durante la regolazione procedere come segue 1 Accendete il radiocomando durante che la ricevente spento Attenzione con sistem...

Page 7: ...ue volte sul valore 2 ecc Press the SET button to select the desired value The red LED will indicate which value is selected 1 X blink indicates value 1 2 x blinks indicate value 2 etc Tutte le fasi s...

Page 8: ...sione batteria bassa Caricare la batteria 2 Spegnimento per temperatura eccessiva Fare raffreddare il regolatore di velocit Perdita dei cardani anteriore 1 Larghezza carreggiata elevata Riduree la dis...

Page 9: ...50 5138 50 5073 50 5078 50 5075 50 5072 50 5071 50 5076 50 5071 50 5074 07 9989 Montaggio differenziale anteriore Front gear assembly diagram Montaggio differenziale posteriore Rear gear assembly dia...

Page 10: ...07 9989 07 9996 50 5084 50 5044 50 5040 50 5057 50 5054 50 5057 50 5028 50 5043 50 5054 Montaggio assetto posteriore Rear shaft assembly diagram 50 5133 Montaggio ammortizzatori Shock assembly Montag...

Page 11: ...r gear BL 50 5167 Pignongel EP Motor gear EP 50 5036 50 5029 50 5101 Montaggio Servo Saver Buffer assembly Montaggio motore Motor assembly 13 0590 Motore EP 13 0046 Motore BL 50 5030 50 5037 Montaggio...

Page 12: ...12 50 5165 50 5341 50 5148 50 5093 Montaggio piastra radio Top plate assembly 50 5279 Montaggio roll cage Cage assembly 50 5286...

Page 13: ...vo nero meno sulla destra esteriore GB Put the LED connector into the receiver to channel 3 CH3 The black line minus belongs to the right side IT Aprire la scatola ed estrarre la spina dei LED ed il r...

Page 14: ...zo pi preciso e una migliore entrata in curva Alto Inclinazione alta ha una guida dritta migliore ma un sterzo meno preciso e l entrata in curva peggiore GB Front caster high low Less caster Less cast...

Page 15: ...mber Better grip on terrain as the edge of the wheels stem into the ground allowing higher cornering speed We recommend approx imately 1 5 degrees negative front and an ave rage of 0 degree to the rea...

Page 16: ...505043 Braccetto superiore inferore Rear lower suspension set No 505134 Spoiler Wing No 505085 ruota dentata cono A diff Differential bevel gear set No 505074 Cassa diff Differential case set No 50504...

Page 17: ...Graffette per carrozzeria Body Clip No 177444 M4 Dadi autobloccanti Nylon nut No 505284 Proiettore LED LED car lights No 505058 M3 8 Vite Gewindeschraube No 505059 M3 10 Vite Set screw No 505285 Box r...

Page 18: ...JR KG 7kg Forza di azionamento 7 kg positioning force 105 x 26 x 21 mm 96 mm No 50 5546 Ammortizzatori anteriore posteriore Shocks front rear No 50 5548 Corona Main gear 1 10 Truck Monstertruck Stadio...

Page 19: ...troppo rapidamente gonfi arsi fumare o prendere fuco non la prendete nelle mani e non toccatela Mantenete und distanza di sicurezza e in caso di incendio spegnarla con polvere antifuoco oppure con sab...

Page 20: ...the environment and to your health If the batteries are marked with a chemical symbol Hg Cd or Pb below the crossed out waste bin on wheels it refers to that more than 0 0005 of mercury Hg more than...

Reviews: