7
Nota importante:
Oltre ai segnali lampeggianti del LED rosso, sono generati anche segnali acustici dal motore. Al
termine di ogniprogrammazione, il regolatore deve essere prima spento. Dopo il riavvio, la nuova
configurazione avrà effetto.
Important note:
In addition to the red LED blinking, the motor will omit an acoustic signal. After every change to
the values the ESC must be switched off to store the values. The new settings will not be effective
until the ESC is re-started.
IT
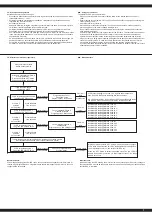
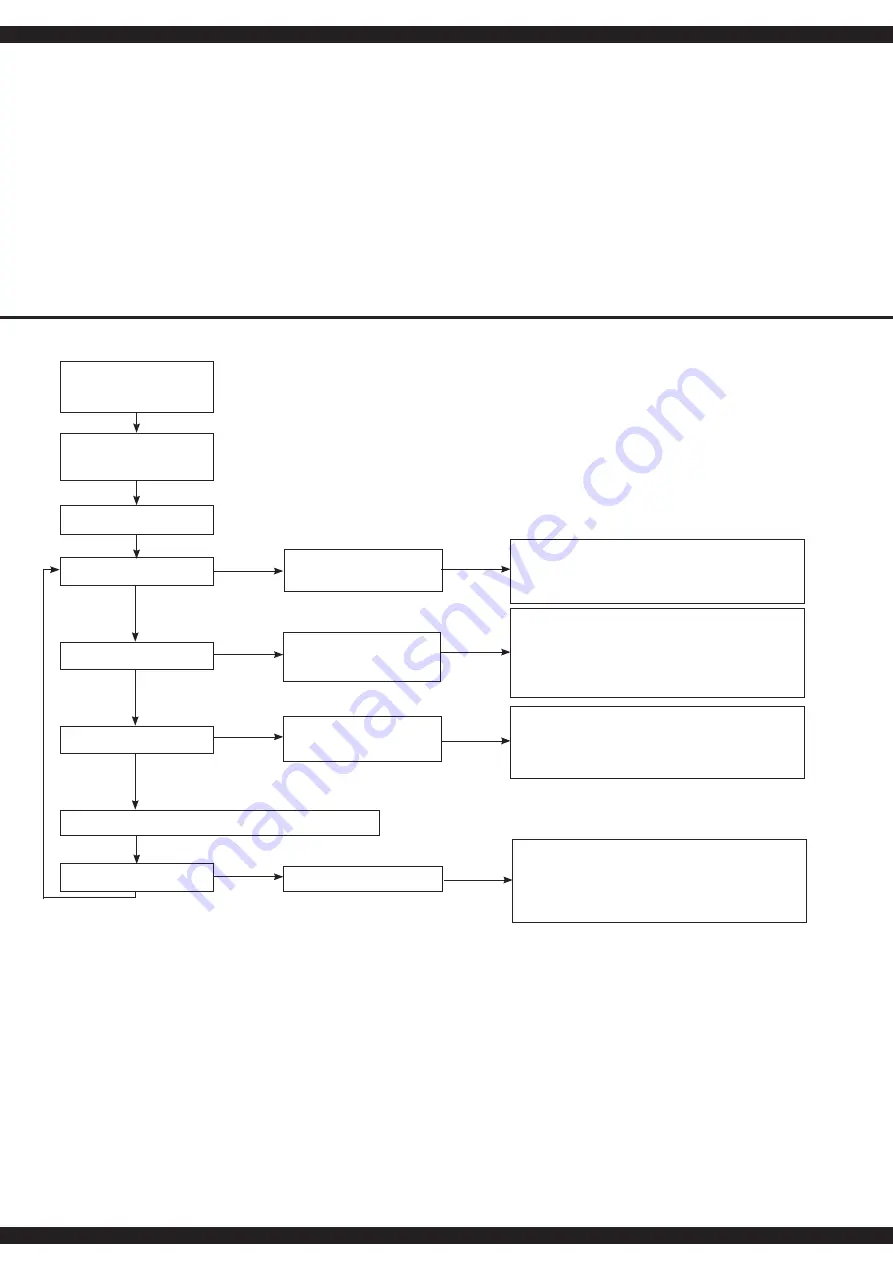
- Struttura del menu del regolatore
GB
- Menu structure
Accendere il regolatore, mentre si
preme il tasto ‚SET‘.
Press and hold the ‘SET‘ button
down and switch the receiver on
Il LED rosso lampeggia
The red LED blinks
Accendere il trasmettitore
Switch transmitter ON
Il LED verde lampeggia una volta
The green LED blinks once
Il LED verde lampeggia 2 x
The green LED blinks twice
Il LED verde lampeggia 3 x
The green LED blinks 3 times
Il LED verde lampeggia X x
The green LED blinks X times
Premere il
pulsante
per 3 secondi
Press the button
for 3 seconds
Premere il
pulsante
per 3 secondi
Press the button
for 3 seconds
Premere il
pulsante
per 3 secondi
Press the button
for 3 seconds
Lasciare il tasto
Release button
Lasciare il tasto
Release button
Lasciare il tasto
Release button
Lasciare il tasto
Release button
Premere il
tasto
Press button
Premere il
tasto
Press button
Premere il
tasto
Press button
Premere il tasto
Press button
Programmazione Fase 1,
modalità di guida
Program option 1, Drive mode
Fase di programmazione 2,
modalità di frenata
Program option 2, Brake mode
Fase di programmazione 3,
sottotensione
Program option 3, Low voltage cut-off
Phase de programmation X
Program Option
Il LED rosso lampeggia una volta, cioè, significa andare avanti con
freno. Red LED blinks once indicating forwards and brake.
rote LED blinkt zweimal, d.h. Vorwärts- und Rückwärtsfahrt mit Bremse
The red LED blinks twice indicating forwards, reverse and brake.
rosso|red LED lampeggia|blinks 1x, ►0 %
rosso|red LED lampeggia|blinks 2x, ►5 %
rosso|red LED lampeggia|blinks 3x, ►10 %
rosso|red LED lampeggia|blinks 4x, ►15 %
rosso|red LED lampeggia|blinks 5x, ►20 %
rosso|red LED lampeggia|blinks 6x, ►25 %
rosso|red LED lampeggia|blinks 7x, ►30 %
rosso|red LED lampeggia|blinks 8x, ►40 %
rosso|red LED lampeggia|blinks 1x, ►aus
rosso|red LED lampeggia|blinks 2x, ►2,6 V
rosso|red LED lampeggia|blinks 3x, ►2,8 V
rosso|red LED lampeggia|blinks 4x, ►3 V
rosso|red LED lampeggia|blinks 5x, ►3,2 V
rosso|red LED lampeggia|blinks 6x, ►3,4 V
Si prega di premere il tasto ‚SET‘ per ogni modifica del valore corrente,
il LED rosso indica ciascuno dei valori, lampeggiare una volta significa
che è impostato su valore 1, due volte sul valore 2 ecc.
Press the ‘SET‘ button to select the desired value. The red LED will
indicate which value is selected. 1 X blink indicates value 1, 2 x blinks
indicate value 2 etc.
Tutte le fasi seguenti di programmazione si svolgano nella stessa maniera.
All of the other menu options are accessed in the same manner.
IT
- Attivazione del regolatore
Nell’attivazione procedete come segue:
• Accendere la trasmittente e assicurarsi che la regolazione della corsa del canale gas è impos
tata esattamente su + / - 100%.
• Collegare la batteria, controllare che la batteria è collegata con la polarità corretta e che il
regolatore non sia ancora acceso.
• Accendere la ricevente.
• Quando la batteria è collegata, il regolatore è pronto. Siate molto cauti, ci sono rischi significa
tivi di lesioni, tramite la partenza di motori ad improvviso.
• Collegare la batteria immediatamente prima dell´inizio d´uso con il regolatore e rimuovere
subito dopo l´uso. Prima dell’utilizzo del modello, fare un test del raggio d´azione.
• Cosi controllate tutti i campi d´uso (tutto gas, a mezzo gas e minimo), se non vi è alcuna interfe
renza. Prestare inoltre attenzione ai servi. Un vibrazione dei servi o deviazioni non controllate,
segnala inoltre dei guasti.
• Se si desidera attivare il freno, mentre il veicolo è in movimento in avanti e lo stick del gas è in
posizione avanzata, è necessario spostare lo stick velocemente e invertire la posizione.
• Per mettere la retro-marcia, spostare lo stick in posizione neutra, attendere qualche istante e
poi portare lo stick di là di questo punto, nella posizione inversa desiderata.
GB
- Using your controller
To operate the ESC, proceed as follows:
• Switch on your transmitter and ensure that the throw for the throttle channel is set to +/-
100%.
• Ensure that the receiver switch is in the OFF position and connect a battery pack ensuring the
correct polarity (+ and -).
• Switch the receiver system ON.
• Once a battery is connected the system is ‘live‘ and extreme caution must be exercised to
prevent injury due to the motor suddenly starting to turn.
• Do not connect the battery pack until directly before operating the model and disconnect the
pack immediate after use.
• Conduct a range test before running the model for the first time. This test should be carried out
at full, half and low throttle and if the servos jitter or make uncontrolled movements do not
operate the model until the reason for the interference has been established and corrected.
• When the vehicle is being driven forwards, pulling the throttle back past the neutral position will
cause the vehicle to brake. To make the vehicle then reverse, the throttle stick must first be
moved back to the neutral position for a short period and then the model will reverse.
• If you want to disable the backward function just set the jumper to disable. If the jumper is set to
enable the backward function is enabled.


