background image

3

1

2

3

4

4x AA

1

2

IT

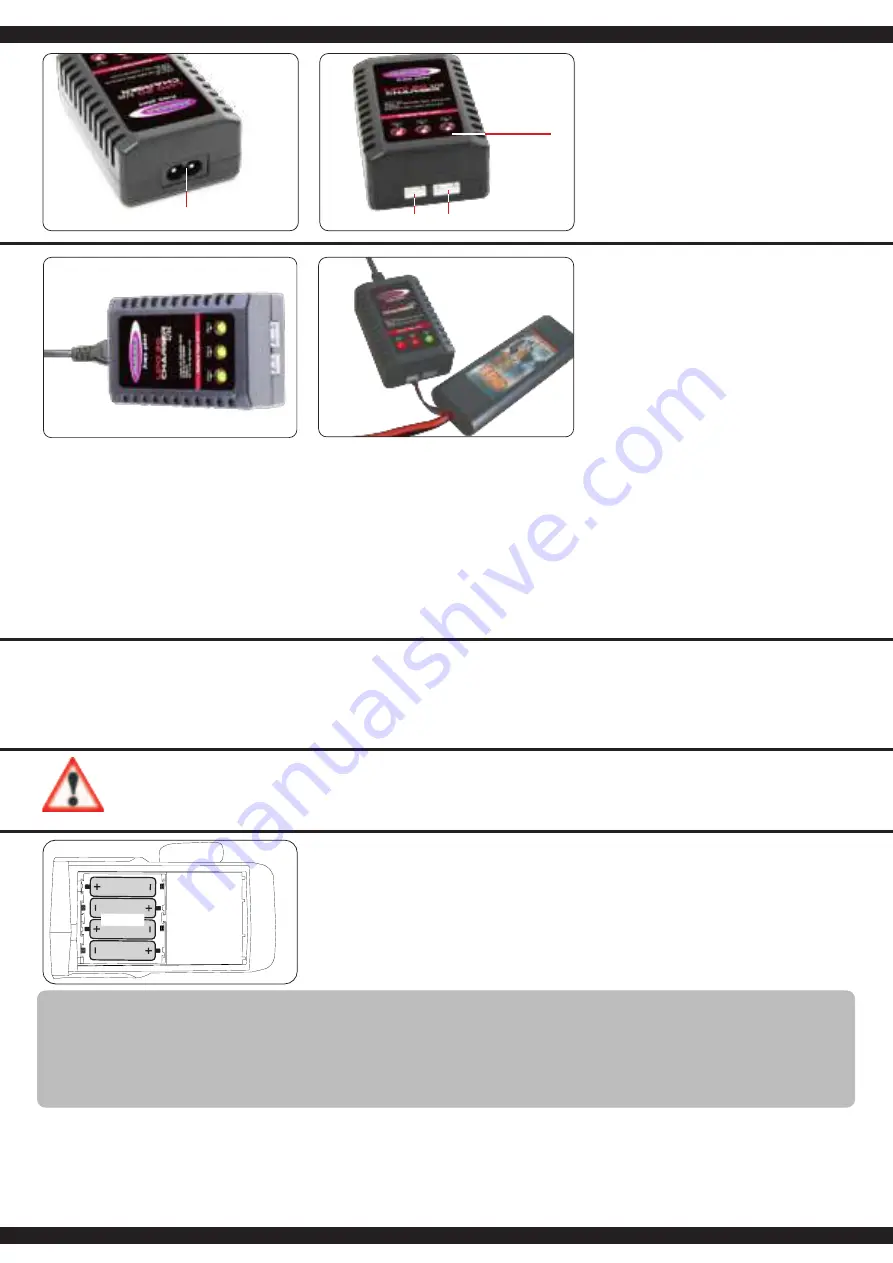
1.  Ingresso 100 - 240 V
2.   Attacchi di bolanciatore 2 cella
3.   Attacchi di bolanciatore 3 cella
   

(Non richiesto per questo modello)

4.   LED di stato

GB

1.  Power Slot 100 - 240 V
2.  2S Balancer
3.  3S Balancer
   

(Not required for this model)

4.  Status LEDs

Inserimento delle batterie nel trasmettitore

Inserire 4 batterie AA nel trasmettitore.

Inserting batteries into the transmitter

Put 4 AA Batteries into the Transmitter

Informazioni relative alle pile:

Le batterie non ricaricabili non devono essere caricate! 
Non aprire! Non gettare nel fuoco! 
Non usare contemporaneamente pile nuove e pile usate!
Non usare contemporaneamente pile alcaline, standard (zinco-carbone) e ricaricabili!
Le batterie ricaricabili devono essere rimosse dal giocattolo!
Le batterie ricaricabili possono essere ricaricate solo sotto la supervisione di un adulto!
I morsetti di collegamento don devono essere cortocircuitati! 

Battery warning: 

Non-rechargeable batteries are not to be recharged! 

Do not open! Do not dispose of in fire! 

Do not mix old and new batteries!
Do not mix alkaline batteries, standard (carbon-zinc) or rechargeable batteries!
Rechargeable batteries are to be removed from the toy before being charged!
Rechargeable batteries are only to be charged under adult supervision!
The supply terminals are not to be short-circuited!

LiPo Caricare una batteria

1.  Inserire il cavo di alimentazione del caricabatterie in una presa adatta. I LED si illuminano di
 

verde e indicano che la batteria è pronta per la ricarica

2.   Ora collega la batteria vuota al caricatore. Batterie 2S da 7,4V al connettore a 3 poli o 11,1V
 

batterie 3S al connettore a 4 poli. Non usare la forza e fare attenzione a non invertire la polarità.


I LED diventeranno rossi dopo pochi secondi, indicando che le celle della batteria si stanno 

 caricando.

 Attenzione!
 

Quando si collega una batteria 2S, solo i primi 2 LED (Cell1-2) diventano rossi, il LED 3 


(Cell 3) rimane verde. Quando si collega una batteria 3S, tutti i LED (Cell1-3) diventano

 rossi.


Non appena una cella della batteria è completamente carica, il LED corrispondente diventa 


verde. Poiché le celle sono caricate individualmente, è possibile che una cella sia 


completamente carica prima delle altre, a seconda dello stato della batteria. Lasciare sempre la


batteria sul caricatore fino a quando tutte le celle collegate sono completamente cariche (verde)


per permettere al caricatore di bilanciare la batteria.

Charging a battery 

1.  Plug the power cord of the charger into a suitable socket. The LEDS light up green and indicate 
 

that the charger is ready for charging.

2.  Now connect the empty battery to the charger. 7.4V 2S batteries to the 3 pin connector or 11.1V 
 

3S batteries to the 4 pin connector. Do not use force and pay attention to reverse polarity. The  


LEDs change to red after a few seconds and indicate that the battery cells are charging. 


Attention:


When connecting a 2S battery, only the first 2 LEDs (Cell1-2) change to red, LED 3 (Cell 3) 


will remain green. When 3S batteries are connected, all LEDs are red (Cell1-3).


As soon as a the battery cell is full, the corresponding LED changes to green. Because the cells 


are charged individually in a balanced way, it is possible that one cell is fully charged earlier than 


the others. Always leave the battery on the charger until all connected cells are fully charged 


(green) to allow the charger to balance your battery

Riconoscimento di una batteria carica.

Quando si collega una batteria carica al caricatore, i LED diventeranno rossi per alcuni secondi e poi

torneranno verdi. Questo significa che la batteria è già completamente carica.

Riconoscimento di una batteria difettosa.

Se i LED rimangono verdi quando si collega una batteria vuota, c‘è un difetto nella batteria (difetto 
della cella o scarica profonda). In questo caso, scollegare immediatamente la batteria dal caricatore
e utilizzare un‘altra batteria.

Detecting a full battery.

When you connect a full battery to the charger, the LEDs will turn red for a few seconds and then 
turn green again. This means that the battery is already fully charged.

Detecting a defective battery.

If the LEDs remain green when an empty battery is connected, there is a defect in the battery (cell 
defect or deep discharge). In this case, immediately disconnect the battery from the charger and 
use another battery.

Attenzione!
Dopo ogni carica e importante di: Scollegare sempre subito la batteria dal caricatore 
ed il  caricatore dalla rete elettrica. Se dopo la carica si lascia collegato l’uno o l’altro 
può causare danni alla batteria, al caricatore o addirittura alla rete elettrica (pericolo 
di incendio). 

Danger! 
Always disconnect the battery from the charger immediately after charging. Always 
disconnect the charger from the power supply immediately after disconnecting the 
battery. Inserting the rechargeable battery or charger after charging will result in da-

mage to the battery, charger or the power supply (fire hazard).

Summary of Contents for 053366 EP

Page 1: ...d handling including without limitation the assembly the charging process the use and choice of the operation area Please refer to the operating and user instructions it contains important information and warnings Questo modello non é un giocattolo Attenzione Tenere lontano assolutamente i bambini inferiori ai 36 mesi PERICOLO DI SOFFOCAMENTO Tenere lontano necessariamente dai bambini Contiene pez...

Page 2: ...t exceeded Do not charge any batteries other than the NiMh battery supplied The average charging time for the empty NiMh battery supplied is approx 6 8 hours If the LED flashes there is a fault Please contact the customer service Caution Only charge suitable battery s with this charger Suitable battery s are Nickel metal hydride battery s with max 6 cells max 7 2 V nominal voltage and max 2000mAh ...

Page 3: ...rde per permettere al caricatore di bilanciare la batteria Charging a battery 1 Plug the power cord of the charger into a suitable socket The LEDS light up green and indicate that the charger is ready for charging 2 Now connect the empty battery to the charger 7 4V 2S batteries to the 3 pin connector or 11 1V 3S batteries to the 4 pin connector Do not use force and pay attention to reverse polarit...

Page 4: ...a del regolatore e la spina della batteria non corrispondono un cavo adattatore è incluso con il modello Leggere il capitolo sulla trasmittente Accendere la trasmittente e assicurarsi che i trim siano in posizione neutrale Tenere il modello in aria per il caso che il motore si metta a girare a tutto gas Ora accendere il regolatore di velocità tramite l interruttore ON OFF Vi incoraggio ad attivare...

Page 5: ...F Switch E Throttle Reverse changed F Power Check G Binding Button H Dual Rate maximum steering deflection I Throttle Trim Trim If the wheels do not point straight forward even though the steering wheel on the transmitter is in neutral you can adjust it with the trim button on the transmitter Trim L R steering Should the wheels rotate forward or backward even though no command was given through th...

Page 6: ... ESC proceed as follows Switch on your transmitter and ensure that the throw for the throttle channel is set to the middel position Ensure that the receiver switch is in the OFF position and connect a battery pack ensuring the correct polarity and Switch the receiver system ON Once a battery is connected the system is live and extreme caution must be exercised to prevent injury due to the motor su...

Page 7: ...usare un bloccasterzo tramite gli alberi di trasmissioni durante la manovra di sterzo Ma di fare anche bene attenzione di non lasciare un gioco troppo grande altrimenti si rischia di perdere gli alberi di trasmis sione La calotta esterna in plastica a 505080 serve solo per fissare il fuso a snodo sulla vite a sfera Consigliamo di non avvitare questo coperchio in modo troppo serrato Before each use...

Page 8: ...097 505054 505082 079996 505054 505087 079989 505064 505029 505029 505028 505029 Montaggio assetto posteriore Rear shaft assembly Montaggio ammortizzatori Shock assembly Montaggio Servo Saver Buffer assembly ...

Page 9: ...9 505027 506119 505093 130592 15 Z T 505026 505480 Montaggio piastra radio Buffer assembly Montaggio Motore Motor assembly ...

Page 10: ...e negative camber angle can deteriorate the ride quality B Positive camber A Positive camber should be avoided in your vehicle due to poorer ride quality teso firm teso firm morbido soft Angolo sospensione Shock angle Suspensione molla Spring tension morbido soft IT Inclinazione alto basso anteriore Basso Inclinazione bassa ha una guida dritta peggiore ma un sterzo più preciso e una migliore entra...

Page 11: ...e Shock angle Angolo sospensione Shock angle Punti impostazione Setting points Suspensione molla Spring tension Angolo sospensione Shock angle Angolo sospensione Shock angle Angolo sospensione Shock angle Inclinazione Solo vite interna Camber only inner screw Suspensione molla basso o meno clip Suspensione molla basso o meno clip Angolo sospensione posteriore sopra Angolo sospensione Inclinazione ...

Page 12: ...e il giocho tra pignone corona Regolatore di velocità si spegne durante la guida 1 Blocco della sottotensione tensione batteria bassa Caricare la batteria 2 Spegnimento per temperatura eccessiva Fare raffreddare il regolatore di velocità Perdita dei cardani anteriore 1 Larghezza carreggiata elevata Riduree la distanza Troubleshooting The motor will not rotate after switching on No signal is presen...

Page 13: ... 505072 Perno Albero Differential bevel gear set No 505073 Corona diff Bevel gear No 505074 Cassa diff Differential case set No 505075 Cassa esterna diff Gear box set No 505076 Bicchierino centro Connecting cup No 505077 Servo Saver supp Buffer steel column No 505028 Perno braccetti Suspension arm shaft set No 505054 Perno braccetto Suspension arm shaft set No 505084 Trascinatore Hexagonal joint s...

Page 14: ...Shim No 505253 O anello O Ring No 505480 Motore Motor No 506119 Servo Servo No 059116 Copertura ingranaggio Gear box No 506154 Telecomando Transmitter No 061171 CCX SCX 2 4GHz Ricevente Receiver No 140141 NiMh 7 4V 5000mAh 2N 30C Batteria Battery No 505271 NiMh Caricatore NiMh Charger No 141391 LiPo Racing 7 4V 5000mAh 2N 30C Batteria con Tamiya spina Battery with Tamiya plug No 413117 LiPo 20 2 3...

Page 15: ...arichi ad alta intensità o le scariche profonde possono danneggiarle Evitate le sollecitazioni meccaniche schiacciare piegare forare Non aprite non gettate nel fuoco e non lasciate vicino ai bambini Manipolate con molta attenzione le batterie danneggiate o con perdita di liquido Possono causare danni alle apparecchiature Non cortocircuitatele e verificate sempre che la polarità sia corretta Verifi...

Page 16: ...075 380 Mail servis topdrony cz Web www topdrony cz Viva net d o o Distributor Jamara for Croatia Ante Topic Mimare 8 HR 10000 Zagreb Susedgrad Mail info viva net hr Web www viva net hr Nettrade Kft Distributor Jamara for Hungary 1033 Budapest Hévízi út 3 b Tel 36 30 664 3835 Mail ugyfelszolgalat kreativjatek hu Janus Trade D O O Distributor Jamara for Slovenia Koroška cesta 53c SI 4000 Kranj Mail...

Reviews: