background image

7

GB

1.  Remove the nut and washer from the rear axle 


Loosen the nut (O) and washer (P) from the rear axle.


Remove the paper protector (4) and throw it in the rubbish.

2.  Motor assembly


Slide the two motors (J, K) onto the rear axle and run the cables through the hole in the model. 

    The motors are marked with R and L. Make sure you insert the motors on the correct side.

    Finally, put the two wheel connectors (D) on the motors.

3. 


Remove the nut and washer from the front axle 


Loosen the nut (O) and washer (P) from the front axle.

4.  Mounting the wheels


Now push the wheels (G) onto the rear axle. First place the washer (P) underneath and then  

    fasten the whole thing with a nut (O). Finally, attach a hub cap (H). Press the hub caps (H) into  

    the recesses provided in the wheel until they click into place. Repeat this procedure for the 

    front axle.

5.  Mounting the steering wheel


Connect the cable from the steering wheel (A) to the cable of the model. Test the horn and the  

    music button to make sure the connection works. Squeeze the steering wheel socket (1) 

    slightly and slide the whole thing into the holder provided in the model.

6.  Fitting the windscreen


Press the windscreen (F) into position until it clicks into place.

7.  Battery connection


Connect all connectors as shown. Only connect wires that fit together and be careful not 

    to reverse the polarity. Check the power supply by pressing the ON/OFF switch on the model. 

    If the power supply is working, you will hear a motor noise.

8.  Assembling the seat


Position the seat (I), making sure that the pins on the seat engage with the holes in the body. 

    When the position is correct, secure the seat with screws (L).

9.  Fitting the rear-view mirror


Press the rear view mirrors into position until they click into place.

10.     Charging your vehicle


  The power swich must be turned in OFF position when charging.


   Insert the charger into the socket - the LED lights up green. Connect the charger to the 

  charging 

socket.


   The LED  on your charger lights up red as long as the battery is being charged. If the LED 

    lights green again, the battery is fully charged.

 •

  The charge time is 9 hours.


   Do not charge the battery more than once within 24 hours.


   Charger and battery heat up during the charging process.

Attention!

•  

Let the model cool ovv sufficiently after each use before putting it back into operation.

    Whenn using an additional batteries let it cool off for minimum 15 minutes until the 

    model is operated again. Overheating can damage the electronics or may result in fire.

•  

Always disconnect the battery from the charger immediately after charging. Always  

    disconnect the charger from the power supply immediately after disconnecting the 

    battery. Inserting the rechargeable battery or charger after charging will result in damage 

    to the battery, charger or the power supply (fire hazard).

•    Use the charger only in dry rooms.

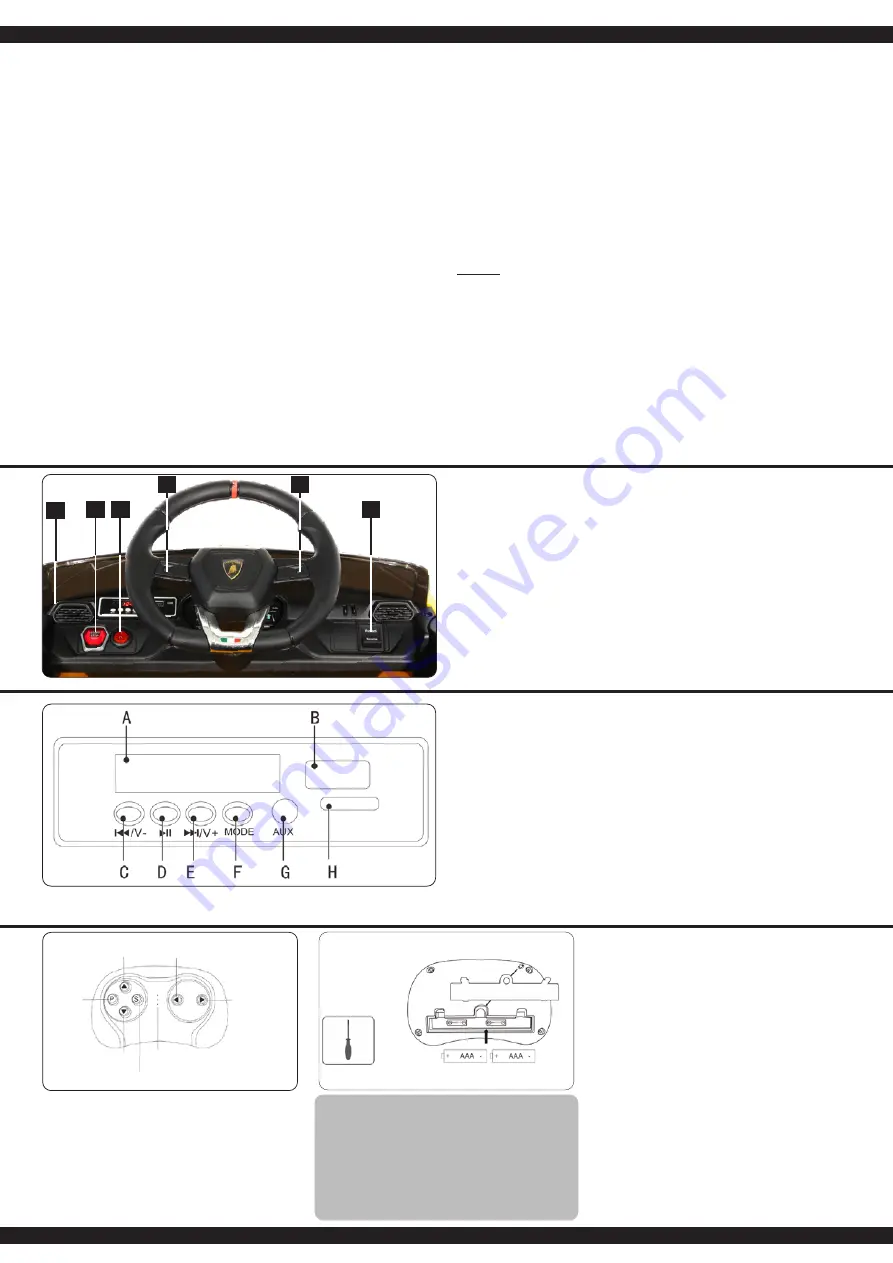
Soundboard

Voltage disply


 Attention!


Your vehicle displays the total voltage of the two batteries in volts immediately after switching 


on. The fully charged batteries will usually display a total voltage of approx. 12.6-13 volts 


unloaded. The display is load dependent. This means that the displayed voltage will drop under 


load. If a voltage of less than approx. 11.8V is displayed in the unloaded state, you should switch 


off the Ride-on and charge the battery (see charging procedure). Otherwise the battery may be 


deeply discharged and irretrievably damaged. 


Otherwise, the battery may become deeply discharged and be irretrievably destroyed. 


A deeply discharged battery is not covered by the warranty and must be replaced at 


a charge. 

B

 USB

C  

V-


 Press = previous, long press = Volume down

D  

Story/pause & play

E  

Musik/V+


Press = Next, long press = Volume up

Song button

G

   Aux


Connect MP3 device / mobile.

H

  Micro SD

Functions

1   ON/OFF Switch


With the ON/OFF switch you start the vehicle.

2   Light button

3   Music

4   Horn

5  

Forward▲:  

Press the shift lever on the „Forward ▲“ position.


Press the foot pedal, the model drives forward.

    Reverse▼:  

Press the shift lever on the „Backward▼“ position.


Press the foot pedal, the model drives backwards.

    Important!

    The vehicle must be stationary before changing direction. Otherwise the gear unit and/or  

    the motor could be damaged.

6. Soundboard

8

1

3

5

6

4

7

2

Functions transmitter

1. Forward

2. Backward

3. Speed

4.  Emergency brake

5. Left

6. Right

7.  LED Indicator

8.   Battery compartment

Fitting the batteries

Observe the polarity..

Battery warning: 

Non-rechargeable batteries are not to be recharged!

Do not open! Do not dispose of in fire! 

Do not mix old and new batteries!

Do not mix alkaline batteries, standard (carbon-zinc) or  

rechargeable batteries!

Rechargeable batteries are to be removed from the toy before 

being charged!

Rechargeable batteries are only to be charged under adult 

supervision!

The supply terminals are not to be short-circuited!

1

1

1

6

1

2

1

5

1

3

1

4

Binding transmitter and model

Switch off the model. Insert 2 AAA batteries into the transmitter.

The  LED  indicator  on  the  transmitter  will  start  flashing.  Now 

switch on the model. Press the button with the label „P“ (4). 

After successful binding the LED display stops flashing and two 

LEDs should light continuously. Press the button labeled „S“ (3) 

to make the vehicle ready to drive. The transmitter is now bound 

and only needs to be bound again when the battery is changed. 

If the transmitter is not used for a longer period of time, it will go 

into standby mode. The LED display will go out. 

To release the transmitter from standby mode, press any button 

on the transmitter.

7

Summary of Contents for 460623

Page 1: ...ni Urus No 460623 No 460624 odpovídají směrnicím 2014 35 EU 2014 53 EU 2011 65 EU a 2009 48 ES Úplné znění EU prohlášení o shodě je k dispozici na následující internetové adrese www jamara shop com Conformity DE Gebrauchsanleitung GB Instruction FR Mode d emploi IT Istruzioni per l uso ES Instrucción CZ Návod k použití DE Geeignet für Kinder ab 3 Jahren Achtung Für Kinder unter 36 Monaten nicht ge...

Page 2: ...g und Gegenstände von drehenden Teile entfernt halten Das Modell nicht in Räumen oder Hallen mit hoher Luftfeuchtigkeit z B Garagen im Regen oder auf nassen Flächen betreiben es besteht die Gefahr von Fehlfunktionen oder Schäden an Elektronik und Gehäuse Das Modell ist nicht wasserdicht und nicht spritzwassergeschützt Betreiben Sie es nur auf asphaltierten Flächen z B Pflastersteinen Das Modell is...

Page 3: ...f the transmitter and the charger not loose in the carton it is iattache in the vehicle body Please take them out before installing the seat FR Si l émetteur et le chargeur ne sont pas libres dans le carton ils sont attachés à la carrosserie du véhicule Veuillez les retirer avant d installer le siège IT Se il trasmettitore e il caricatore non sono sciolti nel cartone sono attaccati nel corpo del v...

Page 4: ...4 1 3 5 7 2 4 6 8 K J O O O O O O P P P P P P P P O O L ...

Page 5: ...5 9 10 5 ...

Page 6: ...r unmittelbar nach Beenden des Ladevorgangs das Modell vom Ladegerät Trennen Sie das Ladegerät immer unmittelbar nach Abstecken des Modells von der Spannungsversorgung Ein eingesteckt lassen des Modells bzw des Ladegeräts nach Beenden des Ladevorgangs kann zu Beschädigungen am Modell Ladegerät oder der Spannungsversorgung führen Brandgefahr Verwenden Sie das Ladegerät nur in trockenen Räumen Sound...

Page 7: ...ting the battery Inserting the rechargeable battery or charger after charging will result in damage to the battery charger or the power supply fire hazard Use the charger only in dry rooms Soundboard A Voltage disply Attention Your vehicle displays the total voltage of the two batteries in volts immediately after switching on The fully charged batteries will usually display a total voltage of appr...

Page 8: ...ssez brancher la chargeur ou la modèle peuvent causer des dommages à la modèle à votzre chargeur ou câble d alimentation risque d incendie Utilisez le chargeur uniquement dans des pièces sèches Tableau de bord A Affichage de la tension Attention Votre véhicule affiche la tension totale des deux batteries en volts immédiatement après la mise sous tension Les batteries complètement chargées affichen...

Page 9: ... altro può causare danni alla batteria al caricatore o addirittura alla rete elettrica pericolo di incendio Utilizzare il caricabatterie solo in ambienti asciutti Scheda audio A Visualizzazione della tensione Attenzione Il veicolo visualizza la tensione totale delle due batterie in volt subito dopo l accensione Le batterie completamente cariche di solito mostrano una tensione totale di circa 12 6 ...

Page 10: ...tilice el cargador sólo en lugares secos Tarjeta de sonido A Indicación de la tensión Atención Su vehículo muestra el voltaje total de las dos baterías en voltios inmediatamente después de encenderlo Las baterías completamente cargadas normalmente muestran un voltaje total de aprox 12 6 13 voltios en estado descargado La pantalla depende de la carga Esto significa que la tensión visualizada caerá ...

Page 11: ...it poškození modelu nabíječky nebo napájení nebezpečí požáru Nabíječku používejte pouze v suchých místnostech Přístrojová deska A Indikátor napájení Upozornění Ihned po zapnutí vozidlo indikuje celkové napětí obou akumulátorů ve voltech Plně nabité akumulátory bez zátěže obvykle ukazují napětí 12 6 13 V Uvedená hodnota závisí na zatížení Znamená to že zobrazené napětí klesá pod zatížením Pokud je ...

Page 12: ... active fuse blows and switches the unit off for a few seconds You will hear a single click at the beginning Oberload or electrical short circuit Do not overload or have the until checked Vehicle does not respond to remote control Not bound Carry out the binding process see instructions No sound function on the steering wheel andlebar the cable was torn or crushed during assembly Check or replace ...

Page 13: ...ero no conducir o sólo en una dirección Interruptor de gas o de dirección defectuoso Compruebe o sustituya el interruptor Se puede encender pero sólo se mueve en una dirección Interruptor direccional defectuoso Compruebe o sustituya el interruptor El fusible activo salta y apaga el aparato durante unos segundos Al principio se oye un solo clic Sobrecarga o cortocircuito eléctrico No sobrecargue o ...

Page 14: ... de la puissance ou peut être endommagée à un point tel que la charge ou la décharge n est plus possible ou la batterie peut s auto allumer pendant le proces sus de charge ou de décharge risque d incendie N essayez jamais de charger ou de décharger des batteries profondément déchargées La tension de la batterie ne doit jamais descendre en dessous de 11 9 volts pour éviter une décharge profonde La ...

Page 15: ...bolo químico Hg Cd o Pb significa que contiene más de un 0 0005 de Mercurio Hg más de 0 002 de Cadmio Cd o más de 0 004 de Plomo Pb CZ Informace týkající se likvidace Baterie a akumulátory se nesmí vyhazovat spolu s komunálním odpadem ale je nutné je likvido vat zvlášť Uživatel je povinen likvidovat použité baterie v souladu s předpisy samostatný sběr odpadů Po použití je možné baterie zdarma odev...

Page 16: ...erfeldstrasse 11 72461 Albstadt Tel 07432 9802700 Fax 07432 2009594 Mail info modellbauversand de Web www modellbauversand de PenTec s r o distributor Jamara for Czech Republic and Slovakia Veleslavínská 30 19 CZ 162 00 Praha 6 Tel 420 235 364 664 Mobil 420 739 075 380 Mail servis topdrony cz Web www topdrony cz Bay Tec Martin Schaaf Am Bahndamm 6 86650 Wemding Tel 07151 5002192 Fax 07151 5002193 ...

Reviews: