6
GB
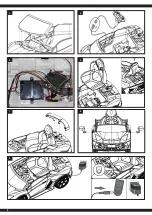
1. Front wheel assembly
Attach a wheel and a Ø 10 mm washer onto the front axle. Fix the whole thing with a splint and
finally, put a cover on the wheel. Repeat this on the other side.
2. Rear wheel assembly
Check that the rear axle is centred in the body and that both axle ends protrude the same
length on the left and right. Slide a rear wheel and then a Ø 10 mm washer onto the axle.
Secure it with a cotter pin and finally put a wheel cover on the wheel. Turn the model to the
other side and make sure that the mounted wheel rests on the ground. Pull the axle out as far
as possible and mount the other rear wheel.
3. Windshield assembly
Align the windshield with the corresponding openings on the car body, insert and push them
into place.
4. Steering wheel assembly
Connect the cable from the steering wheel to the cable of the model. Make sure that the cables
are not kinked, pinched or twisted. Align the steering wheel on the steering column, press
the two pins on the steering wheel and push the steering wheel onto the steering column until it
clicks into the holes.
5. Battery connection
Before assembling the seat, Connect all connectors as shown. Only connect wires that fit
together and be careful not to reverse the polarity. Check the power supply by pressing the
ON/OFF switch on the model. If the power supply is working, you will hear a motor noise.
6. Seat assembly
Align the seat diagonally with the corresponding position on the car body, insert the hook into
the corresponding position, fix with self tapping screws at the back of the seat.
7. Spoiler assembly
Align the spoiler with the corresponding position on the car body, insert and push it into place.
8. Mirror assembly
Align the mirror with the corresponding opening on the car body, insert and push it into place.
9. Charging Your Vehicle
•
The power swich must be turned in OFF position when charging.
•
Insert the charger into the socket - the LED lights up green. Connect the charger to the
charging
socket.
•
The LED on your charger lights up red as long as the battery is being charged. If the LED
lights green again, the battery is fully charged.
•
The charge time is 6 hours.
•
Do not charge the battery more than once within 24 hours.
•
Charger and battery heat up during the charging process.
Attention!
•
Let the model cool ovv sufficiently after each use before putting it back into operation.
Whenn using an additional batteries let it cool off for minimum 15 minutes until the
model is operated again. Overheating can damage the electronics or may result in fire.
•
Always disconnect the battery from the charger immediately after charging. Always
disconnect the charger from the power supply immediately after disconnecting the
battery. Inserting the rechargeable battery or charger after charging will result in damage
to the battery, charger or the power supply (fire hazard).
• Use the charger only in dry rooms.
1
2
3
4
5
6
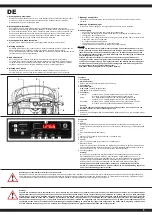
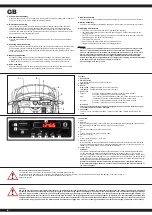
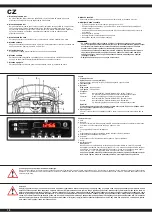
Functions
1. Soundboard
2. ON/OFF switch
With the ON/OFF switch you start the vehicle.
3. Light button
4. Speed
High speed
- Change the speed of the car more quickly.
Low speed
- Change the speed of the car more slowly
5 Shift Lever:
Forward:
Press the “Forward-backward switch” on the “Forward” position.
Press the “Foot pedal”, the model drives forward
Stop:
The model will brake automatically, when your child’s foot remove from the
“Foot pedal”. Press the “Forward-backward switch” in the middle.
Reverse:
Press the “Forward-backward switch” on the “Backward” position.
Press the “Foot pedal”, the model drives backward.
Important!
The vehicle must be stationary before changing direction or speed. Otherwise the gear
unit and/or the motor could be damaged.
6. Foot pedal
To move the car, press the pedal down. To brake or slow down, release pressure from the
pedal.
Soundboard
1
USB
2
Micro SD
After inserting a Micro SD card or USB stick, the soundboard starts playing the tracks one after
the other. Only files with the extension .mp3 can be played back.
3
Aux
Input for a Smartphone or other AUX devices.
4
V-
Press = previous, long press = Volume down
5
Story/Pause & play
6
V+
Press = Next, long press = Volume up
7
Bluetooth / Radio
Press the button on the control panel and the Bluetooth function is activated, this is confirmed
by an acoustic announcement. Now activate the Bluetooth function on your mobile phone. „yx“
appears, your mobile phone is now connected to the model.
8
Voltage disply
Attention!
Your vehicle displays the total voltage of the two batteries in volts immediately after switching
on. The fully charged batteries will usually display a total voltage of approx. 12.6-13 volts
unloaded. The display is load dependent. This means that the displayed voltage will drop under
load. If a voltage of less than approx. 11.8V is displayed in the unloaded state, you should switch
off the Ride-on and charge the battery (see charging procedure). Otherwise the battery may be
deeply discharged and irretrievably damaged.
Otherwise, the battery may become deeply discharged and be irretrievably destroyed.
A completely discharged battery is not covered by the warranty and must be replaced at
the owner‘s expense.
1
2
8
3
4
5
6
7
Only use in direct supervision of an adult!
To control the vehicle a minimum skill level and caution is needed. Make sure you
are familiar with the operation of the model and its characteristics. The model is heavy. This is an increased risk of injury and damage in the event of loss of
control. Avoid any kind of intentional or unintentional collisions with objects or
hazards to persons.
Caution!
Always switch off the model immediately after each use. Immediately after each use the battery should be disconnected from the model. The battery can be deeply discharged
by leaving it switched on accidentally or leaving it plugged in. Deep discharge causes the battery to lose power or can be damaged to such an extent that charging or dischar
-
ging is no longer possible or the battery can self-ignite during charging or discharging (fire hazard). Never attempt to charge or discharge deeply discharged batteries. The
battery voltage should never fall below 11,9 volts to avoid deep discharge. The fully charged battery has a voltage of approx. 13 Volt. After use, the intact battery should be fully
charged immediately after a cooling phase of at least 10 minutes but at the latest after 12 hours to avoid subsequent deep discharge by self-discharge. If the battery is not used
or stored for a longer period of time, the battery should be checked for voltage (min. 12,3 volts) or damage at least every 3 months and charged or disposed of if necessary.
Summary of Contents for 460637
Page 4: ...4 6 7 3 5 4 8 9 ...
Page 15: ...15 ...


