9
GB
1.
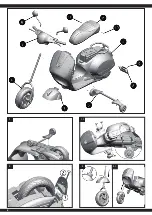
Assembly support wheels
1
Turn the body upside down. Place support wheels (5) on the body and tighten them with
screws (9).
1.1 To fasten the stabilisers screw them both right und left with two screws (9) into the
bodywork.
2. Rear shield assembly
Place the shield (8) at the back of the vehicle in shown position. Fasten the shield with one
screw (9) to the model.
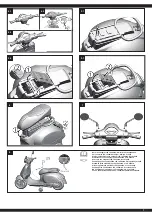
3. Front wheel assembly
3
Push the front shield (7) over the handlebar.
3.1 Then push the handlebar with the front wheel through the opening under the model.
4. Mounting the handle bar
4.1
Loosen the screw with a screwdriver and take out the screw.
4.2 Connect the cable from the steering wheel to the cable of the model. To avoid getting the
cable trapped, push the entire cable through the opening in the model.
4.3 Insert the handle bar (3) to the end of the steering shaft. Line up the holes in the handle bar
with the hole in the steering shaft. Tighten the screw (9) and in the same location with a
screwdriver.
5. Battery compartment / Battery connection
5.1 The battery compartment is under the seat. Loosen the screw and open the cover.
5.2 Connect all connectors as shown. Be sure not to reverse the polarity. Make sure the red
wire is well connected with the red terminal on the battery, and same as the black one.
5.3 Close the cover and tighten the screw.
6. Assembly of seat
Hook up the seat on the notch up front, press into the right position and fasten the seat with
one bolt (10) and a nut (11).
7. Attach the view mirrors
Install wing mirror (6) to the designated position, and fasten it.
8. Charging Your Vehicle
●
The power swich must be turned in OFF position when charging.
●
Insert the charger into the socket - the LED lights up green. Connect the charger to the
charging socket.
●
The LED on your charger lights up red as long as the battery is being charged. If the LED
lights green again, the battery is fully charged.
●
The charge time is 6 hours
●
Do not charge the battery more than once within 24 hours.
●
Charger and battery heat up during the charging process.
Warning!
●
The charger is not a toy. Only use the charger supplied.
●
The battery may only be charged by or under the supervision of an adult.
●
The terminals must not be short-circuited.
●
The charger must be checked regularly for damage to the cable, plug, housing and other
parts. If any damage is found, the charger must not be used until the damage has been
repaired.
●
Let the model cool off sufficiently after each use before putting it back into operation.
When using an additional batteries let it cool off for minimum 15 minutes until the
model is operated again. Overheating can damage the electronics or may result in fire.
●
Always disconnect the model from the charger immediately after charging. Always
disconnect the charger from the power supply immediately after disconnecting the
model. Inserting the rechargeable model or charger after charging will result in damage
to the model, charger or the power supply (fire hazard).
●
Use the charger only in dry rooms.
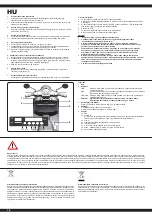
Functions
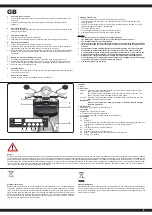
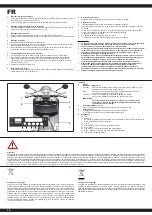
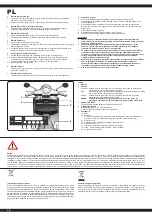
1 Horn
2 Shift Lever:
Forward: Press the “Forward-backward switch” on the “Forward” position. Press the “Foot
pedal”, the model drives forward.
Stop:
The model will brake automatically, when your child’s foot remove from the “Foot
pedal”. Press the “Forward-backward switch” in the middle.
Reverse: Press the “Forward-backward switch” on the “Backward” position. Press the “Foot
pedal”, the model drives backward.
IMPORTANT!
Always stop vehicle when changing the speed or direction to avoid damage
the gears and motor.
3 ON/Off switch
With the ON / OFF switch you start the vehicle.
4 Foot pedal
Applies power (speed) to the vehicle.
● To move the car, press the pedal down.
● To brake or slow down, release pressure from the pedal.
5 Soundboard
5.1 USB
5.2 Micro SD
After inserting a Micro SD card or USB stick, the soundboard starts playing the tracks one
after the other. Only files with the extension .mp3 can be played back.
5.3 Line In
5.4 Title back / Decrease volume (hold down)
5.5 Play / Pause
5.6 Title ago / Increase volume (hold down)
5.7 Mode - Switching between USB, Micro SD and other functions
5.8 Battery level indicator
Danger!
Always switch off the model immediately after each use. Immediately after each use, the batteries should be disconnected from the model. The batteries can be deeply discharged by leaving them switched
on accidentally or leaving them plugged in. Due to deep discharge, the batteries lose power or can be damaged to such an extent that charging or discharging is no longer possible or the batteries can
self-ignite during the charging or discharging process (fire hazard). Never attempt to charge or discharge deeply discharged batteries. The voltage of a battery should never fall below 5.7 volts to avoid a
deep discharge. The fully charged battery has a voltage of approx. 6.5 volts. After use, the intact batteries should be fully charged immediately after a cooling phase of min. 10 minutes but at the latest after
12 hours to avoid a subsequent deep discharge by selfdischarge. If the batteries are not used or stored for a longer period of time, the batteries should be checked for voltage (min. 6.2 volts) or damage at
least every 3 months and recharged or disposed of if necessary.
Disposal restrictions
Batteries and accumulators must not be disposed of in domestic waste. You are obliged to dispose
of batteries (seperate collection) appropriately. After use you can return batteries free of charge
to the retail store. As batteries contain substances that can be irritant, can cause allergy and are
highly reactive, separate collections and proper recycling is important to the environment and to your
health. If the batteries are marked with a chemical symbol Hg, Cd or Pb below the crossed-out waste
bin on wheels it refers to that more than 0.0005% of mercury (Hg), more than 0.002% of cadmium
(Cd) or more than 0.004% Lead (Pb) is included.
Disposal restrictions
Electrical appliances must not be disposed of in domestic waste and must be disposed of separately.
You are obliged to take out the batteries, if possible, and to dispose of the electrical equipment at
the communal collection points. Should personal data be stored on the electrical appliance you must
remove them by yourself.
1
2
3
4
5
5.1
5.2
5.8
5.3 5.4
5.5 5.6
5.7
Summary of Contents for 461835
Page 6: ...6 1 2 8 8 1 1 3 3 1...


