background image

20

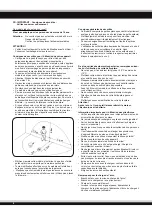
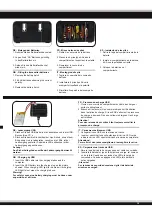
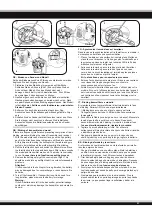
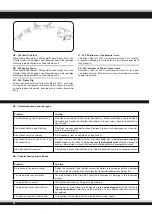
DE - Flugakku aufl aden 

(nur bei Versionen mit 230 V Ladegerät)

1.  Trennen Sie die Steckverbindung zum Akku 

(c)

 und entnehmen

   ihn dem Modell .

2.  Verbinden Sie das Steckernetzteil (nicht enthalten) 

(b)

 mit dem 

  Wechselstromnetz, stecken Sie es in eine Steckdose.

3.  Die Lade-LED leuchten auf, sie zeigen Ladebereitschaft an.

4.  Verbinden Sie das Kabel des Akkus 

(c)

 mit dem Kabel des 

  Ladegeräts an (nicht enthalten) 

(b)

.

  Der Ladevorgang ist beendet wenn die Lade-LED erlischt.

Wichtige Hinweise:

Wenn sich der Akku während des Ladevorgangs erwärmt, 

trennen Sie ihn bitte umgehend vom Ladegerät, damit der 

Akku nicht zerstört wird. Nach einem Flug ist der Akku u.U. 

stark erwärmt. In diesem Fall muss der Akku erst ca. 30 Min. 

lang abkühlen bevor er wieder aufgeladen wird. Bringen Sie 

einen LiPo-Akku niemals mit einer offenen Flamme in Berüh-

rung, es besteht Explosionsgefahr.

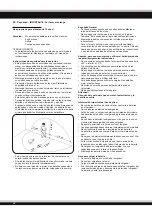
GB - Recharging the fl ight battery 

(in versions with 230 V charger) 

1.  Disconnect the connector to the battery 

(c)

 and take it to the 

 model.

2.  Connect the power adapter with the AC system (not included) 


(b)

 and plug it into a power socket.

3.  The LED will switch on and indicate that it’s now ready for 

 charging.

4.  Connect the battery 

(c) 

with the output of the charger (not 

  included) 

(b)

. The charging process is completed when the 

  charge LED goes out.

Note:

If the battery heats up during charging, disconnect it. Failure 

to do so may destroy the battery. After fl ying the battery will 

be hot, allow it to cool for app. 30 minutes before charging. 

Never allow batteries to come into contact with open fi re as 

this may cause the batteries to explode.

FR - Charge de l’accu de propulsion


     (seulement chez les versions avec 230 V)

1.  Débranchez le connecteur vers l’accu 

(c)

 et l‘enlever à partir du 

 modèle.

2.  Branchez l’alimentation (non inclus) 

(b) 

stabilisée sur une prise 

  secteur alternative.

3.  Les LED s’allument et indiquent que le chargeur est près.

4.  Branchez l’accu 

(c) 

sur la sortie du chargeur (non inclus) 

(b)

 en 

  passant. Le processus de charge est terminé lorsque la LED 

 s’éteint.

Remarque importante:

Si votre accu venait à chauffer fortement lors du processus 

de charge, séparez celui-ci immédiatement du chargeur afi n 

que l‘accu ne soit pas détruit. Après un vol, votre accu est 

chaud. Dans ce cas, laissez le refroidir environ 30 minutes 

avant de le recharger. N‘utilisez jamais un fl amme vive dans 

les environs immédiats de votre accu LiPo et surtout ne 

rentrez pas en contact avec celui-ci, il y a danger d‘explosion.

IT - Carica della batteria di potenza

   (solamente per versioni con caricatore da 230 V) 

1.  Staccare laccumulatore 

(c)

 dal modello .

2.  Collegare l’alimentatore alla presa (non incluso) 

(b).

3.  Si accende il LED.

4.  Collegare il pacco batteria 

(c)

 con il cavo il caricabatterie (non

  incluso) 

(b). 

Il caricamento è completato quando il LED si 

 spegne.

Nota importate:

Se notate che la vostra batteria appena collegata per la rica-

rica riscalda fortemente, staccatela immediatamente! Per evi-

tarne la distruzione. Lasciate raffreddare la batterie dopo un 

volo prima di ricaricarle. Evitate di avvicinare fi amme libere 

alle batterie LiPo evitando assolutamente di avvicinarle a forti 

fonti di carore, perché potrebbero esplodere.

ES - Cargar la batería principal


(solo para versiones con cargador de 230 V) 

1.  Desconecta el conector de la batería 

(c)

. Tirar la batería 

(c)

 de 

  la helicóptero.

2.  Conecte el cargador (no incluido) 

(b) 

con la fuente de 

  alimentación, despues en la toma de corriente.

3.  La LED brilla y indica que esta pornta para la carga.

4.  Conecte el cable del cargador (no incluido) 

(b)

 en el buje de la

 batería 

(c)

. La carga se completa cuando el LED de carga se 

 apaga.

Aviso importante: 

Si la batería se calienta demasiado durante la carga, 

desconéctelas rápidamente del cargador, así evitará que se

estropee. Normalmente, tras volar la batería se habrá 

calentado. En esto casos, se debe dehar enfriar la batería 

durante 30 minutos antes de bolber a cargarla. Nunca 

exponga una batería LiPo a una llama, podría provocar una 

exprosión.

a

b

c

Summary of Contents for Alien Attack V2

Page 1: ...n Utilisable en Omologato in Autorizado en EU CH DE Gebrauchsanleitung GB Instruction FR Notice d utilisation IT Istruzioni di montaggio ES Instrucciones de montaje Alien Attack V2 Art Nr Ord No R f C...

Page 2: ...Emetteur 18 Afficheur LCD 18 Mise en place des piles 19 Processus de charge USB 19 Charge de l accu de propulsion p vers avec chargeur 20 Synchroniser le mod le avec l metteur 21 Roll 360 Flip 22 Vol...

Page 3: ...el suite des d fauts de fabrications le remboursement se limite la valeur d achats du produit concern Cela n est pas valable dans le cas de non respect des consignes d utilisations ou de n gligence co...

Page 4: ...ax 49 0 7565 9412 23 www jamara com info jamara com Vos pourrez galement trouver des informations sur notre site In ternet www neuershop jamara com Conformite Textes de la directive europ enne R TTE a...

Page 5: ...n und oder der Akkus Bitte werfen Sie nur entladene Akkus in die Sammelboxen beim Handel oder den Kommunen Entladen sind die Akkus in der Regel dann wenn das Modell nicht mehr l uft GB Disposal restri...

Page 6: ...ewahren Sie die Umverpackung und alle sonstigen Teile inkl Anleitung sorgf ltig auf Das Fliegen des Modells erfordert gro es Geschick Vor dem ersten freien Flug ist die Gebrauchsanweisung zu lesen und...

Page 7: ...ons safely Flying a model requires a certain amount of skill know ledge and should be supervised by an adult Before starting ensure that any child read and understand these instructions Ensure that al...

Page 8: ...tes les pi ces ainsi que la notice L utilisation de cet h licopt re demande de l adresse et ne doit se faire que sous la surveillance d un adulte Lisez attentivement la notice d utilisation avec les e...

Page 9: ...rebbe danneggiare l elettronica Conservate sempre tutti i pezzi e l imballo cosi come le istruzioni Seguite attentamente le istruzioni per ottenere un modello affidabile ricordando che voi sarete i re...

Page 10: ...nes Para volar este helic ptero se requiere cierta habilidad y conocimientos y debe ser supervisado por un adulto Antes de usarlo aseg rese de haber le do y entendido las instrucciones y que todas las...

Page 11: ...jegliche Haftung f r Sch den aus die durch den fehlerhaften Umgang mit den Lithium Polymer Zellen entstehen Bei unsachgem er Verwendung des Akkus besteht Brand oder Ver tzungsgefahr berladen zu hohe...

Page 12: ...t there is a risk of getting fire or acid injuries Overcharging too high power or discharging at low level destroys the cell Protect from mechanical stress squeezing pushing bending drilling Never ope...

Page 13: ...ments Prot gez les l ments contre des chocs m caniques pincement pression torsion per age N ouvrez ou ne d coupez en aucun cas les accus ne les jetez pas dans le feu et tenez les bonne distance des en...

Page 14: ...iedono una particolare cura Per questo JAMARA e K declina ogni res ponsabilit sull impiego di queste batterie e dai danni che potreb bero derivare dal loro utilizzo Un uso non appropiato di queste bat...

Page 15: ...an de unos cuidados m nimos La empresa Jamara e K de manera explicita declina cualquier res ponsabilidad sobre los da os causado o derivados por un manejo err neo de las bater as LiPo Una utilizaci n...

Page 16: ...motors 4 channel 2 4 GHz digital transmitter with LCD display 2 extra fast working fully proportional servos 4 flight modes for beginners and professionals All channels can be fully trimmed Flexible...

Page 17: ...Rotor 55 mm Longitud 95 mm Altitud 50 mm Peso 38 g RTF Bater a LiPo 3 7 V 330 mAh Salvo error y omisi n La empresa se reserva el derecho a reali zar cambios t cnicos las fotos y dibujos no contractual...

Page 18: ...ll 9 Trim avanti dietro 10 Stick direzionale destra sinistra avanti indietro 11 Antenna ES Emisora 1 Power LED 2 Dual mode Flip mode 3 Acelerador Joystick 4 Equilibrio Gas 5 Equilibrio Direcci n 6 On...

Page 19: ...sollte der Ladevorgang berwacht werden GB Charging by USB 1 Insert the USB cable into the charging station and the computer 2 Insert the LiPO battery into the charge plug as the picture showed When c...

Page 20: ...pr s 4 Branchez l accu c sur la sortie du chargeur non inclus b en passant Le processus de charge est termin lorsque la LED s teint Remarque importante Si votre accu venait chauffer fortement lors du...

Page 21: ...ur une surface horizontale plane Mettez en place l accu et branchez le Ne bougez plus l mod le afin que le gyroscope puisse se r gler Les lumi res LED la fin des branches commencent clignoter 2 Action...

Page 22: ...bile impostare il livello della leva di comando Ed e possibile vederlo direttamente sul display Quando si prema il pulsante si cambia il grado di agilit del modello Se si imposta una bassa il modello...

Page 23: ...are conoscenza con tutte le funzioni di controllo e di effettuare i primi voli di test Posizionare il modello su una superficie piatta davanti al pilota Le eliche del modello devono essere in posizion...

Page 24: ...ezza mantenere la distanza 2m verso se stessi altre persone animali oggetti ecc ES Configuraci n de vuelos y las instrucciones para principiantes Antes del vuelo siempre se deben comprobar los siguien...

Page 25: ...lato in volo In caso che il modello si allontana troppo ridurre il gas e farlo atterrare non troppo distante dal pilota ES 2 paso Nick y ejercicio di roll Ponerse aprox 2 metros detras del modelo y vo...

Page 26: ...an der Zeit den Flug aus der seitlich vom Model stehenden Position und von der vom Model zugewandten Seite aus zu ben Denken Sie daran dass Sie zum Teil invertiert umgekehrt steuern m ssen GB Step 5...

Page 27: ...on voulue 2 Trim nick Si vous actionnez ce r gleur de trimmage dans une direction le mod le basculer dans la direction voulue en avant ou en arri re 3 Trim du roulement Si vous actionnez ce r gleur da...

Page 28: ...d Das Modell driftet in eine Richtung Das Model muss ausgetrimmt werden Befolgen Sie dazu die Anweisungen zum Austrim men in dieser Anleitung Das Modell hat keine Leistung Der Flugakku ist leer Laden...

Page 29: ...e che le batterie sono cariche Il modello deriva in una direzione Regolare la posizione del volo tramite i trim Il modello non ha prestazioni La batteria non carica Caricare la batteria Il modello non...

Page 30: ...frame Cadre principal Telaio Chasis No 03 7714 Ladestation Charging station Chargeur Stazione di carica Staci n de carga No 17 9948 USB Ladeadapter nicht im Lieferumfang enthalten USB charging cable N...

Page 31: ...de Extra Trade Lindenstra e 82 66787 Wadgassen Tel 06834 9604952 Fax 06834 9604963 E Mail info extra trade de www extra trade de D Edition e K Sailweg 7 95339 Neuenmarkt Tel 09227940777 Fax 092279407...

Page 32: ...ch h ndler Ihr Fachh ndler _____________________________________________ _____________________________________________ _____________________________________________ ___________________________________...

Reviews: