11
IT - Sostituzione de la pala rotore
Se deve cambiare una pala del rotore, si deve assicurare di
montare la pala al rotore corretto. Assicurarsi quale pala viene
montata a destra e a sinistra
(A + B)
! Orientarsi all’immagine
(figura 1)
e le etichette sul lato sotto delle pale del rotore
. Se
si montano le pale del rotore non correttamente, il modello
sarà incontrollabile!
Per sostituire le pale rimuovere la vite di
fissaggio
(figura 2)
ed tirare la pala delicatamente. Premere la
nuova pala con cura e avvitare la vita di fissaggio.
ES - Sustitución de la pala del rotor
Si tiene que cambiar una pala de rotor, debe asegurarse de
que montar la pala en el rotor correcto
(A + B)
. Orientarse a la
imagen
(Figura 1)
y las etiquetas en el bajo de las palas del rotor
. Asegúrese qual pala vien montada a la izquierda
y qual pala en la derecha!
Para cambiar la palas quitar el tor-
nillo de fijación
(Figura 2)
y tire la pala con cauta. Presione la
nueva pala con cauta y atornillar el tornillo de fijación.
1
3
2
4
iOS /Android
App Download
DE - Foto / Video / Steuerung
GB - Photo / video / control
FR - Photo / vidéo / contrôle
IT - Foto / video / comando
ES - Foto / vídeo / control
B
D
E
F
G
H
A
C
DE - Software Download und Installation
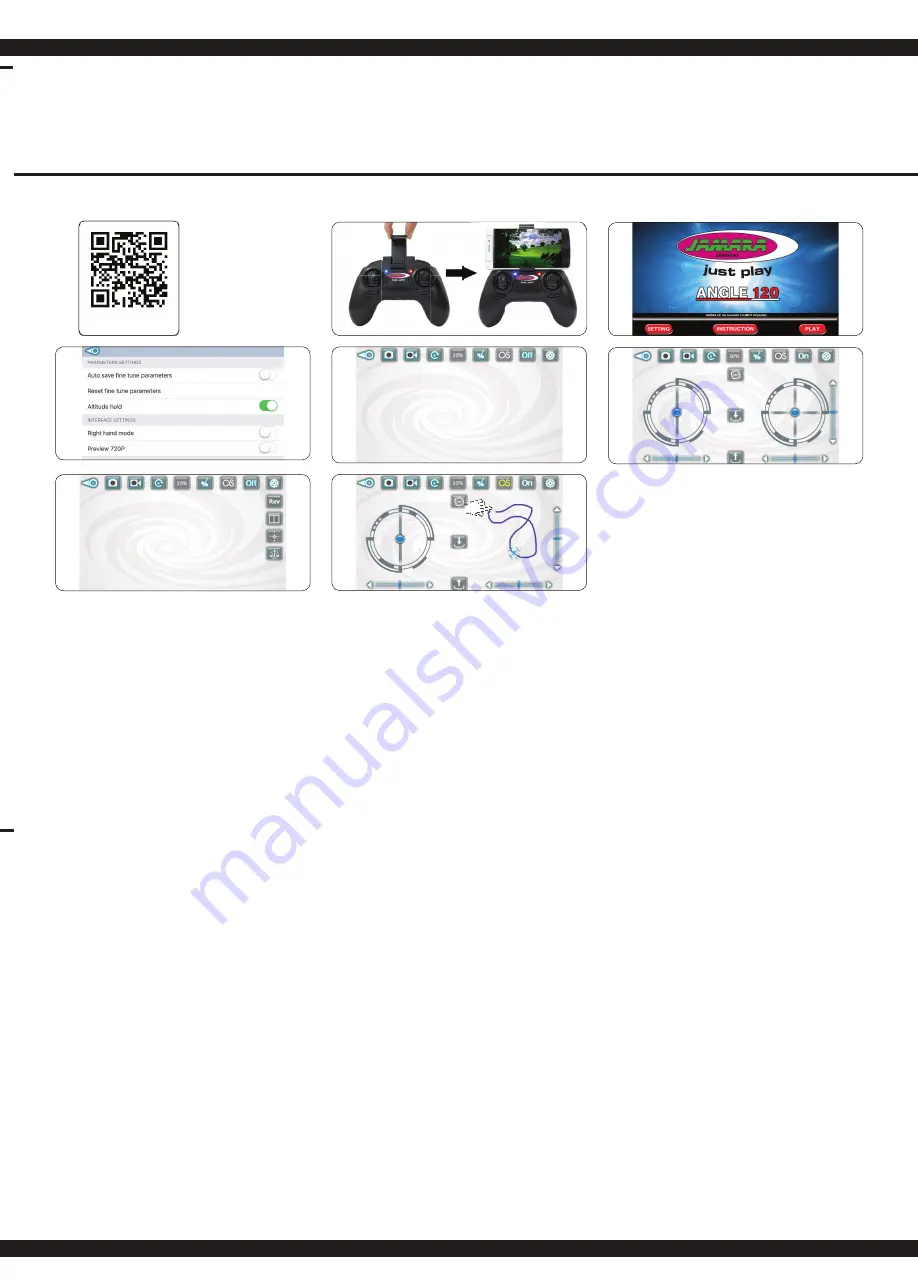
1. Downloaden & Installieren Sie die kostenlose App auf Ihr Smart Phone. Stecken Sie Ihr Handy
in die Halterung.
2. Schalten Sie das Modell und den Sender ein und führen den Bindevorgang (Seite 4) durch.
Öffnen
Sie auf Ihrem Smartphone die „Einstellungen“ und schalten das Wlan ein. Um Ihr
Smartphone/Tablet mit dem Modell zu koppeln müssen Sie eine WLAN-Verbindung mit dem
Modell aufnehmen (Jamara Angle 120). Sie benötigen kein Passwort und können sich direkt
damit verbinden.
3. Öffnen Sie nun die “Angle 120“ APP und drücken den "SETTING" Button, es öffnen sich die
App-Einstellungen. Übernehmen Sie die Einstellungen die Sie in Bild 4 sehen. Aktivieren Sie
nun die Höhenkontrollfunktion (Altitude Hold). Mit dem Pfeil-Symbol oben Links im Display,
kehren Sie zu Start-Menü zurück. Starten Sie das Programm mit der „Play“-Taste.
4. Es öffnet sich das Live-Bild der Kamera. Fotos
(A)
und Videos
(B)
können über die App wie
auch mit dem Sender erstellt werden (siehe Seite 9). Diese werden auf Ihrem Smartphone/
Tablet und Speicherkarte abgespeichert.
Die folgenden Punkte werden benötigt wenn Sie Ihr Modell über die APP FPV steuern
wollen:
5. Um das Modell über die App zu fliegen müssen Sie zuerst den Sender ausschalten und das
Handy aus der Halterung entnehmen. Anschließend aktivieren Sie die Steuerelemente (G).
Es öffnet sich das Steuermenue (Bild 6),
6. Legen Sie fest ob Sie über die Sensorsteuerung (E) oder über die virtuellen Steuerknüppel
(L+M) steuern möchten. Wählen Sie ob das Modell schnell oder langsam reagieren soll (D).
Drücken Sie nun den Take Off Button (K) und die Rotoren beginnen sich zu drehen. Das
Modell nimmt nun Befehle über den virtuellen Höhensteuerknüppel (L) an und hebt ab.
Landen können Sie in dem Sie den virtuellen Höhensteuerknüppel (L) ganz nach unten ziehen
oder in dem Sie den Landing Button (J) drücken. Das Modell beginnt dann selbstständig zu
sinken bis es gelandet ist. Während dessen müssen Sie das Modell weiterhin an die ge
wünschte Landeposition steuern.
Über die Trimmtasten (N) können Sie die Feinabstimmung des Modells vornehmen.
A Foto
B Video
C Galerie
Über den Galleriebutton in der App können Sie die Videos/Photos abrufen.
D Einsteiger-/Fortgeschrittenen-/Expert-Modus
Langsam (30%) - Mittel (60%) - Schnell (100%)
E Aktivierung der Sensorsteuerung
Drücken Sie den Button für die Sensorsteuerung. Nun ist die links/rechts Steuerfunktion
deaktiviert und das Modell lässt sich über das Schwenken des Smartphone steuern. Um die
links/rechts Steuerfunktion wieder zu aktivieren, drücken Sie den Button für die Sensorsteue-
rung erneut.
F Flugbahn-Planung-Modus
Malen Sie mit dem Finger eine Flugbahn vor, die Ihr Modell automatisch nachfl iegen wird
(Bild 8).
G Einschalten der Steuerelemente (Bild 6)
Der Sender muss dazu ausgeschaltet sein.
ACHTUNG! Nur am Boden - niemals während dem Flug den Sender ausschalten.
H Zusatzmenü (Bild 7)
I Flip
J Lande-Button
K Take Off Leerlauf
L Heben / Senken | Gieren links / rechts
M Links / Rechts
N Trimmung
O Bildschirmdrehung 180°
P Splitscreen (für VR-Brille)
Q Kompass- / Headless-Modus
Durch Drücken kommen Sie in den Kompass-/ Headless-Modus.
R Autokalibrierung
GB - Software Download and Installation
1. Download & Install the free App on your mobile phone. Insert the mobile phone holder on top of
the antenna of the remote control.
2. Turn on the model, then transmitter and perform the binding process – see page 4. Only
available if operated via remote control. Open the „Settings“ in your mobile phone/ tablet and
turn the Wifi on. To pair your mobile phone/tablet with the model you need to establish a WLAN
connection with the model (Jamara Angle 120). You do not need a password and can directly
connect to it.
3. Now open the „Angle 120“ App and press the „Setting“ button for the App tools to open. Copy
the settings you see in figure 4. Now activate the Altitude Hold function. The arrow in top left
corner will enable you to move back tot he start menu. Start the program with the „Play“ button.
4. This will open the live image of the camera. Photos (A) and videos (B) can be taken via the App
and Transmitter (see page 9). Footage is stored on the storage space of your mobile/ cell phone
or tablet.
The following points need tob e adhered to if you want to control your model via the FPV App:
5. In order to fly the model via the App, you must first turn off the transmitter and remove the phone
from the holder. Then activate the App - Control (G). The Steering menu will open (image 6).
6. Specify whether you want to control through the tilt control (E) or via the virtual stick (L+M).
Select whether the model is to respond quickly or slowly (D). Now press the Take Off button (K)
and the rotors begin to rotate. The model now takes control input on the virtual height control
stick (L) and takes off. To land the model use the virtual height stick (L) and pull it down or use
the landing Button (J). The model will then begin to decline autonomously until it has landed.
Meanwhile, you need to continue controlling to the desired landing position. Above the trim
buttons (N), you can fine-tune the model.
A Photo
B Video
C Gallery
You can use the Gallery button in the app to view the videos / photos.
D Beginner / Advanced / Expert mode
Slow (30%) - Medium (60%) - Fast (100%)
E Activation of the sensor control
Press the button for sensor control. Now the left / right control function is deactivated and the
model can be controlled by pivoting the smartphone. To reactivate the left / right control function,
press the button for sensor control.
F Flight Pivot Mode
Paint with your finger a trajectory that your model will search for automatically (Fig. 8).
G Activating the control elements (Fig. 6)
The transmitter must be switched off.
ATTENTION! Only on the ground - never switch off the transmitter during flight.
H Additional menu (Fig. 7)
I Flip
J Land Button
K Take Off idle
L Lifting / lowering | Yawing left / right
M Left / Right
N Trimming
O Screen rotation 180 °
P Splitscreen (for VR glasses)
Q Compass / Headless mode
Press to entre Compass / Headless mode.
R Autocalibration
5
6
7
8
L
N
O
P
Q
R


