5
7
DE
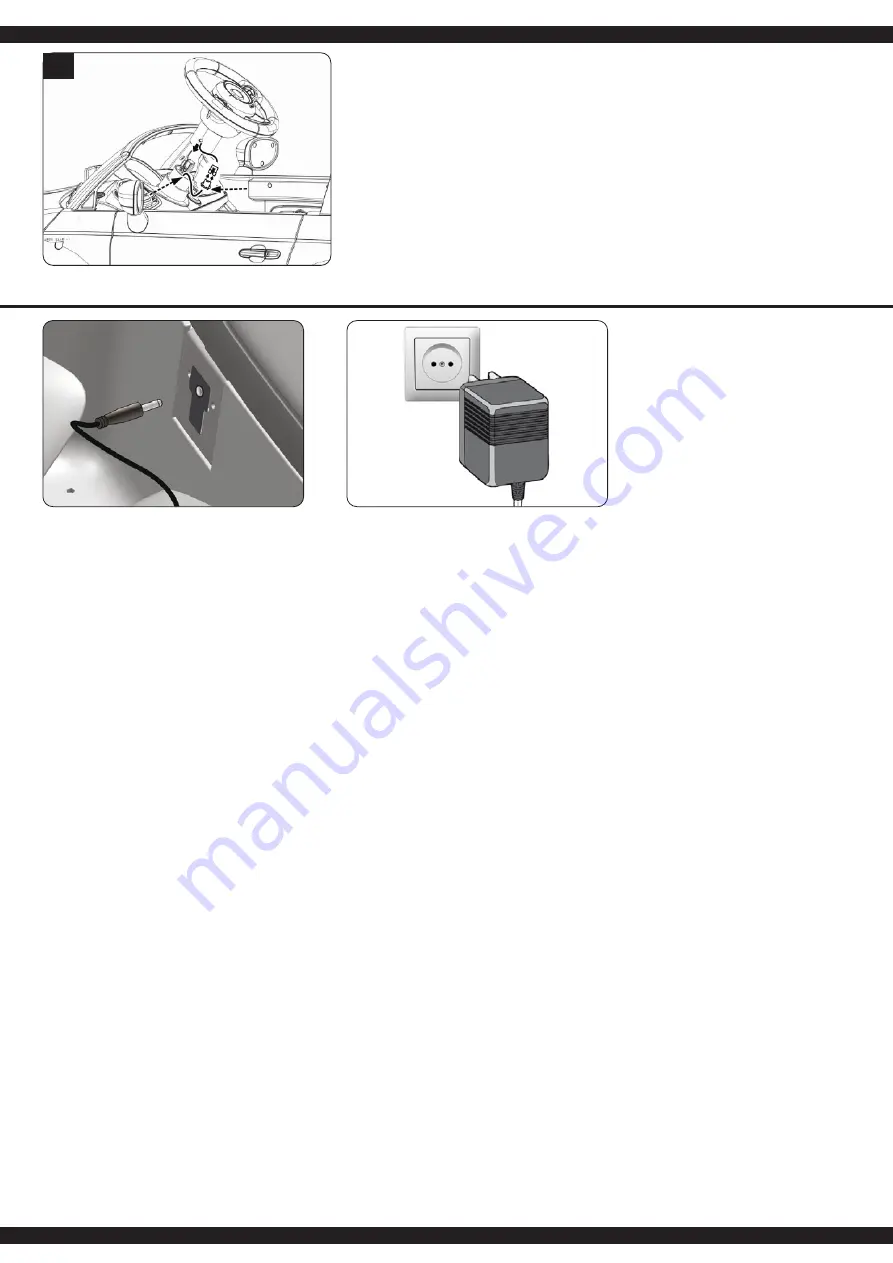
7. Montage Lenkrad
•
Verbinden Sie das Kabel vom Lenkrad mit dem Kabel am
Armaturenbrett. Verstauen Sie die Kabel in der Aus-
sparung im Modell. Drücken Sie die Sicherungs-
stifte rechts und links am Lenkrad ein und schieben Sie
das Lenkrad in die vorgesehene Position bis es einrastet.
GB
7. Steering wheel assembly
•
Connect the cable from the steering wheel to the cable of
the dashboard. Stow the cables in the recess in the
model. Push in the locking pins on the right and left side
of the steering wheel and push the steering wheel into
the intended position until it engages
FR
7. Monter le volant
•
Connecter les câbles du volant à ceux du tableau de
bord. Rangez les câbles dans le logement du modèle.
Enfoncez les goupilles de verrouillage sur les côtés droit
et gauche du volant et faites glisser le volant dans la
position prévue jusqu'à ce qu'il s'enclenche.
IT
7. Montaggio volante
•
Collegare il cavo del volante con il cavo sul cruscotto.
Conservare i cavi nell'incavo del modello. Spingere i
perni di bloccaggio sui lati destro e sinistro del volante e
far scorrere il volante nella posizione prevista fino
all'innesto.
ES
7. Montaje del volante
•
Conectar el cable del volante con el cableen el
salpicadero. Guarde los cables en el hueco del modelo.
Empuje los pasadores de bloqueo de los lados derecho
e izquierdo del volante y deslice el volante a la posición
deseada hasta que encaje.
CZ
7. Sestava volantu
•
Připojte kabel z volantu ke kabelu z palubní deska.
Kabely uložte do vybrání v modelu. Zatlačte zajišťovací
čepy na pravé a levé straně krytu volant a zatlačte jej do
určené polohy pozici, dokud nezapadne.
DE
- Ladevorgang
•
Das Fahrzeug muss während dem Laden ausgeschaltet sein.
•
Schließen Sie das Ladegerät an der Ladebuchse an und stecken Sie das Ladegerät in die
Steckdose.
•
Die Ladezeit beträgt zwischen 10 und 15
Stunden.
•
Laden Sie den Akku nicht öfter als 1 x innerhalb 24 Std.
•
Ladegerät und Akku erwärmen sich während des Ladevorgangs.
Warnung!
•
Lassen Sie dem Modell nach jedem Einsatz genügend Zeit um abzukühlen bevor Sie es
wieder in Betrieb nehmen. Beim Verwenden eines etwaigen Tauschakkus muss
zwischen jedem Akkuwechsel mindestens eine Abkühlphase von 15 Minuten
eingehalten werden bis das Modell wieder betrieben wird. Bei Überhitzung kann
Beschädigung der Elektronik oder Brandgefahr die Folge sein.
•
Trennen Sie immer unmittelbar nach Beenden des Ladevorgangs das Modell vom
Ladegerät. Trennen Sie das Ladegerät immer unmittelbar nach Abstecken des Modells
von der Spannungsversorgung. Ein eingesteckt lassen des Modells bzw. des
Ladegeräts nach Beenden des Ladevorgangs kann zu Beschädigungen am Modell,
Ladegerät oder der Spannungsversorgung führen (Brandgefahr).
GB
- Charging Your Vehicle
•
The power swich must be turned in OFF position when charging.
•
Plug the charger port into the input socket and plug the charger plug into a wall outlet.
The battery will begin charging.
•
The charge time is between 10 and 15 hours.
•
Do not charge the battery more than once within 24 hours.
•
Charger and battery heat up during the charging process.
Warning!
•
Let the model cool off sufficiently after each use before putting it back into operation.
When using an additional batteries let it cool off for minimum 15 minutes until the
model is operated again. Overheating can damage the electronics or may result in fire.
•
Always disconnect the model from the charger immediately after charging. Always
disconnect the charger from the power supply immediately after disconnecting the
model. Inserting the rechargeable model or charger after charging will result in damage
tothe model, charger or the power supply (fire hazard).
FR
- Charge de la voiture
● Il faut absolument que la voiture soit éteinte pour effectuer la charge.
● Branchez la prise de charge du chargeur et connectez le chargeur sur une prise secteur.
● Le temps de charge est entre 10 et 15 heures.
● Ne chargez votre accu pas plus d’1x en 24 heures.
● Le chargeur et l’accu vont chauffer pendant le processus de charge
.
Avertissement !
●
Après chaque utilisation, avant de remettre le modèle en marche, laissez-le
suffisamment le temps de refroidir. Laissez une phase de 15 minutes de refroidissement
lorsque vous utilisez une batterie de rechange pour redémarrer le modèle de nouveau.
En cas de surchauffe, les composants électroniques peuvent être endommagés ou un
risque d´incendie peut survenir.
●
Débranchez toujours après chaque arrêt la modèle du chargeur. Débranchez aussi
toujours le chargeur immédiatemment après avoir débranché la modèle de
l´alimentation. Laissez brancher la chargeur ou la modèle peuvent causer des
dommages à la modèle, à votzre chargeur ou câble d´alimentation (risque d´incendie).
IT
- Carica del veicolo
•
Il veicolo deve essere spento mentre si carica.
•
Collegare il caricatore alla presa di carica e collegare il caricatore nelle presa
•
Il tempo di carica è di 10 - 15 ore.
•
Non caricare la batterie volte in 24 ore.
•
Caricatore e batteria si riscaldano durante la carica.
Avvertimento!
•
Lasciate che il modello dopo ogni utilizzo il tempo sufficiente per raffreddarsi prima di
rimetterlo in funzione. Quando si utilizza delle batterie per cambio deve essere
rispettato una fase di raffreddamento di 15 minuti tra ogni cambio della batteria prima
di rimetterlo in funzione. Il surriscaldamento può danneggiare l’elettronica o pericolo
d’incendio possono esssere le conseguenze.
•
Dopo ogni carica e importante di: Scollegare sempre subito la batteria dal caricatore ed
il caricatore dalla rete elettrica. Se dopo la carica si lascia collegato l’uno o l’altro può
causare danni alla batteria, al caricatore o addirittura alla rete elettrica (pericolo di
incendio).
ES
- Carga del vehículo
•
El vehículo debe estar apagado durante la carga.
•
Conectar el cargador en el buje de carga y conectar el cargador en la toma de corriente.
•
El tiempo de carga es de aproxi madamente entre 10 y 15 horas.
•
No cargue la batería mas de una vez en 24 horas.
•
El cargador y la batería se calientan ligeramente durante el proceso de carga.
Apercibimiento!
•
Deje que el modelo después de cada uso e l tiempo suficiente para enfriarse antes de
volver a ponerlo en funcionamiento. Cuando se utiliza baterías para cambiar se tiene
que respetar una fase de enfriamiento de 15 minutos entre cada cambio de las baterías
antes de ponerlo de nuevo en funcionamiento. El sobrecalentamiento puede dañar la
electrónica o peligro de incendio puden ser la consecuencia.
•
Después de cada carga es importante de: Desconectar siempre la modelo del cargador
y el cargador de la fuente de alimentación. Si después de la carga se deja conectado a
uno o otra puede causar daños a la modelo, cargador
CZ
-Nabíjení
•
Tlačítko On/Off musí být v pozici OFF než začnete model nabíjet.
•
Připojte nabíječku do zásuvky pro nabíjení a připojte nabíječku do elektrické sítě.
Baterie se začne nabíjet.
•
Doba nabíjení po každé jízdě je přibližně 10 až 15 hodin.
•
Nenabíjejte baterii déle než 24h.
•
Nabíječka a baterie se během nabíjení zahřívají
Upozornění!
• Po každém použití nechte model dostatečně vychladnout, než jej znovu použijete.
Pokud máte náhradní baterii, vyměňte ji nejdříve po 15min., co necháte model
vychladnout. Přehřátí modelu může poškodit elektronické součástky modelu a může
způsobit požár.
• Po nabíjení vždy odpojte model od nabíječky a nabíječku odpojte ze zásuvky. Připojení
právě nabitého modelu nebo nabíječky ihned po nabíjení může způsobit poškození
modelu, nabíječky nebo zásuvky (zdroj energie), v nejhorším případě může dojít i k
požáru.


