88
GB
1. Installing front bumper
Put the bumper (2) on the body of the car as shown. Tighten and fix with 6x M4*12 mm
screws.
2. Assembly of the front wheels
Remove the nuts and the washer from the front axle using the spanner. Now put the wheels
(5) and one washer (6) each on the front axle and secure it with a nut (7). Finally, put a cover
(4) on the wheel. Repeat this on the other side.
3. Mounting the drive motor and the rear wheels
Put the drive motor (3) onto the rear axle, connect the motor wire plug with the plug in at the
motor clamp port, and insert the motor into the clamp slot.
Put the wheel (5) and one washer (6) each on the rear axle and secure it with a nut (7).
Finally, put a cover (4) on the wheel. Repeat this on the other side.
4. Installing steering wheel
Connect the connecting wire on the steering wheel with the connecting piece on the
instrument platform. Finally, the steering wheel (14) is clamped into the slot on the instrument
platform and fixed with the M5*35mm screw and the M5 locknut.
5. Mounting the seat
Place the seat (9) in the car body slot. Tghten and fix it with 4 pieces M4x12 mm screws.
6. Installing backrest
Insert the backrest (10) into the body hole as shown in the figure.
7. Installing windshield and rearview mirror
Press the windshield (8) and rearview mirrors (13) into position until it locks into place.
8. Installing toy shovel fastener and toy shovel
First fix the toy shovel fastener (12) on the rear box plate with a M4*12mm screw. Finally, the
toy shovel (11) can be stuck on the fixed seat.
9. Battery connection
Open the cover underneath the seat and connect the connectors. Be careful not to reverse
the polarity. Close the cover.
10. Charging your vehicle
• The power swich must be turned in OFF position when charging.
• The charging port is under the seat.
• Insert the charger into the socket - the LED lights up green. Connect the charger to the
charging socket.
• The LED on your charger lights up red as long as the battery is being charged. If the LED
lights green again, the battery is fully charged.
• The charge time is 6 hours.
• When the vehicle begins to run slowly, recharge the battery.
• Do not charge the battery more than once within 24 hours.
• Charger and battery heat up during the charging process.
Warning!
•
The charger is not a toy. Only use the charger supplied.
•
The battery may only be charged by or under the supervision of an adult.
•
The terminals must not be short-circuited.
•
The charger must be checked regularly for damage to the cable, plug, housing and other
parts. If any damage is found, the charger must not be used until the damage has been
repaired.
•
Let the model cool off sufficiently after each use before putting it back into operation.
When using an additional batteries let it cool off for minimum 15 minutes until the
model is operated again. Overheating can damage the electronics or may result in fire.
•
Always disconnect the model from the charger immediately after charging. Always
disconnect the charger from the power supply immediately after disconnecting the
model. Inserting the rechargeable model or charger after charging will result in damage
tothe model, charger or the power supply (fire hazard).
•
Only use the charger in dry rooms.
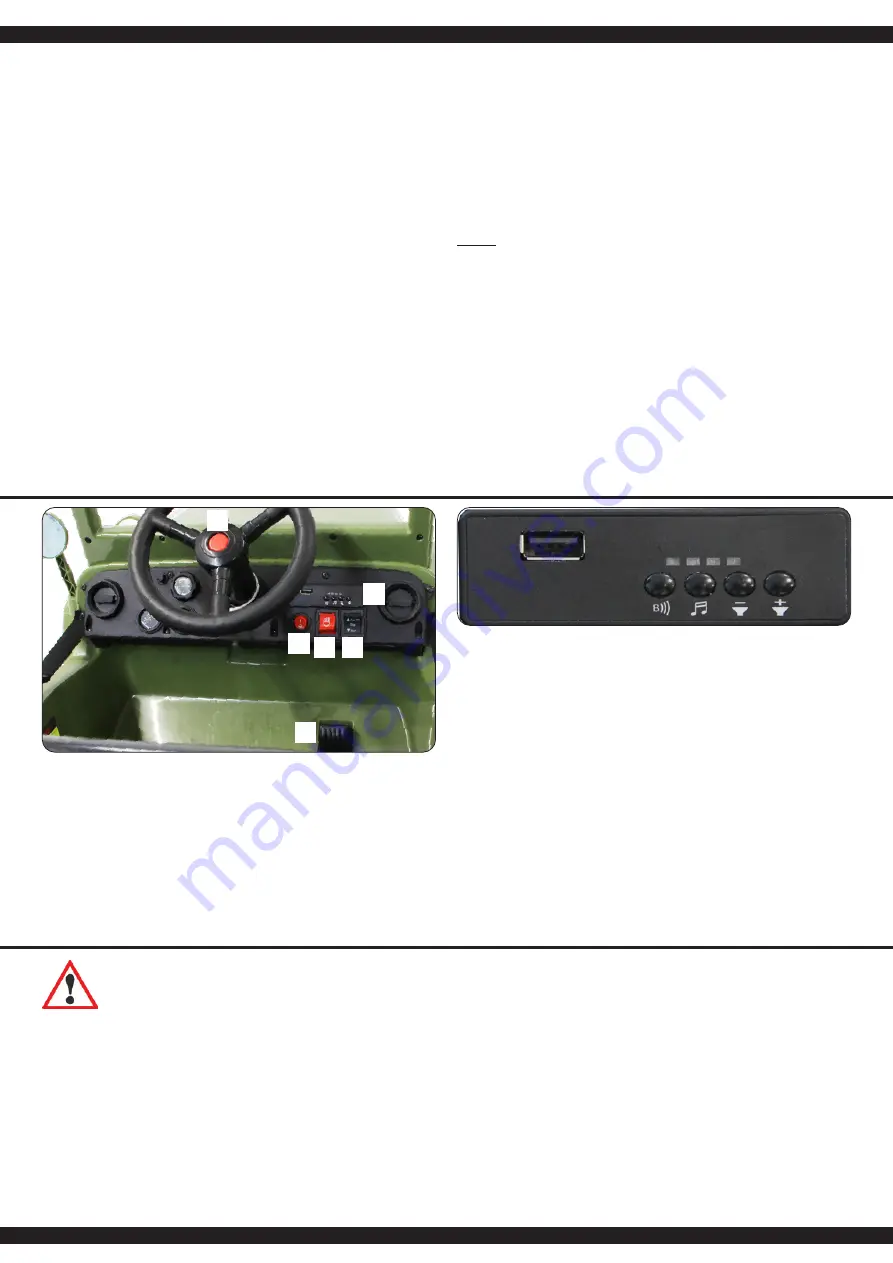
Functions
1. Horn
2. Soundboard
A
USB
After inserting a USB stick, the soundboard starts playing the tracks one after the other. Only
files with the extension .mp3 can be played back.
B
Bluetooth/Musik
1x kurz drücken um Bluetooth einzuschalten. Bei nochmaligem kurzen Drücken ertönt Musik.
C
Songtaste
D
Musik/V-
drücken = Titel rückwärts, langes drücken = Lautstärke leise
E
Musik/V+
drücken = Titel vorwärts, langes drücken = Lautstärke laut
F
Spannungsanzeige
3.
ON/OFF Switch
With the ON/OFF switch you start the vehicle.
4. Light button
5. Shift Lever:
Forward:
Press the “Forward-backward switch” on the “Forward” position.
Press the “Foot pedal”, the model drives forward
Stop:
The model will brake automatically, when your child’s foot remove from the
“Foot pedal”. Press the “Forward-backward switch” in the middle.
Reverse:
Press the “Forward-backward switch” on the “Backward” position.
Press the “Foot pedal”, the model drives backward.
Important!
The vehicle must be stationary before changing direction. Otherwise the
gear unit and/or the motor could be damaged.
6. Foot pedal
To move the car, press the pedal down.
To brake or slow down, release pressure from the pedal.
1
2
3 4 5
6
B
D
C
E
F
A
Caution
Always switch off the model immediately after each use. Immediately after each use the battery should be disconnected from the model. The battery can be deeply discharged
by leaving it switched on accidentally or leaving it plugged in. Deep discharge causes the battery to lose power or can be damaged to such an extent that charging or dischar
-
ging is no longer possible or the battery can self-ignite during charging or discharging (fire hazard). Never attempt to charge or discharge deeply discharged batteries. The
battery voltage should never fall below 11,9 volts to avoid deep discharge. The fully charged battery has a voltage of approx. 13 Volt. After use, the intact battery should be fully
charged immediately after a cooling phase of at least 10 minutes but at the latest after 12 hours to avoid subsequent deep discharge by self-discharge. If the battery is not used
or stored for a longer period of time, the battery should be checked for voltage (min. 12,3 volts) or damage at least every 3 months and charged or disposed of if necessary.


