5
1
2
3
4
5
7
8
16
15
14
13
12
11
10
9
Chassis
Chassis
Chassie
Chassis
Chásis
Podvozek
Podwozie
Chassis
Podvozok
Lenkrad
Steering wheel
Volant directionnel
Sterzo
Volante
Volant
Kierownica
Stuurwiel
Volant
Windschutzscheibe
Windshield
Pare-brise
Parabrezza
Parabrisas
Přední sklo
Szyba przednia
Voorruit
Čelné sklo
Heckspoiler
Rear Spoiler
Aileron arrière
Spoiler posteriore
Alerón trasero
Zadní spoiler
Tylny spojler
Achterspoiler
Zadný spojler
Antriebsrad 2x
Driving wheels 2x
Roue d‘entraînement 2x
Ruota motrice 2x
Rueda motriz 2x
Hnací kolo 2x
Koło napędowe 2x
Aandrijfwiel 2x
Hnacie koleso 2x
MP3 Kabel
MP3 Cable
Cable MP3
Cavo MP3
Cable MP3
MP3 kabel
Kabel MP3
MP3-kabel
MP3 kábel
Radkappe 4x
Wheel cap 4x
Protection de roue 4x
Copriruota 4x
Llanta 4x
Kryt kola 4x
Pokrywa koła
4x
Wieldop 4x
Kryt kolesa 4x
Rückspiegel 2x
Rearview mirror 2x
Rétroviseur 2x
Retrovisore 2x
Retrovisor 2x
Okno auta 2x
Lusterko wsteczne 2x
Achteruitkijkspiegel 2x
Spätné zrkadlo 2x
Vorderrad 2x
Front wheel 2x
Roue avant voorwiel 2x
Ruote anteriori 2x
Ruedas delanteras 2x
Přední kolo
2x
Koło przednie
2x
Wiel vooraan 2x
Predné koleso 2x
Fernsteuerung
Transmitter
Radiocommande
Trasmittente
Emisora
Dálkový ovladač
Zdalne sterowanie
Afstandsbediening
Diaľkové ovládanie
Splint
Split pin
Goupille
Spalato spina
Pasador
Závlačka
Zawleczka
Pen
Závlačka
U-Scheibe 6x Ø 10 mm
Washer 6x Ø 10 mm
Rondelles 6x Ø 10 mm
Rondella 6x Ø 10 mm
Arandela 6x Ø 10 mm
Podložka 6x Ø 10 mm
Podkładka 6x Ø 10 mm
Sluitring 6x Ø 10 mm
Podložka U 6x Ø 10 mm
Mutter
Nut
Ecrou
Dado
Tuerca
Matice
Nakrętka
Moer
Matica
Ladegerät
Charger
Chargeur
Caricatore
Cargador
Nabíječka
Ładowarka
Lader
Nabíjačka
Schrauben 1x Ø4x12
Screws 1x Ø4x12
Vis fixe 1x Ø4x12
Vita 1x Ø4x12
Tornillo 1x Ø4x12
Šroub 1x Ø4x12
Śruba 1x Ø4x12
Schroef 1x Ø4x12
Skrutka 1x Ø4x12
Schrauben 1x Ø5x38
Screws 1x Ø5x38
Vis fixe 1x Ø5x38
Vita 1x Ø5x38
Tornillo 1x Ø5x3
Šroub 1x Ø5x3
Śruba 1x Ø5x3
Schroef 1x Ø5x3
Skrutka 1x Ø5x3
6
DE -
Teile
GB -
Parts
FR -
Pièces
IT -
Parti
ES -
Partes
CZ -
Části
PL -
Części
NL -
Onderdelen
SK -
Časti
1
DE
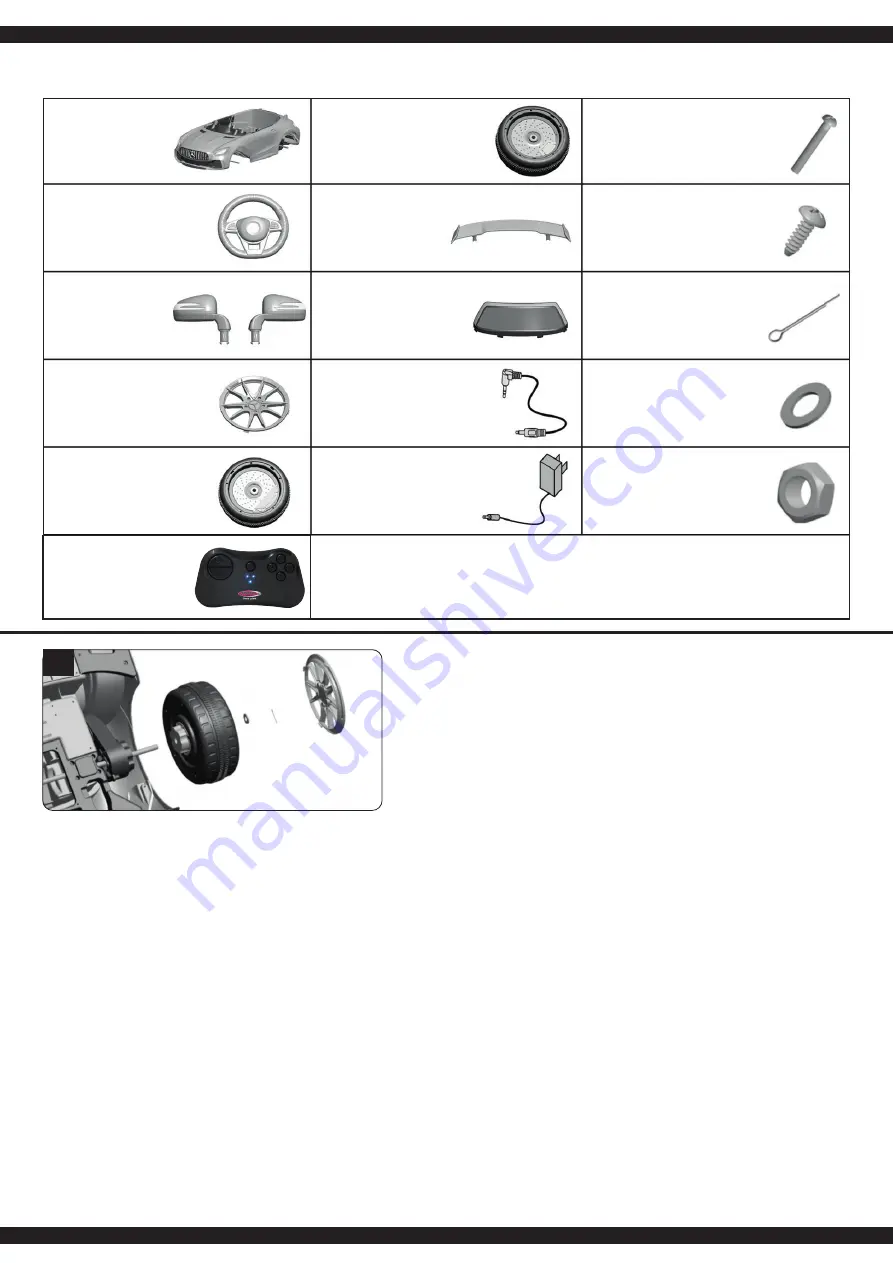
1. Montage der Hinterräder.
•
Stellen Sie die Karosserie mit der Unterseite nach oben
•
Stecken Sie ein Antriebsrad
(6)
auf das Getriebe.
•
Schieben Sie eine Unterlegscheibe
(14)
auf die
Hinterachse.
•
Fixieren Sie das Ganze mit einem Splint
(13).
Mit Hilfe
einer Zange verbiegen Sie das Ende des Splints.
•
Stecken Sie zum Schluss eine Abdeckung
(4)
auf das
Rad
•
Wiederholen Sie dies auf der anderen Seite.
GB
1. Assembly of the rear wheels
•
Place the body with the underside facing up.
•
Attach a drive wheel
(6)
to the gear unit.
•
Slide a washer
(14)
onto the rear axle.
•
Fix the whole thing with a plit pin
(13)
. Bend the ends of
the split pin back using a pair of pliers.
•
Finally, put a cover
(4)
on the wheel
•
Repeat this on the other side.
FR
1. Montage des roues arrières.
• Ajustez la carrosserie avec le dessous vers le haut.
• Montez maintenant une roue motrice
(6)
sur le réducteur.
• Glissez une rondelle
(14)
sur l‘essieu arrière.
• Fixez le tout à l‘aide d‘un Goupille
(13)
. A l’aide d’une
pince tordez le bout de la goupille.
• Enfin, placez un couvercle
(4)
sur la roue.
• Répétez l‘opération de l‘autre côté.
IT
1. Montaggio delle ruote posteriori.
•
Sistemare la carrozzeria con la parte inferiore rivolta
verso l‘alto.
•
A questo punto montare una ruota motrice
(6)
sul
ingranaggio.
•
Spingere una rondella
(14)
sull‘asse posteriore.
•
Fissare il tutto con un Spalato spina
(13)
. Con l‘aiuto di
una pinza può piegare la coppiglia.
•
Infine, applicare un coperchio
(4)
sulla ruota.
•
Ripetere l‘operazione sull‘altro lato.
ES
1. Montaje de ruedas traseras.
•
Coloque la carrocería con la parte inferior hacia arriba.
•
A continuación, montar una rueda motriz
(6)
en el
engranaje.
•
Deslizar una arandela
(14)
sobre el eje trasero.
•
Fijar todo con una Pasador
(13)
. Con
el ayudo de una pinza deformar el final del pasador.
•
Por último, coloque una tapa
(4)
a la rueda.
•
Repita la operación en el otro lado.
CZ
1. Montáž zadních kol
•
Umístěte tělo dnem vzhůru
•
Nasaďte hnací kolo
(6)
na převodovku.
•
Nasuňte podložku
(14)
na zadní nápravu.
•
Celé to zafixujte závlačkou
(13)
.
Pomocí kleští ohněte konec závlačky.
•
Nakonec nasaďte na kolo kryt
(4)
.
•
Opakujte na druhé straně.
PL
1. Montaż tylnych kół.
•
Połóż ciało do góry nogami
•
Założyć koło napędowe
(6)
na skrzynię biegów.
•
Nasuń podkładkę
(14)
na tylną oś.
•
Całość przymocuj zawleczką
(13)
. Za pomocą
szczypiec zagnij koniec zawleczki.
•
Na koniec załóż osłonę
(4)
na koło
•
Powtórz po drugiej stronie.
NL
1. Montage van de achterwielen.
•
Plaats het lichaam ondersteboven
•
Plaats een aandrijfwiel
(6)
op de versnellingsbak.
•
Schuif een ring
(14)
op de achteras.
•
Zet het geheel vast met een splitpen
(13)
.
Buig het uiteinde van de splitpen met een tang.
•
Plaats tot slot een hoes
(4)
op het wiel
•
Herhaal aan de andere kant.
SK
1. Montáž zadných kolies.
•
Položte telo hore nohami
•
Nasaďte hnacie koleso
(6)
na prevodovku.
•
Nasuňte podložku
(14)
na zadnú nápravu.
•
Celé to zafixujte závlačkou
(13)
. Pomocou klieští ohnite
koniec závlačky.
•
Nakoniec nasaďte na koleso kryt
(4)
.
•
Opakujte na druhej strane.


