4
DE
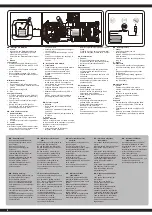
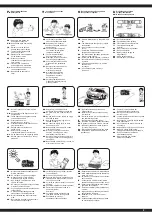
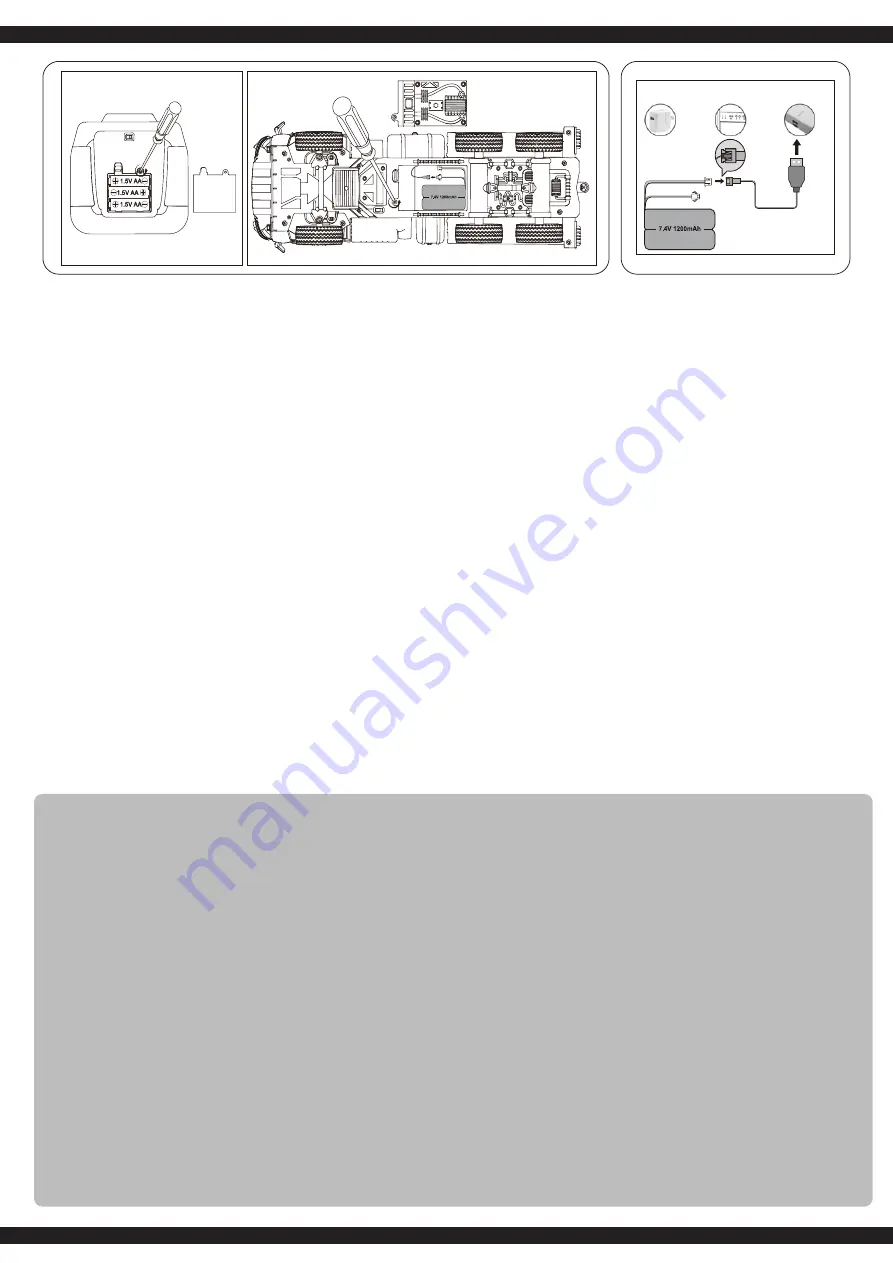
- Einlegen der Batterien
1. Sender
• Nehmen Sie den Batteriefachdeckel ab.
• Legen Sie 3 x AA Batterien ein, achten
Sie auf die richtige Polung.
• Setzen Sie den Batteriefachdeckel wieder
auf.
2. Modell
Ladevorgang
•
Stecken Sie den USB-Stecker des Lade
kabels in die USB-Buchse ihres PC’s. LED
leuchtet.
•
Klemmen Sie den Fahrakku an das Lade
gerät. LED blinkt.
•
Akku vollständig geladen. LED erlischt.
Die Ladezeit beträgt bei entladenem Akku
ca 3 Stunden.
GB
- Insert the batteries
1. Transmitter
• Remove the battery compartment cover.
• Fit the 3 x AA batteries, observe the correct
polarity.
• Replace the battery hatch
2. Car
Charging the battery
•
Plug the USB cable into your USB jack of
your PC and plug the battery pack into it.
LED lights up.
•
Connect the drive battery to the charger.
LED flashes.
•
Battery fully charged. LED goes out.
The charging time by completely dischar
ged battery pack about 3 hours.
FR
- Mise en place des piles
1. Radiocommande
• Retirez le couvercle de la batterie.
• Insérer les piless 3 x AAA, respectez la
polarité.
• Remplacer le couvercle du compartiment.
2. Voiture
Charge de la batterie
●
Branchez la prise USB du câble et rechar
gez sur la prise de votre ordinateur. et con
nectez votre accu au chargeur.
La LED s‘allume.
•
Connecte l‘accu de propulsion au chargeur.
La LED clignote.
•
L‘accu est complètement chargé. La LED
s‘éteint.
Pour un accu complètement déchargé, le
temps de charge est entre
3 heures.
IT
- Inserimento delle batterie
1. Trasmittente
• Togliere il coperchio del scomparto batterie.
• Inserire
3 x AA
batterie nella giusta
posizione, facendo attenzione ai poli.
• Rimettere il coperchio del scomparto
batterie.
2. Macchina
Ricarica della batteria
•
Inserire il connettore USB del cavo di ricari
ca alla porta USB del PC e collegate il
accu mulatore con la spina del caricabatte
rie.
Il LED si accende.
•
Collegare la batteria dell‘unità al caricatore.
Il LED lampeggia.
•
Batteria completamente carica. Il LED si
spegne.
Il tempo medio di ricarica della batteria
(se completamente scarica) è di 3 ore.
ES
- Colocar las pilas
1. Emisora
• Retire la tapa del compartimiento de la
batería.
• Coloque 3 x AAA baterías, respetando la
polaridad.
• Reemplace la tapa del compartimiento de
la batería.
2. Coche
Carga de la batería
Enchufe el conector USB del cable de carga
en el puerto USB de su ordenador y conecte el
acumulador al conector del cargador.
El LED se ilumina.
•
Conecte la batería de la unidad al
cargador. El LED parpadea.
•
Batería completamente cargada. El LED se
apaga.
El tiempo de carga, para una battería-total
mente de scargada, oscilará entre 3 horas.
CZ
- Vložení baterií
1. Funkce:
• Sundejte krytku bateriového prostoru.
• Vložte
3 x AA
baterii se správnou polaritou.
• Dejte zpět kryt bateriového prostoru.
2. Model:
Proces nabíjení
•
Zasuňte zástrčku USB nabíjecího kabelu
do zásuvky USB počítače Rozsvítí se
kontrolka LED.
•
Připojte pohonnou baterii k nabíječce. LED
dioda bliká.
•
Kontrolka LED plně nabité baterie zhasne.
Doba nabíjení při vybitém akumulátoru je
přibližně 3 hodiny.
PL
- Zakładanie baterii
1. Funkcje pilota
•
Zdejmij pokrywę komory baterii.
•
Włóż
2 x baterie AA
, upewniając się, że
polaryzacja jest prawidłowa.
•
Załóż pokrywę schowka na baterie.
2. Model
Proces ładowania
•
Włóż wtyczkę USB kabla ładującego do
gniazda USB w komputerze.
•
Podłącz akumulator napędowy do
ładowarki. Dioda LED miga.
•
Dioda LED w pełni naładowanej baterii
gaśnie.
Czas ładowania wynosi ok. 3 godzin przy
rozładowanej baterii.
NL
- Batterij plaatsen
1. Zender
• Verwijder het deksel van het
batterijcontainer.
• Plaats 3 x AA-batterijen en let daarbij op de
juiste polariteit.
• Plaats het deksel van het batterijcontainer
terug op.
2. Model
Oplaadproces
•
Steek de USB-stekker van de oplaadkabel
in de USB-aansluiting van uw PC LED licht
op.
•
Sluit de aandrijfbatterij aan op de lader.
LED knippert.
•
LED-lampje batterij volledig opgeladen
gaat uit.
De oplaadtijd bedraagt ongeveer 3 uur met
een lege batterij.
SK
Vloženie batérií
1. vysielač
•
Odstráňte kryt priestoru pre batérie.
•
Vložte 3 x batérie AA, pričom dbajte na to,
aby ste
uistite sa, že je polarita správna.
•
Vymeňte kryt priestoru pre batérie.
späť na.
2. model
Nabíjanie
•
Zasuňte zástrčku USB nabíjacieho kábla
do zásuvky USB počítača. LED dióda sa
rozsvieti.
•
Pripojte pohonnú batériu k nabíjačke. LED
bliká.
•
Batéria je plne nabitá. LED dióda zhasne.
Čas nabíjania pri vybitej batérii je približne
3 hodiny.
DE
-
Batteriehinweis:
Nicht wiederaufladbare Batterien
dürfen nicht aufgeladen werden!
Nicht öffnen!
Nicht ins Feuer werfen!
Alte und neue Batterien nicht
mischen!
Keine alkalischen, Standard-
(Kohlenstoff-Zink) oder wiederauf
-
ladbare Batterien mischen!
Aufladbare Batterien sind aus dem
Spielzeug herauszunehmen,
bevor sie geladen werden!
Aufladbare Batterien dürfen nur
unter Aufsicht Erwachsener
geladen werden!
GB
-
Battery warning:
Non-rechargeable batteries are not
to be recharged! Do not open!
Do not dispose of in fire!
Do not mix old and new batteries!
Do not mix alkaline batteries, stan-
dard (carbon-zinc) or rechargeable
batteries!
Rechargeable batteries are to be
removed from the toy before being
charged!
Rechargeable batteries are only to
be charged under adult supervision!
The supply terminals are not to be
short-circuited!
FR
-
Indications relatives aux
piles:
Les batteries non rechargeables ne
doivent pas être rechargées!
Ne pas ouvrir! Ne pas jeter au feu!
Ne pas utiliser des piles neuves et
usées à la fois!
Ne pas utiliser en même temps
des piles alcalines, standard (zinc-
charbon) et des accumulateurs!
Les piles rechargeables doivent être
retirées du jouet!
Les batteries rechargeables ne
peuvent être rechargées que
sous la surveillance d‘un adulte!
Les connexions ne doivent pas être
court-circuitées!
IT
-
Avvertenza sulle batterie:
Le batterie non ricaricabili non devo-
no essere caricate!
Non aprire! Non gettare nel fuoco!
Non usare contemporaneamente
pile nuove e pile usate!
Non usare contemporaneamente
pile alcaline, standard (zincocarbo-
ne) e ricaricabili!
Le batterie ricaricabili devono esse-
re rimosse dal giocattolo!
Le batterie ricaricabili possono esse-
re ricaricate solo sotto la
supervisione di un adulto!
I morsetti di collegamento don devo-
no essere cortocircuitati!
ES
-
Advertencia sobre las
baterías:
Las baterías no recargables no se
pueden cargar!
No abrir! No arrojar al fuego!
No mezcle baterías nueva y viejas!
No mezcle baterías alcalinas,
estándar (carbono-zinc) o baterías
recargables!
Las baterías recargables deben
retirarse del juguete!
Las baterías recargables sólo
pueden cargarse bajo la supervisión
de un adulto!
Los conectores de conexión no
deben estar en cortocircuito!
CZ
-
Informace ohledně
akumulátoru:
Nenabíjejte jednorázové baterie!
Neotvírejte! Nevhazujte do ohně!
Nedávejte dohromady staré a nové
baterie.
Nedávejte dohromady alkalické a
standardní (carbon-zinc) nebo
nabíjecí baterie.
Před nabíjením vyjměte nabíjecí
baterie z hračky!
Nabíjecí baterie lze nabíjet pouze
pod dohledem dospělé osoby!
Nezkratujte připojovací svorky!
PL -
Informacja dotycząca
akumulatora:
Nie ładować baterii jednorazowego
użytku!
Nie otwierać! Nie wrzucać do ognia!
Nie mieszać starych i nowych
baterii.
Nie mieszać baterii alkalicznych,
zwykłych (węglowocynkowych)
lub akumulatorowych/ ładowalnych
– używać baterii jednego rodzaju.
Przed rozpoczęciem ładowania
należy wyjąć akumulatorki z
zabawki!
Akumulatorki można ładować tylko
pod nadzorem osoby dorosłej!
Nie wolno zwierać zacisków
przyłączeniowych!
NL
-
Gegevens betreffende de
accu:
Laad geen wegwerpbatterij op!
Niet openen!
Niet in het vuur werpen!
Gebruik geen oude en nieuwe
battijen tegelijkertijd.
Gebruik geen alkaline batterijen,
standaard (zinkkoolstof) of
oplaadbare batterijen tegelijkertijd
Verwijder de batterijen uit het speel-
goed voordat het wordt opgeladen!
Laad de batterijen op enkel onder
toezicht van een volwassene!
Voorkom kortsluiting van de aanslui-
tingsklemmen!
SK
-
Informácia ohľadom
akumulátora:
Nenabíjajte jednorazové batérie!
Neotvárajte! Nehádžte do ohňa!
Nepoužívajte staré a nové batérie
súčasne!
Nepoužívajte alkalické, štandardné
(zinkovo-uhlíkové) batérie a
akumulátory súčasne!
Pred začatím nabíjania vyberte ba
-
térie z hračky!
Batérie je možné nabíjať len pod
dohľadom dospelej osoby!
Nezvierajte pripojovacie svorky!


