background image

2

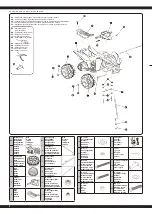
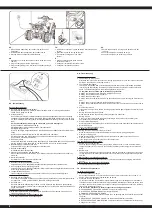
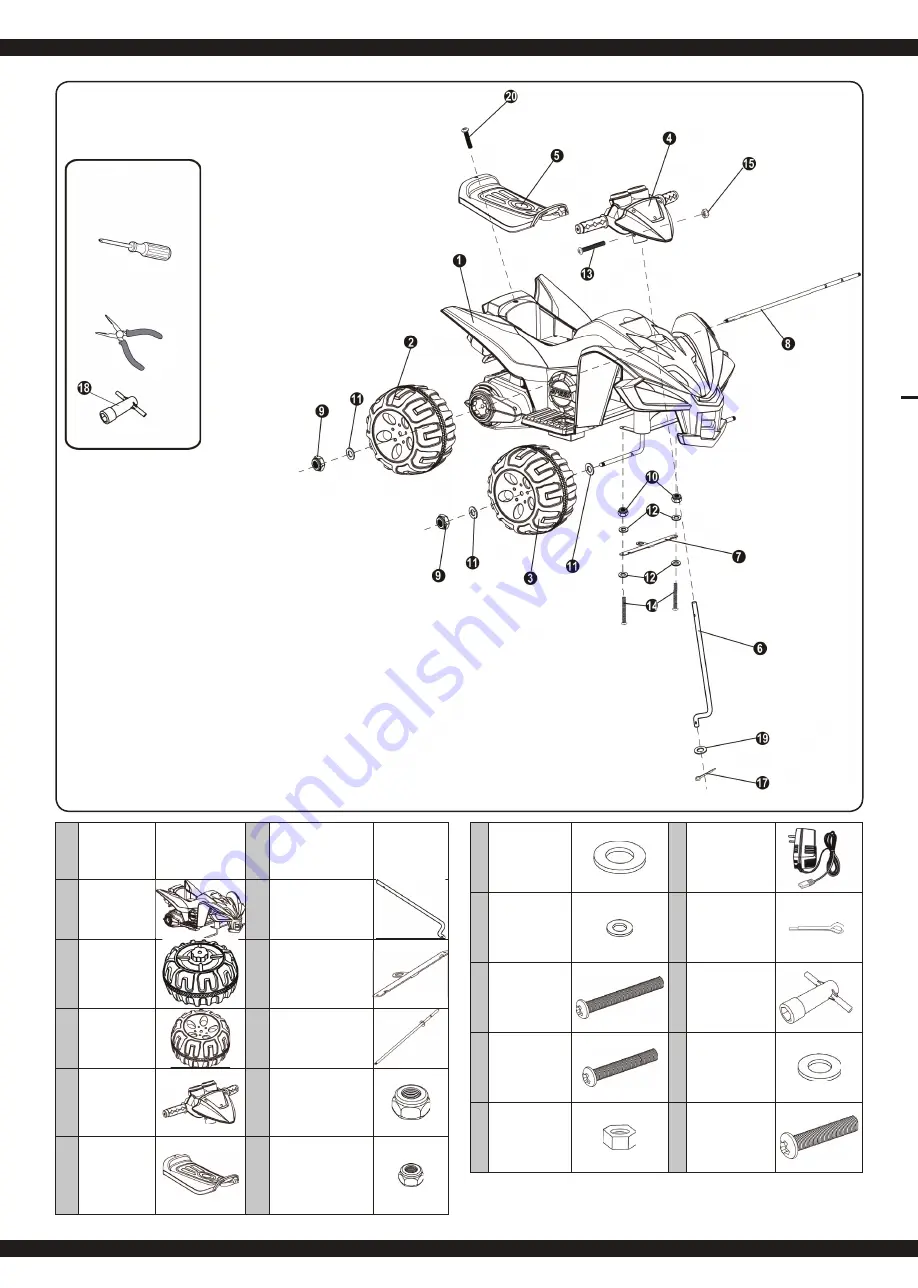
DE - Teile | GB - Parts | FR - Pièces | IT - Parti | ES - Partes

DE - 

Einige Teile der Montage müssen links und rechts montiert werden.

GB - 

Some parts shown are assembled on both sides of vehicle

FR - 

Certaines pièces doivent êtres montées à droite ou à gauche lors de l’assemblage.

IT - 

Alcuni parti del montaggio devono essere montati a sinistra e a destra.

ES - 

Algunas partes del montaje tienen ser montado en la parte izquierda y derecha.

DE - 

Schraubenzieher 

        (nicht enthalten)

GB - 

Screwdriver (not included)

FR - 

Tournevis (pas inclus) 

IT - 

Cacciaviti (non incluso)

ES - 

Desarmadora


(no incluye)

DE - 

Zange(nicht enthalten)

GB - 

Pliers (not included)

FR - 

Pinces (pas inclus) 

IT - 

Pinze (non incluso)

ES - 

Pinzas


(no incluye)

No. 

Bezeichnung

Description

Désignation 

Designazione

Designación

Bild

Picture

Image

Immagine

Imagen

No. 

Bezeichnung

Description

Désignation 

Designazione

Designación

Bild

Picture

Image

Immagine

Imagen

1

Chassis

Chassis

Chassie

Chassis

Chásis

6

Lenksäule

Steering shaft

Arbre de direction 

Albero dello sterzo

Del eje de dirección

2

Antriebsrad

Driving wheel

Roue 

d‘entraînement

Ruota motrice

Rueda motriz

7

Vorderachse

Front axle 

Axe avant

Asse anteriore

Eje delantero

3

Rad

Wheel

Roue 

Ruota

Rueda

8

Hinterachse

Rear axle

Axe arrière

Asse posteriore

Eje posterior

4

Lenker

Handle bar

Guidon

Manubrio

Manillares

9

Ø 10 mm

Sicherungsmutter

Locknut

Écrou de blocage

Dado di bloccaggio

Tuerca de seguridad

5

Sitz

Seat

Siège

Sedile

Asiento

10

Ø 5 mm

Sicherungsmutter

Locknut

Écrou de blocage

Dado di bloccaggio

Tuerca de 

seguridad

11

Ø 12 mm

Unterlagscheibe

Washer

Rondelles

Rondelle

Arandela

16

Ladegerät

Charger

Chargeur

Caricatore

Cargador

12

Ø 5 mm

Unterlagscheibe

Washer

Rondelles

Rondelle

Arandela

17

Splint
Split pin
Goupille
Spalato spina
Pasador

13

M5 x 35

Zylinderschraube

Machine screw

Vis à machine

Macchina a vite

Máquina tornillo

18

Schraubenschlüssel
Spanner
Clé plate
Chiave inglese
Llave inglesa

14

M5 x 14

Zylinderschraube

Machine screw

Vis à machine

Macchina a vite

Máquina tornillo

19

Ø 10 mm

Unterlagscheibe

Washer

Rondelles

Rondelle

Arandela

15

Ø 5 mm

Mutter

Nut

Ecrou

Dado

Tuerca

20

M5 x 12

Zylinderschraube

Machine screw

Vis à machine

Macchina a vite

Máquina tornillo

Summary of Contents for Quad 12 V

Page 1: ...nformation can also be found at www jamara shop com Conformity FR D claration de conformit Par la pr sente la soci t Jamara e K d clare que le mod le r duit Quad 12 V No 404640 est conforme en tous po...

Page 2: ...rzo Del eje de direcci n 2 Antriebsrad Driving wheel Roue d entra nement Ruota motrice Rueda motriz 7 Vorderachse Front axle Axe avant Asse anteriore Eje delantero 3 Rad Wheel Roue Ruota Rueda 8 Hinte...

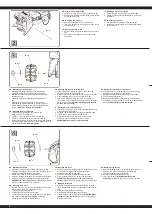
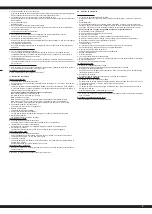
Page 3: ...do y llaves DE Montage GB Assembly FR Assemblage IT Montaggio ES Montaje DE Vorderachse Stellen Sie die Karosserie 1 mit der Unterseite nach oben Entfernen Sie alle Teile von der vorderen Achsplatte 7...

Page 4: ...asse posteriore 8 Fissare con un dado autobloccante 10 9 Ripetere questo processo per l altra ruota sull asse posteriore Tirare il dado 9 su tutte due le parti ATENZIONE Non stringere eccessivamente...

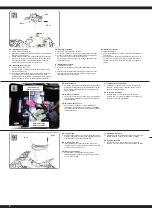
Page 5: ...ben und einen Splint 17 in das Loch der Lenkachse 6 einsetzen Mit Hilfe einer Zange verbiegen Sie das Ende des Splints GB Steering shaft assembly Turn the vehicle body 1 on its side Insert the straigh...

Page 6: ...a tuercas 5 10 en el agujero central No 4 No 10 No 13 No 6 DE Akkuanschlu Verbinden Sie alle Steckverbindungen wie abgebildet Stecken Sie nur passende Steckverbindungen ineinan der Die Motoranschl sse...

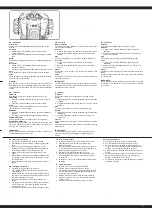
Page 7: ...el interruptor ON OFF 2 se enciende o apaga Adelante 1 Primir el bot n Forward Backward 3 en la posici n Forward 2 Presione el pedal de gas 4 de modo que el veh culo se mueve hacia adelante Stop El v...

Page 8: ...zur Besorgnis GB Troubleshooting The vehicle does not run The battery may low on power After each use or once a month minimum charge the battery for a full 10 hours Do not leave the battery on the ch...

Page 9: ...che i connettori di batteria e adattatori sono connettati bene Il caricatore non e collegato correttamente Assicurarsi che il caricatore sia collegato alla presa di corrente e se passa corrente Carica...

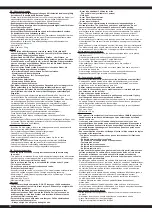
Page 10: ...et up during the ride Never take additional Children for a ride The vehicle is only suitable for 1 person Hold tight Never ride without a helmet Never drive without shoes Never drive in the dark The m...

Page 11: ...di adulti Il pacco batteria fornito non caricato Caricatelo prima dell uso Non caricare il pacco batteria subito dopo l uso del modello Fare raffreddare il pacco batteria prima della carica Evitare i...

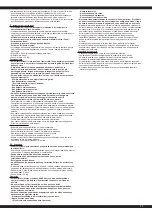
Page 12: ...0 Fax 07432 2009594 Mail info modellbauversand de Web www modellbauversand de Extra Trade Rudolf M ller Gerrit M ller GdbR Lindenstra e 82 66787 Wadgassen Tel 06834 9604952 Fax 06834 9604963 Mail info...

Reviews: