6
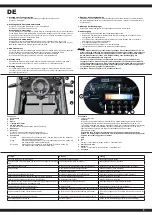
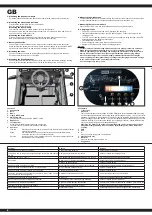
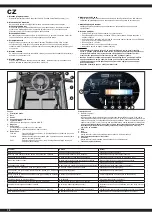
Functions
1. Soundboard
2. Horn
3. Music
4. Light ON/OFF/Siren
5. ON/OFF-Switch
you can start the Modell with the ON/OFF switch
6. Megaphone
7. Throttle pedal
Press the accelerator pedal to make the model move.
Take your foot off the accelerator and the model stops.
8. Gear lever
Forward:
Move the gear lever to the „D“ position. Press the accelerator pedal so that the
model moves forward.
Stopp:
The model stops as soon as the foot is lifted from the accelerator pedal.
Set the the gear lever to the neutral position (P).
Reverse:
Set the gear lever to the „backward“ position. Press the accelerator pedal so
that the model moves backwards.
Soundboard
1.
Voltage disply
Attention!
Your vehicle displays the total voltage of the two batteries in volts immediately after switching
on. The fully charged batteries will usually display a total voltage of approx. 12.6-13 (blue) volts
unloaded. The display is load dependent. This means that the displayed voltage will drop under
load. If a voltage of less than approx. 11.8V (red) is displayed in the unloaded state, you should
switch off the Ride-on and charge the battery (see charging procedure). Otherwise the battery
may be deeply discharged and irretrievably damaged.
Otherwise, the battery may become deeply discharged and be irretrievably destroyed.
A deeply discharged battery is not covered by the warranty and must be replaced at
a charge.
2. USB
3. Aux
4. V-
Press = previous, long press = Volume down
5. Story/pause & play
6. Music/V+
Press = Next, long press = Volume up
7. Song button
2
3
4
5
6
7
8
1
1
2
4
5
6
7
3
GB
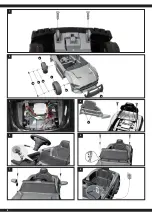
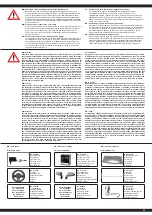
1. Mounting the transport wheels
Screw the transport wheels to the back of the model with the corresponding screws (13).
2. Mounting the wheels and bull bars
First insert the bull bars into the front of the model.
Remove all parts from the axles.
Mounting the front wheels
To mount the front wheels, slide a washer (14) onto the front axle.
Put a wheel on the axle and slide another washer onto it. Fix the whole thing with a nut (15)
and finally put on a wheel cover (16).
Mounting the drive wheels
Slide a drive wheel (8) and a washer (14) onto the rear axle. Secure it with a nut (15).
Now put the wheel cover (16) on the wheel. Repeat on the other side.
3. Battery connection
Connect all plug connections as shown. Only connect connectors that fit into each other.
Make sure that the polarity is not reversed. Check the power supply by pressing the ON/OFF
switch on the model. When the power supply is working, you will hear a motor noise.
4. Mounting the seat
Position the seat on the body by inserting the pegs at the back of the seat into the body.
Screw it down with two M4 x 12 (13) screws.
5. Mounting the Steering Wheel
Connect the cable from the steering wheel to the cable on the dashboard. Install the steering
wheel (3) in the intended position and secure it with the locking screw and nut (17).
6. Mounting the windscreen
First connect the cable from the windscreen to the cable from the model. Push the windscreen
into the intended position until it clicks into place and secure it with screws (13).
7. Mounting the rear view mirrors
Press the rear view mirrors into the intended position until they click into place.
8. Charging process
•
The power swich must be turned in OFF position when charging.
•
Insert the charger into the socket - the LED lights up green. Connect the charger to the
charging
socket.
•
The LED on your charger lights up red as long as the battery is being charged. If the LED
lights green again, the battery is fully charged.
•
The charge time is 10 hours.
•
Do not charge the battery more than once within 24 hours.
•
Charger and battery heat up during the charging process.
Warning!
•
Let the model cool off sufficiently after each use before putting it back into operation.
When using an additional batteries let it cool off for minimum 15 minutes until the
model is operated again. Overheating can damage the electronics or may result in fire.
•
Always disconnect the model from the charger immediately after charging. Always
disconnect the charger from the power supply immediately after disconnecting the
model. Inserting the rechargeable model or charger after charging will result in damage
to the model, charger or the power supply (fire hazard).
•
Use the charger only in dry rooms.
Problem
Source
Solution
The battery can no longer be charged
Carger or battery defective.
Check charger and battery
The battery can no longer be charged although the battery and charger
are OK.
Charging socket defective (if present)
Check or replace the charging socket.
The journey time is very short.
The battery has been deep discharged or is worn out.
Use a new battery and avoid deep discharge.
No function
Battery is not or incorrectly connected.
Connect the battery (see instructions)
ON/OFF switch defective.
Check or replace switch.
Can be switched on but does not drive.
Motor cable incorrectly connected or not connected.
Check and connect motor cable (see instructions).
Can be switched on but does notmove, or only direction.
Gas or direction switch defective.
Check or replace switch.
Can be switched on but only travels in one direction.
Directional switch defective.
Check or replace switch.
The active fuse blows and switches the unit off for a few seconds. You will
hear a single click at the beginning
Oberload or electrical short circuit.
Do not overload or have the until checked.
Vehicle does not respond to remote control
Not bound.
Carry out the binding process (see instructions).
No sound function on the steering wheel/andlebar
the cable was torn or crushed during assembly.
Check or replace the steering wheel.
Vehicle has very high wear on switches.
Dirt and moisture damage the switches.
Do not drive in moisture or dirt such as meadows, gavel, sand, etc.
The rubber tyres come loose on the wheels
Ridden on too hot a surface or in dirt.
Change tyres and avoid hot surfaces and dirt.
Wheel keeps falling off the axle.
Mounted incorrectly.
Check that the wheel is properly engaged (see instructions).


