background image

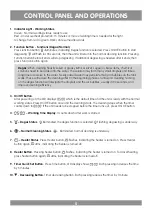
1.  Indicator Light - Working Status.  

Green - Normal working status, ready to use.

  Red - Under overheat protection. 15 minutes or more of waiting time is needed for the light  

to change from red to green. Work can resume afterwards.

2.  Function Button - Functions (Degas/Normal).  

Press function button, 


illuminates, indicating Degas function is selected. Press On/Off button to start 

degassing. 


will flash for 90 seconds, then the unit will return to the normal cleaning function. Pressing 

Function button before it ends will stop degassing. If additional degassing is needed after it ends, then 

press Function button again.

3.  On/Off Button. 


After powering on, the LED displays 

 which is the default time and the unit is ready with the normal 

working status. Press On/Off button once and the cleaning starts. The cleaning stops when the timer 

counts down to 

. If the unit needs to be stopped before the timer runs out, press On/Off button.

4. 

  – Working Time Display. 

It counts down after work is started.

5.       – Degas Status.    

Illuminated, the degas function is selected. 


Flashing, degassing is underway.

6.        – Normal Cleaning Status.    

– Illuminated, normal cleaning is underway.

7.        – Heater Status. 

Press Heater button,   flashes, indicating the heater is turned on. Press Heater 

button again,   dims, indicating the heater is turned off.

8.  Heater Button. 

Pressing heater button,   flashes, indicating the heater is turned on. To cancel heating, 

press heater button again,   dims, indicating the heater is turned off.

9.  Timer Quick Set Button. 

Press Time button, LED display shows 

. Each pressing increases the time 

by 5 minutes.

10.   - Decreasing Button. 

Timer decreasing button. Each pressing reduces the timer by 1 minute. 

5

CONTROL PANEL AND OPERATIONS

Degas:

 When cleaning heavily soiled or greasy items or silver, copper or brass items, chemical 

solutions need to be added into the water. The solution may form many small droplets and take a 

long time to dissolve in the water. Newly added water may generate many air bubbles on the tank 

walls. These will reduce the cleaning effect in the beginning phase of ultrasonic cleaning. Turning 

on the degas function will dissipate the droplets and the air bubbles, usually in 90 seconds, and 

improve cleaning efficiency.

Summary of Contents for ULTRA 8051

Page 1: ...heater Ceramic heater 100W 65 C temperature limited Multiple circuit protectors When overloaded or improperly used the protectors shut down the power to certain areas to protect the machine Cooling f...

Page 2: ......

Page 3: ...requency vibration The air bubbles burst when in contact with object and dislodge the debris to achieve the cleaning effect Using tap water is sufficient Purified water or distilled water has the same...

Page 4: ...nual to operate the device Do not use components unapproved by the manufacturer When removing the power cord from the socket grab the power plug not the cord To protect the power cord from damage do n...

Page 5: ...let when not in use and before servicing or cleaning To reduce the risk of electrical shock do not put the appliance in water or other liquid Do not place or store appliance where it can fall or be pu...

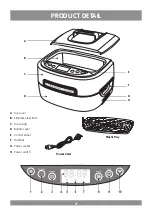
Page 6: ...4 PRODUCT DETAIL A Top cover B Stainless steel tank C Top casing D Bottom cover E Control panel F Handles G Power socket H Power switch A B C D E F G H Plastic Tray Power Cord...

Page 7: ...uminated the degas function is selected Flashing degassing is underway 6 Normal Cleaning Status Illuminated normal cleaning is underway 7 Heater Status Press Heater button flashes indicating the heate...

Page 8: ...es tools fuel injectors etc BABY ITEMS Toys baby items speech therapy tools etc SILVER COPPER OR BRASS Silverware silver copper or brass decorations etc LAB ITEMS Test tubes beakers flasks etc PCB INK...

Page 9: ...nt Disinfection Rooms Non disposable medical instruments may have blood or organic tissues left after use They need to be removed with ultrasonic cleaners before disinfection 4 Dental Clinics Dental c...

Page 10: ...consuming job Using ultrasonic cleaning with the Enhanced Cleaning method can improve the effectiveness and efficiency 10 Mobile Phone and Electronics Service Shops PCB renewal Non operational electr...

Page 11: ...wellery eyewear watch bands shavers or razors Ultrasonic cleaning can clean the debris in the crevices It is quick and convenient This model has a large tank When cleaning small items the Indirect Cle...

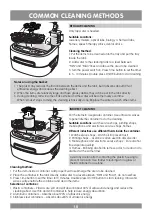
Page 12: ...elp reduce energy absorbtion 2 Aluminum containers Absorbs about 20 of ultrasonic energy 3 Stainless steel containers Absorbs about 8 of ultrasonic energy 10 COMMON CLEANING METHODS Only tap water is...

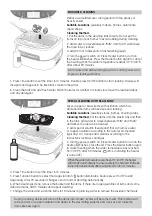
Page 13: ...then in the tank add water to a level between MIN and MAX and above the area to be cleaned 2 Add special solution SeaClean2 that can remove silver or copper oxidation according to the ratio recommende...

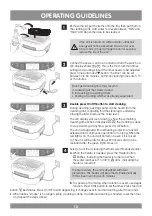
Page 14: ...or 15 minutes Prolonged cleaning time may result in a Loosening of the screws if used b Increasing pre existing cracks c Peeling of coating which was already separated Double press On Off button to st...

Page 15: ...ill be activated after approximately 15 minutes to ensure safety The unit will be disabled until it is repaired Do not run the unit for extended time or continuously The unit is designed with overheat...

Page 16: ...g your unit please call our Returns Department on 44 0 1258 822516 for a RMA Returns Materials Authorisation number Please return your unit in its original packaging along with a covering letter stati...

Reviews: