background image

M AX

M AX

M A X

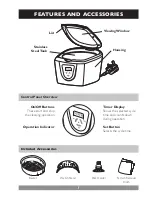
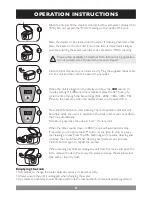
OPERATION INSTRUCTIONS

6

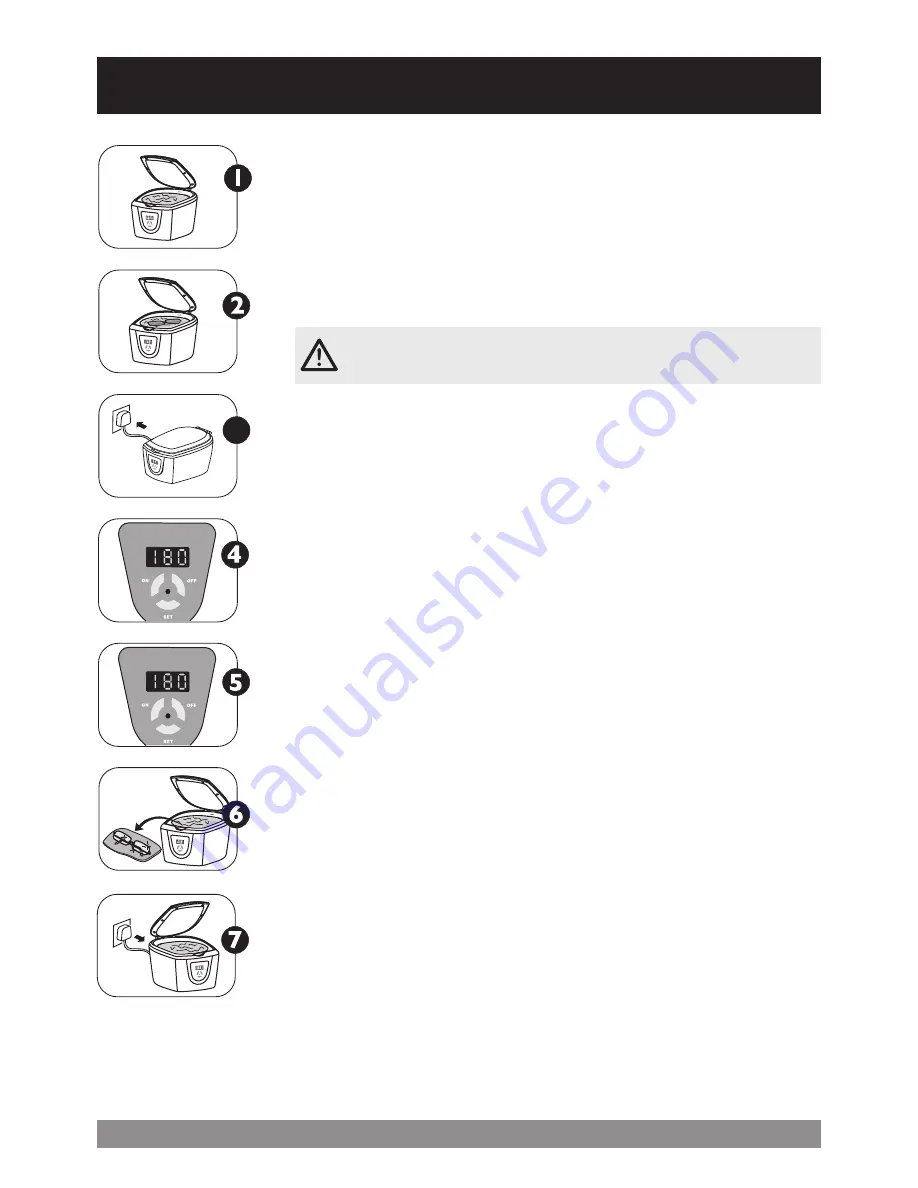
Open the lid and fill the stainless steel tank with warm water (ideally 45 to 

50°C). Do not exceed the “MAX” marking on the inside of the tank.

Place the item(s) to be cleaned into the water. If cleaning small items, then 

place the basket in the tank first. Ensure the item is immersed as fully as 

possible, ensuring the water level does not exceed the “MAX” marking.

To avoid the possibility of scratches from friction during operation, 

do not overlap items. Ensure items are spaced apart.

Close the lid and ensure your hands are dry. Plug the supplied mains cable 

into the unit and then into the nearest mains outlet.

When the unit is plugged in, the display will show the 

180

 second (3 

minute) setting. If a different time is required, press the SET button to 

cycle the time through the five settings 180s - 280s - 380s - 480s - 90s. 

Move to the next step when the display shows your required time.

Press the ON button to start cleaning. The red operation indicator will 

illuminate while the unit is in operation. The built in timer will count down 

the time automatically.

Note: During operation the unit will “buzz”, this is normal.

When the timer counts down to 000 the unit will automatically stop. 

If required, you can press the OFF button at any time to stop or pause 

the cleaning process. Press the ON button again to resume cleaning and 

continue the countdown. When cleaning has finished, you can press

the ON button again to repeat the process.

When cleaning has finished, unplug the unit from the mains and open the 

lid to remove the item. Pour away the water and wipe the stainless steel 

tank with a clean dry cloth.

3

Emptying the tank

• Remember to change the water between cycles as it becomes dirty.

• Always ensure the unit is unplugged when changing the water.

• Any waste concentrate should be disposed of via the local authority solvent disposal programme.

Summary of Contents for ULTRA 7000

Page 1: ...14 07 070 V1 USER GUIDE ULTRA 7 0 0 0 U LT R A S O N I C C L E A N E R...

Page 2: ...c cleaners are very easy to use although to get the best from your new purchase we recommend you read this User Guide before getting down to any serious cleaning It also contains important safety info...

Page 3: ...arnish Removal Cloth Housing Viewing Window Lid Stainless SteelTank Timer Display Shows the selected cycle time and counts down during operation Set Button Selects the cycle time On Off Buttons These...

Page 4: ...ur Do not exceed the MAX marking on the inside of the tank Always unplug the unit immediately after use and before emptying the liquid Do not operate the unit next to heat sources such as radiators Op...

Page 5: ...e the unit unattended when the heater is switched on Always unplug and clean the unit when left overnight Children should be supervised to ensure that they do not play with the appliance The product m...

Page 6: ...ntures etc Ensure that all items are waterproof and non porous Office equipment Printer heads printer cartridges fountain pen nibs wax or rubber stamps etc CDs DVDs Any CD VCD DVD pre recorded or CD R...

Page 7: ...n cleaning spectacles ensure that the lenses are free from any objects and are facing upwards As mentioned on previous page the coating on some spectacle lenses can exhibit hairline cracking during ul...

Page 8: ...s 380s 480s 90s Move to the next step when the display shows your required time Press the ON button to start cleaning The red operation indicator will illuminate while the unit is in operation The bui...

Page 9: ...den items or laminated glasses will be enlarged by ultrasonic cleaning It won t happened if the item is in perfect condition CLEANING METHODS General Cleaning Use normal tap water for general cleaning...

Page 10: ...the metal strap in immersed in the water It is not necessary to detach the watch housing from the strap attach the watch in such a way that the housing is outside the liquid Important If the watch me...

Page 11: ...harp objects Please clean the tank with a piece of cloth and wipe dry The unit should be stored in a cool dry place away from any heat sources radiators etc and sources of moisture bathrooms etc Ideal...

Page 12: ...g your unit please call our Returns Department on 44 0 1258 822516 for a RMA Returns Materials Authorisation number Please return your unit in its original packaging along with a covering letter stati...

Reviews: