


Page 50
1998-2006 Edition
Using a bottle brush, clean all surfaces you can reach in the compartment. It is important to work the bottle brush
in all directions. Lightly tap the walls of the inside walls of the ash compartment and the inside walls of the
firebox. Continue to tap until you can no longer see any fly ash drop. Thoroughly vacuum out this compartment.
Replace the Access Plate and the side and rear Brick Pattern Boards as before making certain that the plates
create a tight seal.
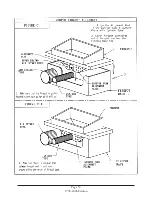
FIREBOX FLOOR EXHAUST CHANNEL (MODEL J1000B ONLY): See Figure C4. Remove the ashpan.
Located on the firebox floor, under the ashpan, are two round plates. These are the Access Plates to the Firebox
Floor Exhaust Channel. Lift up and remove these plates. Using a bottle brush, clean all surfaces you can reach
in the compartment. It is important to work the bottle brush in all directions; as far to the left and right sides as
possible. Push the vacuum attachment hose as far as possible to the front sides to clean the inner side bottom
channel shown in Figure C4. Thoroughly vacuum out this compartment. Replace the Access Plates as before
making certain that the plates sit flat on the firebox floor.
CAUTION: Installing these access plates with worn gaskets can cause room air to enter the heat exchanger
chambers causing excessively lazy burns in the firepot. Replace the gaskets under the heat exchanger access
plates every time these access plates are removed. Use only Jamestown authorized gasket material. Contact
the local Jamestown Dealer for the availability of gasket material.
EXHAUST SYSTEM: Inspect the spark arrester/ rain cap and clean any accumulated debris off the screen or
slots. Inspect and clean the Clean Out T connector, elbows and pipe as necessary. When reassembling cover
plates, caps or any vent system components that have been disassembled, reseal all joints with RTV red silicone
to ensure an air tight seal. Important: The spark arrester/rain cap should be inspected more often; especially
during the fall when leaves can get caught in the spark arrestor/rain cap openings.
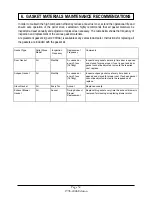
SEALS AND GASKETS: If at any time, the flame in the stove tends to "lick" toward the door glass excessively
or if the draft setting has to be increased significantly (as compared to before) to achieve a clean burn at a
particular fuel feed knob setting, the door gasket, ash pan gasket or glass gaskets may have come loose or
gotten worn down. Inspect the gasket on the door, ash pan and glass monthly and replace as needed. See
page 50 for gasket replacement schedules.
4. Once a Year
Caution
If you do not follow all of the above maintenance schedules, this pellet stove will not perform up its potential. High
Energy Manufacturing Ltd. will view this as misuse and abuse and will void all applicable warranties on your unit.
Once a year, clean the rear components compartment where all the motors and blowers are installed. Lint and dust
will collect in this compartment over time. Specifically, clean the blower impeller. Dust will collect on the vanes
causing the blower wheel to spin out of balance. An out of balance blower will cause excessive blower noise and
can cause premature failure of the motor bearings. If the interior of the home has been exposed to high levels of
dust particles [due to drywall repair or other remodeling] more frequent cleaning of the blower impeller may be
required.
Clean the blower wheel vanes by first loosening the built up dust by scrubbing lightly with an old tooth brush then
using a vacuum hose attachment to remove the dust.
NOTE: Blower motors that fail due to excessive dust buildup on the blower impeller will be viewed as misuse and/or
abuse and is not warranted.
Summary of Contents for J1000B
Page 2: ......
Page 8: ...Page vi 1998 2006 Edition ...
Page 16: ...Page 8 1998 2006 Edition ...
Page 20: ...Page 12 1998 2006 Edition ...
Page 36: ...Page 28 1998 2006 Edition ...
Page 44: ...Page 36 1998 2006 Edition ...
Page 45: ...Page 37 1998 2006 Edition ...
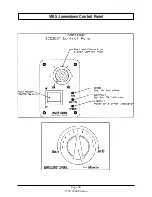
Page 46: ...VIII 5 Jamestown Control Panel Page 38 1998 2006 Edition ...
Page 61: ...Page 53 1998 2006 Edition ...
Page 62: ...Page 54 1998 2006 Edition ...
Page 63: ...Page 55 1998 2006 Edition ...
Page 64: ...Page 56 1998 2006 Edition ...
Page 69: ...Page 61 1998 2006 Edition ...
Page 70: ...Page 62 1998 2006 Edition ...
Page 79: ...Appendix A 3 1998 2006 Edition ...
Page 80: ...Appendix A 4 1998 2006 Edition ...
Page 81: ...Appendix A 5 1998 2006 Edition ...
Page 82: ...Appendix A 6 1998 2006 Edition ...
Page 84: ...Appendix B 2 1998 2006 Edition ...
Page 87: ...APPENDIX E AUGER MOTOR BRACKET INSTALLATION Appendix E 1 1998 2006 Edition ...
Page 90: ...Appendix F 3 1998 2006 Edition ...
Page 93: ...APPENDIX H J1000 CROSSFLOW FAN Part 07EEG Appendix H 1 1998 2006 Edition ...
Page 94: ...APPENDIX I 1 EXHAUST BLOWER ASSEMBLY MODEL J1000 Appendix I 1 1998 2006 Edition ...