


APPENDIX G
3 PIECE MITERED GLASS KIT
INSTALLATION
Appendix G-1
1998-2006 Edition
GLASS GASKET
03HAA
CENTRE GLASS
04AAB
SIDE
GLASS
04AAA
Warning
Proper care and safety must be followed when removing broken glass. Only use factory approved
replacement glass and gasket material.
Do Not Slam The Door
Caution
:
Do not attempt to clean glass while HOT! Allow sufficient time for cooling. Do Not Use Abrasive
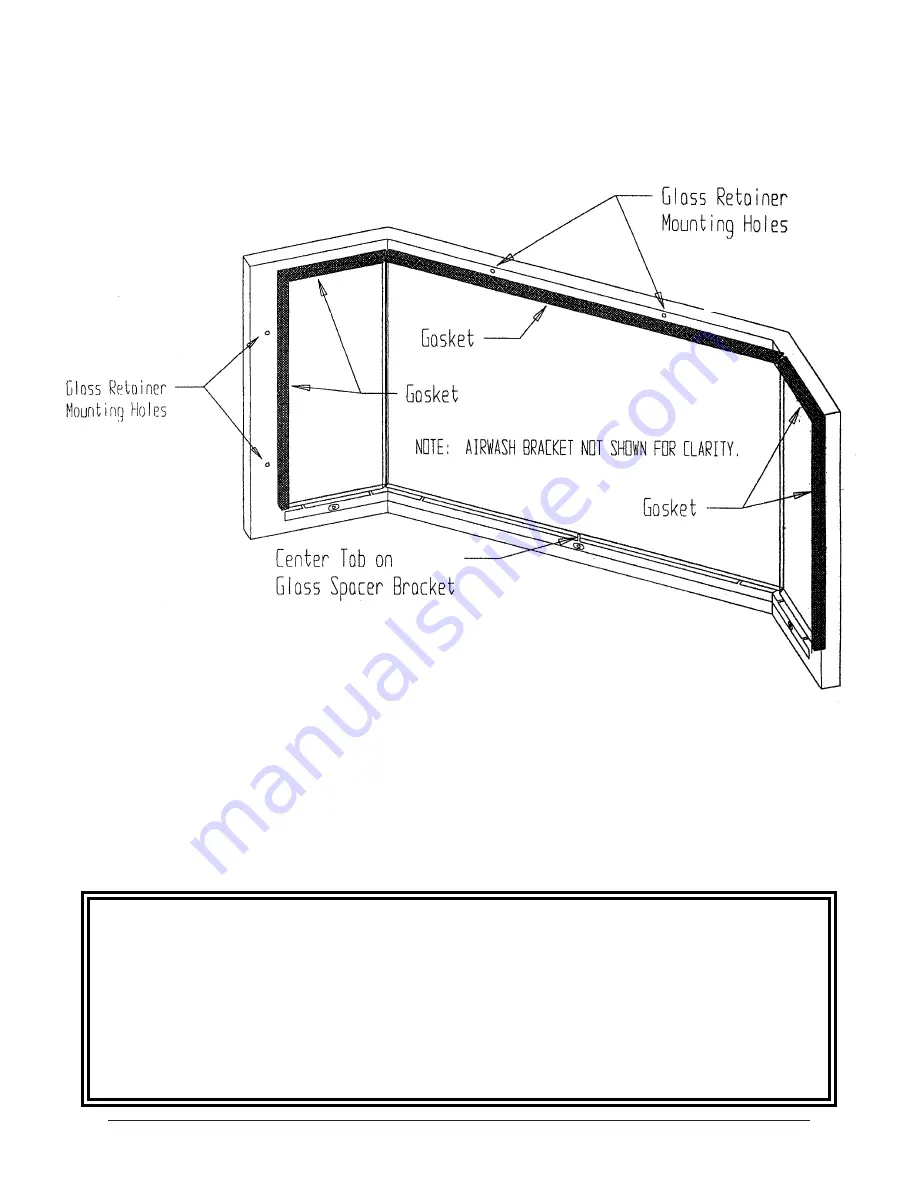
Step 1: After having installed the Glass Spacer Bracket and the “Airwash” Bracket on the windowsill,
wrap the outer edges of the pieces of glass as shown here with glass gasket material. Wrap each
glass piece using a separate piece of gasket.
Step 2: Place the larger center glass inside the doorsill cavity. Please note that the gasket must be
along the top edge of this glass piece. Also note that at the bottom, the glass must sit behind the
vertical center tab that is part of the glass spacer bracket.
Step 3: Place side glass piece inside the windowsill cavity. Please note that the mitered edge of these
two pieces must butt against the side edges of the center glass and the gasket material on these side
pieces must wrap around the outer and top edge.
(Step 4 on next page)
Summary of Contents for J1000B
Page 2: ......
Page 8: ...Page vi 1998 2006 Edition ...
Page 16: ...Page 8 1998 2006 Edition ...
Page 20: ...Page 12 1998 2006 Edition ...
Page 36: ...Page 28 1998 2006 Edition ...
Page 44: ...Page 36 1998 2006 Edition ...
Page 45: ...Page 37 1998 2006 Edition ...
Page 46: ...VIII 5 Jamestown Control Panel Page 38 1998 2006 Edition ...
Page 61: ...Page 53 1998 2006 Edition ...
Page 62: ...Page 54 1998 2006 Edition ...
Page 63: ...Page 55 1998 2006 Edition ...
Page 64: ...Page 56 1998 2006 Edition ...
Page 69: ...Page 61 1998 2006 Edition ...
Page 70: ...Page 62 1998 2006 Edition ...
Page 79: ...Appendix A 3 1998 2006 Edition ...
Page 80: ...Appendix A 4 1998 2006 Edition ...
Page 81: ...Appendix A 5 1998 2006 Edition ...
Page 82: ...Appendix A 6 1998 2006 Edition ...
Page 84: ...Appendix B 2 1998 2006 Edition ...
Page 87: ...APPENDIX E AUGER MOTOR BRACKET INSTALLATION Appendix E 1 1998 2006 Edition ...
Page 90: ...Appendix F 3 1998 2006 Edition ...
Page 93: ...APPENDIX H J1000 CROSSFLOW FAN Part 07EEG Appendix H 1 1998 2006 Edition ...
Page 94: ...APPENDIX I 1 EXHAUST BLOWER ASSEMBLY MODEL J1000 Appendix I 1 1998 2006 Edition ...


