background image

9

S P I K E S

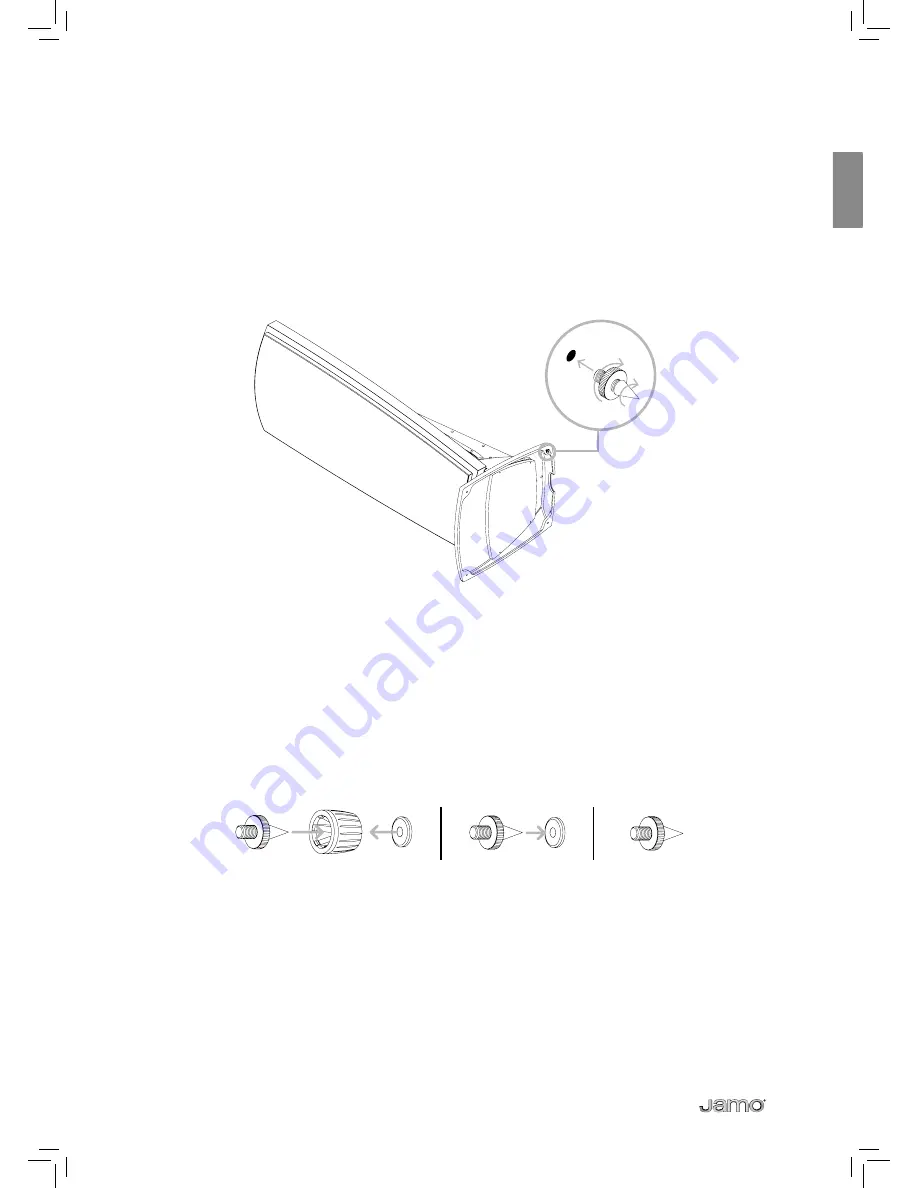
After the initial placement of the speakers it’s now time to screw in the spikes. Be-

cause of the weight of the R 909, we recommend that you gently lay it on one side 

and screw in all four spikes together. Before you do this, however, be sure to place 

a couple of thick towels or similar underneath the side of the speaker. This will pre-

vent accidental scratching to the surface of the R 909 and, equally importantly, will 

avoid you putting a rather large dent in your fl oor.

After screwing in the spikes, we recommend you fi t them with the hard rubber feet 

and the indented metal washers we’ve supplied. These will spare the fl oor from 

damage and allow you to gently bring the speaker to its vertical position. Once 

upright simply adjust the spikes to give optimal support.

Floor surfaces vary considerably so we have given you 3 different choices when it 

comes to spiking options. You can keep the hard rubber feet on the spikes, rest the 

spikes on the four indented metal washers, or place the spikes directly onto the 

fl oor. Always choose the option that gives the most stability for your speakers in 

your domestic environment.

Using the spikes without the hard rubber feet or indented metal washers will give 

the very best support and sound quality. If you want to spare your fl oor surface 

from being punctured however, the rubber feet or indented metal washers are a 

good compromise. Sonically, there’s really very little difference between them - use 

whichever one suits your fl oor surface better.

A warning: be careful when using the spikes with the indented metal washers - you 

don’t want to get your fi nger trapped between the two!

Whichever spiking option you choose, avoid “walking” the speakers if you need to 

move them to a different position… especially on hard wood fl oors!

2

1

Summary of Contents for R 909

Page 1: ...1 OWNERS MANUAL Jamo R 909...

Page 2: ...4 english...

Page 3: ...5 CONTENTS Introduction 6 Placement 7 Listening position 8 Spikes 9 Connecting 10 Front and back fabric covers 11 Cleaning 12 Specifications 12 The scope of the warranty 13...

Page 4: ...these speakers sound like Secondly it will give time for the speakers to run in the tonal quality of this design changes slightly after the first couple days of playing music Please remember the guid...

Page 5: ...s 10 degrees to the back wall will reflect the generated sound off your back and side walls which will give you the acoustic impression of a much larger room Also remember that a dipole speaker emits...

Page 6: ...er will cross each other at a point behind you IF YOUR ROOM a doesn t allow you to get the speakers the required distance from the back and side walls or b has highly reflective surfaces ie glass wind...

Page 7: ...s vary considerably so we have given you 3 different choices when it comes to spiking options You can keep the hard rubber feet on the spikes rest the spikes on the four indented metal washers or plac...

Page 8: ...e terminal jumpers before you connect up your loudspeaker cables BI AMPING In a bi amped system make sure you remove the terminal jumpers before con necting up your cables The top pair of terminals dr...

Page 9: ...o so gently in order to pre vent scratching or marking We recommend placing your hands level with the two top hooks on the front cover when lifting it for optimal balance Please note that the front fa...

Page 10: ...ofer In mm 2 x 15 2 x 380 Midrange In mm 5 150 Tweeter In mm 1 25 Short term power W Min 800 Sensitivity dB 2 8v 1 m 89 Frequency range Hz 25 30 000 Impedance Ohm 4 Crossover frequencies Hz 250 and 2...

Page 11: ...cts arising from incorrect installation or operation Defects arising from modification repair attempt of repair by a non authorised service centre Defects arising from the use of non original spare pa...

Page 12: ...14 www jamo com...

Reviews: