background image

basic


saw


operations

Familiarize yourself with the following functions of the 14" Metal Cutter before connecting it to a power source

and using it.

1. When starting this 14" Metal Cutter for the first time or after it has been idle for a while, always let the machine

run for one full minute with the blade completely recessed into the guard before making any cuts. If the

blade wobbles or vibrates, discard and replace it immediately.

2. When beginning a cut with the saw, care should be taken not to bump or slam the blade into the work.

Once it has entered, continue the cut with an even smooth stroke. The faster a cut is made the less heat is

created in the work piece preventing discoloring and blade life is prolonged. Cut with maximum force without

overloading the motor.

3. Use an independent support when cutting long, heavy pieces to prevent them from tipping the saw or falling down

after they are cut.

4. When transporting the saw, secure the motor mount to the base to prevent damage.

5. When blade comes up to full speed, pull the handle to begin cutting. It is important to cut with steady and even 

pressure (Do Not Force) in order to have consistent cuts.

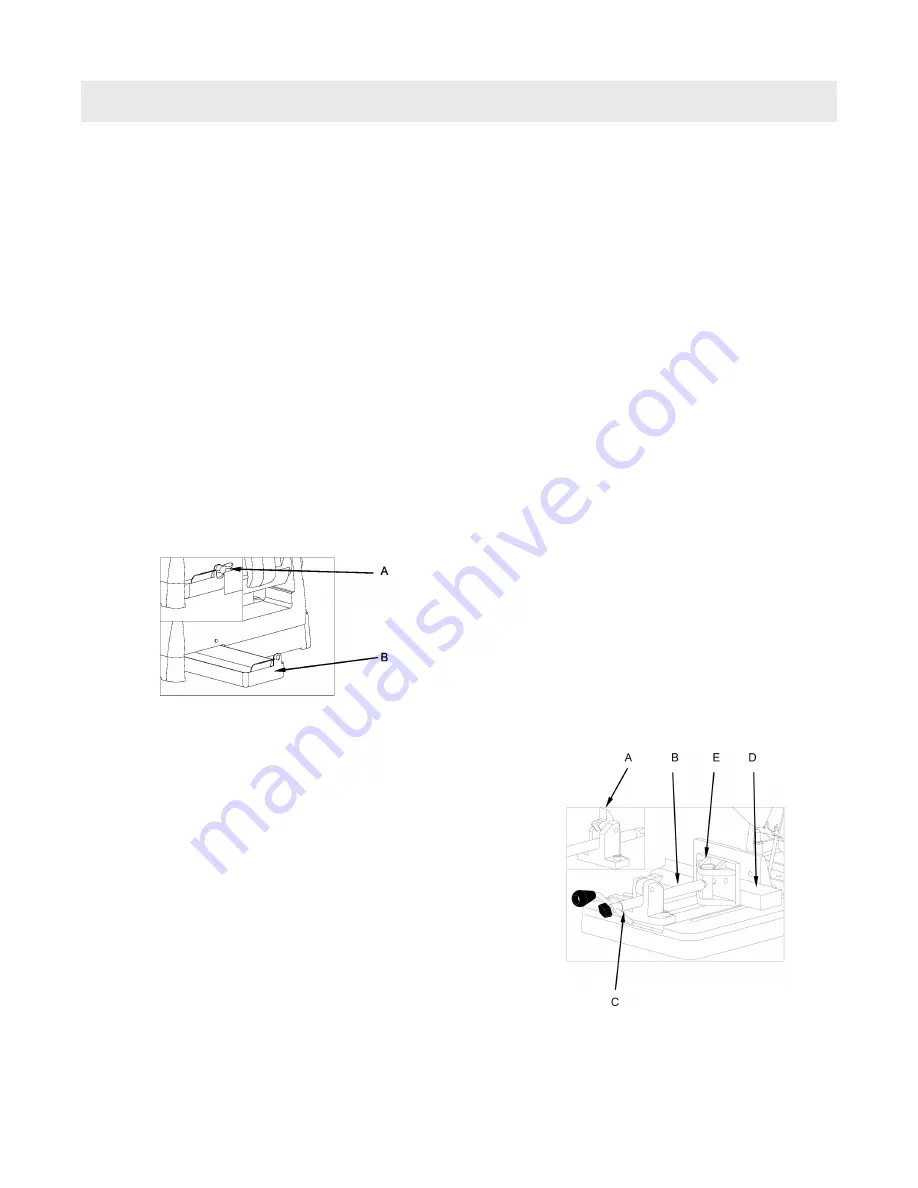
CLEAN CHIP COLLECTOR

Loosen the screw (A), take out the chip collector (B) and clear it. Put the chip collector (B) back and re-tighten the 

screw (A). 

THE QUICK VISE

Clamping the work piece can be accomplished quickly and easily as

follows:

1. Lift thread-nut (A)

2. Pull out screw handle (C) far enough to allow work piece (D) to be

placed in vise opening against rear vise jaw (E) as shown.

NOTE: It is not necessary to thread screw handle (C) when the

thread-nut (A) is in the raised position. The screw handle

(C) can be rapidly pulled out or pushed in.

3. Push screw handle (C) until front vise jaw (E) contacts the work

piece (D).

4. Flip thread-nut (A) over to engage vice screw (B) and tighten

screw handle (C) to securely clamp work piece (D) in the vise.

10

Summary of Contents for Slugger MCCS14

Page 1: ...F ROTATING MACHINE PARTS LINE VOLTAGE PRESENT NEVER PLACE FINGERS NEAR CUTTING AREA MODEL MCCS14 120V OR MCCS14 2 220V Serial Date of Purchase WARNING before use be sure everyone using this machine reads and understands all safety and operating instructions in this manual United States Patent 5 415 503 ...

Page 2: ...ineering Inc with in thirty 30 days of purchase date This warranty is void if tool is used on materials thicker than 5 8 9 5 mm solid for aluminum 1 2 8mm for mild steel or 5 16 6 mm for solid stainless steel has been damaged by acci dent neglect improper service or other causes not arising out of defects in materials or workmanship This warranty does not apply to machines and or com ponents which...

Page 3: ...in Carrying tools with your finger on the switch or plugging in tools that have the switch on invites accidents Remove adjusting keys or switches before turning the tool on A wrench or a key that is left attached to a rotating part of the tool may result in personal injury Do not overreach Keep proper footing and balance at all times Proper footing and balance enables better control of the tool in...

Page 4: ...users Maintain tools with care Keep cutting tools sharp and clean Properly maintained tools with sharp cutting edges are less likely to bind and are easier to control Check for misalignment or binding of moving parts breakage of parts and any other condition that may affect the tool s operation If damaged have the tool serviced before using Many accidents are caused by poorly maintained tools Use ...

Page 5: ...r should be blown out or vacuumed frequently to keep dust from interfering with normal ventilation 1 Connect this tool to a power source with appropriate voltage for your model and a 20 amp circuit The wrong size circuit can damage the motor 2 If the motor won t start release the trigger switch immediately Unplug the tool Check the saw blade to make sure it turns freely If the blade is free refer ...

Page 6: ...hipping Your Slugger 14 Metal Cutter package should also include the following WARNING To avoid injury from unexpected starting or electrical shock do not plug the power cord into a power source outlet during unpacking and assembly This cord must remain unplugged whenever you are working on the saw 1 Remove the saw from the carton by lifting the saw with the carrying handle 2 Place the saw on a se...

Page 7: ...is handle is built into the unit to move it from one location to another Before attempting to pick up the unit by the carrying handle always clamp the cut off saw power head in the down position using chain 2 7 Plastic Chip Guard To protect eyes and face from the chips created while cutting 8 Switch To turn the saw ON depress trigger switch To turn the saw OFF release trigger switch 9 Arbor Lock A...

Page 8: ...ws A and rotate the saw blade cover B 3 Press arbor lock C and at the same time rotate blade G with 8mm hex wrench in arbor screw until the arbor lock engaged 4 Using the 8 mm hex wrench provided loosen arbor screw D by turning it counter clockwise and remove arbor screw D washer E outside blade flange F and blade G Do Not Remove Inside Blade Flange 5 Make sure the inside surfaces of both the insi...

Page 9: ... Ensure the blade and blade flanges are clean Ensure the recessed sides of the flanges are facing the blade Using the arbor wrench supplied make sure the arbor screw is firmly tightened PLAN AHEAD TO PROTECT YOUR EYES HANDS FACE EARS Any power saw can throw debris This can result in permanent eye damage Wear safety goggles or glasses that comply with ANSI Z87 1 shown on package Everyday eyeglasses...

Page 10: ...vent them from tipping the saw or falling down after they are cut 4 When transporting the saw secure the motor mount to the base to prevent damage 5 When blade comes up to full speed pull the handle to begin cutting It is important to cut with steady and even pressure Do Not Force in order to have consistent cuts CLEAN CHIP COLLECTOR Loosen the screw A take out the chip collector B and clear it Pu...

Page 11: ...n work in vise so that if a jam occurs the blade will not move the work piece in the vise Clamp it securely Angle bar should be clamped with both legs down as shown Generally the saw cuts most efficiently if the blade is cutting the thinnest section at any time RECOMMENDED CUTTING CAPACITY WARNING Use of tool for greater than recommended capacities may lead to motor burnout and possible electric s...

Page 12: ...peat for the other side To reassemble reverse the procedure The ears on the metal end of the brush assembly go in the same hole the carbon part fits into Tighten the cap snugly but do not over tighten NOTE To reinstall the same brushes first make sure the brushes go back in the way they came out Otherwise a break in period will occur that will reduce motor performance and increase brush wear LUBRI...

Page 13: ... on page 14 2 Cut not square Defective blade Work not positioned properly Excessive blade pressure 3 Motor head won t fully rise or blade guard won t fully close Lubrication necessary Part failure Pivot spring or guard spring not replaced properly after service Grit sticking to stops 4 Blade binds jams or burns work piece Improper feed pressure Dull blade Improper blade 5 Tool vibrates or shakes S...

Page 14: ...saw breakdown 14 ...

Page 15: ...T PAD 2 saw parts list item part description qty 1 MCCS5001 SAFETY COVER 1 2 UH2055 M5 LOCK WASHER 4 3 UH0568 M5 X 85 TFHMS 4 4 MCCS5004 SPRING 1 5 UH0400 M4 X 8 CRPHMS 2 6 MCCS5006 LEVER 1 7 MCCS5007 SHOULDER SCREW 1 8 MCCS5008 BLADE GUARD 1 9 MCCS5009 LEVER 1 10 MCCS5010 SPACER 1 11 UH0425 M4 X 12 CRPHMS SPLITLW 2 12 MCCS5012 PROTECTION PLATE 1 12A MCCS5200 WARNING LABEL 120V 1 13 MCCS5013 SPECI...

Page 16: ... 16 saw parts list cont item part description qty 156 UH0659 M6 X 30 CRSPHMS 2 157 MCCS5157 BASE 1 158 UH0421 M4 X 12 CRPHMS 6 159 MCCS5159 SUPPORT PLATE 1 160 MCCS5160 CHIP BOX 1 161 UH4606 M6 NUT 1 162 UH2062 M6 LOCK WASHER 1 163 UH2060 M6 FLAT WASHER 1 164 MCCS5164 KNOB 1 165 UH0623 WING SCREW 1 167 UH2043 M4 LOCK WASHER 3 168 MCCS5168 STEPPED LOCKING PIN 1 172 MCCS5172 SHOULDER SCREW 1 item pa...

Reviews: