6200 Hwy 12 • Eau Claire, WI 54701 • 1-800-998-2398
Visit our website at www.jdmfg.com
MAINTENANCE INSTRUCTIONS
• Disconnect power before cleaning or maintaining your fan in order
to prevent serious injury or death.
• Service and repair of fan should only be completed by a qualified
technician.
• For maximum efficiency and fan life, keep the following free from
dirt and dust: blades, housing, shutters, motor, and guard
• The totally enclosed air over motor has sealed ball bearings and
does not require additional lubrication.
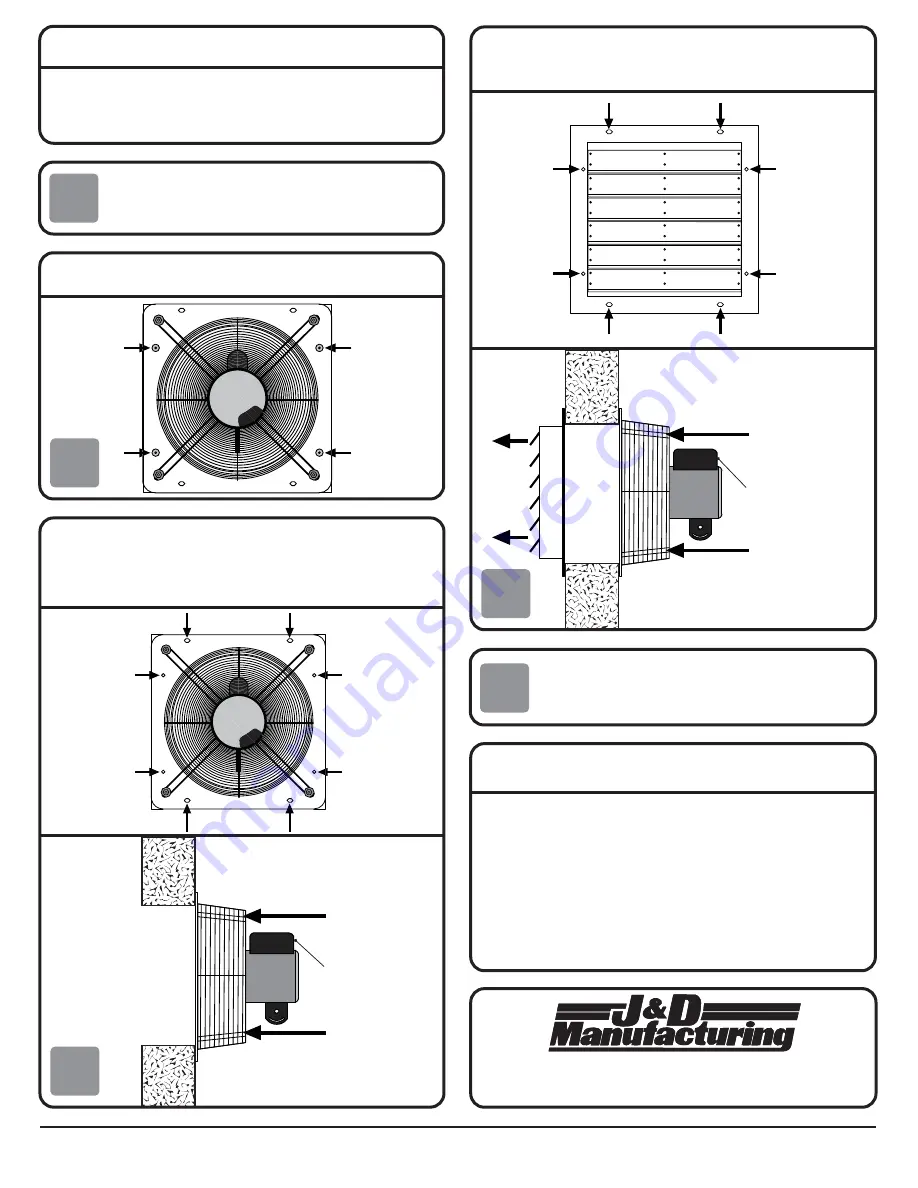
Using appropriate hardware (not provided) for your structure and the weight
of the shutter, secure the shutter to the outside of your structure using the
(8) pre-drilled holes on the flange. Louvers should open to the outside.
4
5
The STANDARD INSTALLATION method is the preferred method. If the
wall you are using to mount your exhaust fan is exceptionally thick, or if
you wish to have the shutter mounted to the outside of your building, the
ALTERNATE INSTALLATION method may be used.
ALTERNATE INSTALLATION
Separate the shutter from the assembled fan by drilling out the 4 rivets that
hold the shutter to the flange as shown below.
2
Using appropriate hardware (not provided) for your structure and the
weight of your exhaust fan, secure the fan to your structure using the (8)
pre-drilled holes on the flange. Exhaust fan must be mounted with the motor
inside of structure, protected from the weather, and with capacitor on top
as shown.
3
Capacitor
Inside of structure
Outside
Direction
of airflow
Direction
of airflow
Capacitor
Inside of structure
Outside
Direction
of airflow
Direction
of airflow
Refer to step 4 of STANDARD INSTALLATION for instructions
on how to power your exhuast fan.
1
Construct a rough opening using dimensions listed in step 1
of STANDARD INSTALLATION
IS209-11I
J&D Manufacturing • 6200 Hwy 12 • Eau Claire, WI 54701 • 1-800-998-2398 • www.jdmfg.com
Page 3 of 3


