


5
6
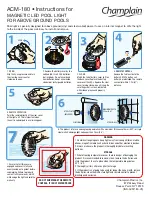
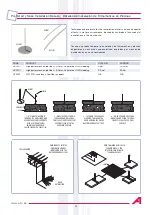
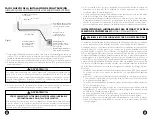
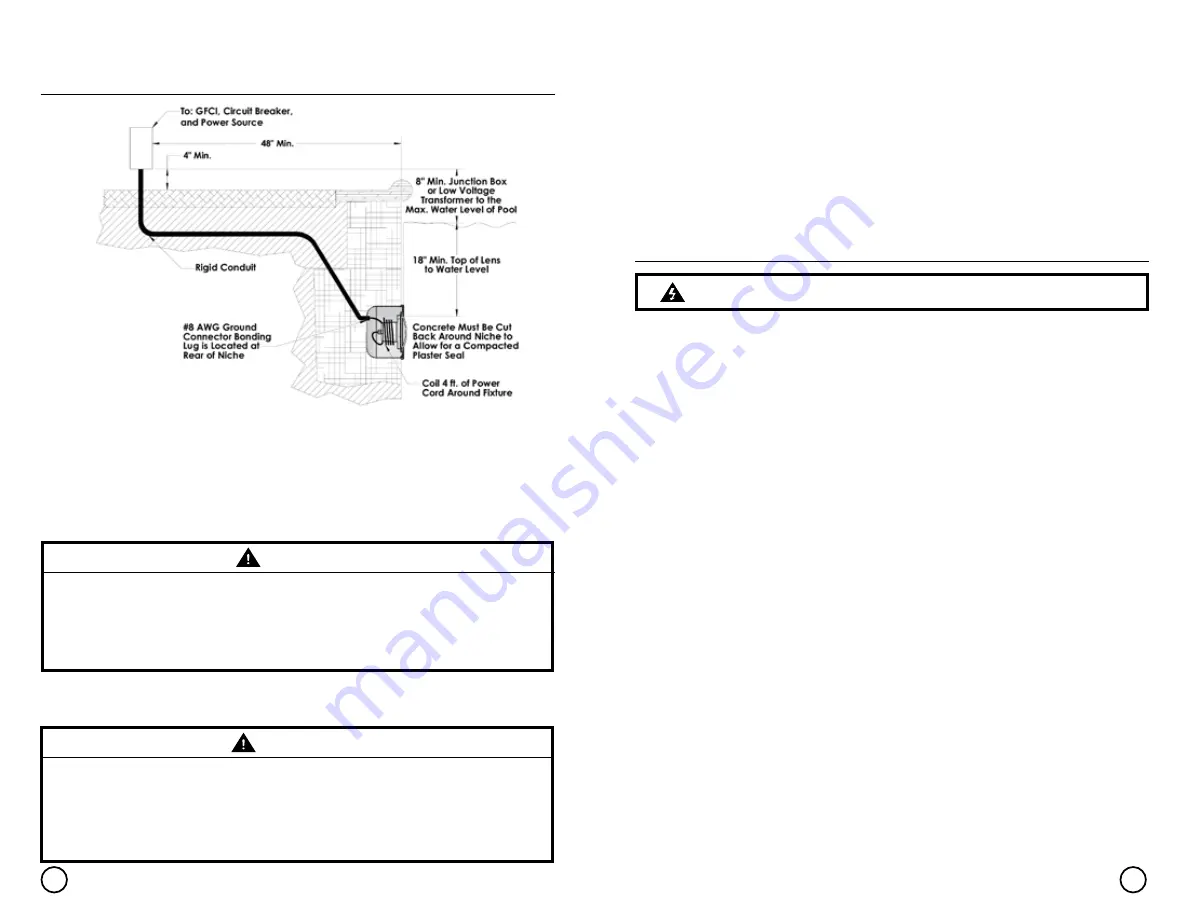
1. Feed the fixture cord through the conduit to the junction box. Be sure to leave at
least four (4) feet of cord at base of the fixture to coil around the light to ensure ease
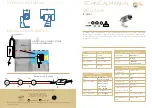
of servicing once the pool and/or spa is filled; reference Figure 1.
2. At the junction box, cut the cord. Be sure to leave at least six (6) inches of cord for
making connections.
3. Carefully strip the outer cord jacket to expose six (6) inches of the underlying three
insulated wires.
5. Using the stainless steel pilot screw provided, install the ColorSplash XG series fixture
assembly into the niche, carefully tightening the pilot screw. (Reference Figure 1)
6. Fill the pool to completely submerge the light prior to operating the light. Do not
operate light out of water, this may cause damage to the light.
7. Make a final check to confirm proper light operation by switching “on” the main
switch or circuit breaker and the light switch. The light should illuminate when power
is switched “on”. If the light is not operating, go back to Step 1 to recheck each
installation step for proper completion.
Installation of this light must be completed by a licensed or certified electrician or a
qualified pool professional in accordance with the National Electrical Code and any
applicable local codes and ordinances. Improper installation may result
in death or serious injury to pool users, installers or others due to electrical shock.
In addition, improper installation may cause property damage.
Always disconnect power to the pool and/or spa light at the circuit breaker panel before
attempting to service the light. Failure to do so could result in serious injury or death due
to electrical shock.
Confirm that the pool or spa meets the current National Electrical Code requirements
and any applicable local codes or ordinances. The electrical system must be installed by a
licensed or certified electrician to meet or exceed those requirements prior to installation
of the light. This includes, but is not limited to, the following National Electrical Code
requirements:
• Installation of a ground fault circuit interrupter (GFCI) for line voltage models on the
lighting circuit with an appropriately rated circuit breaker.
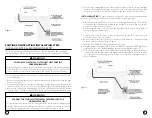
• A junction box or low voltage transformer is located at least 8 inches above the
maximum pool water level and at least 48 inches from the pool edge; reference Figure 1.
• Proper electrical bonding of the light fixture and all metal items within 5 feet of the
pool and/or spa.
• Proper wet niche installation with the top edge of the underwater light’s lens at least
18 inches below the surface of the water in the pool and not more than 20” in
Canada; reference Figure 1.
• Proper electrical wet niche bonding and grounding using the #8 AWG ground
connector at the rear of the niche; reference Figure 1.
• The wet niche is properly electrically bonded and grounded via the No. 8 AWG
ground connector located at the rear of the niche; see Figure 1.
4. Connect these three (3) wires to their corresponding junction box circuit wires and
secure the junction box cover in place.
Do not operate this light for more than two minutes without completely submerging
it in water. Failure to do so can result in permanent damage to the light. If the light is
operating without being fully submerged in water, the light’s circuitry will automatically
shut down for a cooling period before powering back on within 10 minutes to prevent
damage to the light.
WARNING
NEW CONSTRUCTION INSTALLATION STEPS
(ONCE ALL ELECTRICAL REQUIREMENTS ARE MET)
Figure 1
WARNING
This special pilot screw secures and electrically grounds the fixture to the mounting ring and
wet niche. Failure to install the stainless steel pilot screw provided could create an electrical
shock hazard, resulting in death or serious injury to pool users, installers or others.
USE ONLY THE STAINLESS STEEL PILOT SCREW PROVIDED
WITH THIS UNDERWATER LIGHT.
COLORSPLASH XG SERIES LED POOL AND SPA LIGHT
FIXTURE INSTALLATION
(EXISTING POOL AND/OR SPA)
DANGER!
RISK OF ELECTRICAL SHOCK OR ELECTROCUTION!
Summary of Contents for ColorSplash XG LPL-F2C Series
Page 17: ...30 31 NOTES NOTA NOTES NOTA...