background image

7

8

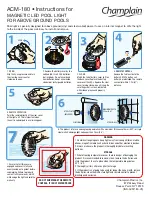
The following steps detail installation of the ColorSplash XG Series LED light fixture

into an existing pool. Read this section in its entirety prior to beginning any installation.
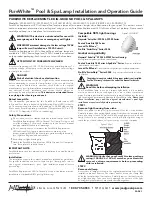
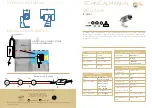
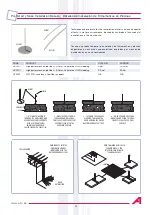
Figure 1

Figure 1

EXISTING CONSTRUCTION INSTALLATION STEPS

(ONCE ALL ELECTRICAL REQUIREMENTS ARE MET)

WARNING

Failure to bring the pool and/or spa electrical system up to current code requirements prior 

to light installation may create an electrical shock hazard resulting in death or serious injury 

to users, installers, or others due to electrical shock, and may also cause property damage.

POOL OR SPA ELECTRICAL SYSTEM MUST MEET CURRENT  

CODE REQUIREMENTS.

WARNING

This special pilot screw secures and electrically grounds the fixture to the mounting ring and 

wet niche. Failure to install the stainless steel pilot screw provided could create an electrical 

shock hazard, resulting in death or serious injury to pool users, installers or others.

USE ONLY THE STAINLESS STEEL SCREW PROVIDED WITH THIS 

UNDERWATER LIGHT.

1.  Disconnect the main electrical switch or circuit breaker and the switch which operates  

  the installed light.

2.  Remove the existing light per the original manufacturer’s instructions. Place the light  

  fixture on the deck.

3.  Leaving the light fixture on the deck, cut the light cord. Be sure to leave at least six (6)  

  inches of cord in order to connect it to the replacement light cord. Discard the light fixture.

4.  Remove the existing cord by pulling it up out of the niche and onto the deck. Carefully  

  strip the outer cord jacket to expose six (6) inches of the underlying three insulated wires.

5.  Tape the three existing light wires to the replacement light cord with electrical insulating  

  tape. Avoid wrapping too much tape around the cords. Otherwise, the thickness will be  

  too great for the cord to be able to be pulled through the conduit to the junction box.

INSTALLER NOTICE:

 This light’s external cord cannot be replaced and should be handled 

with care. Any damage to this external cord necessitates replacing the light.

6.  After removing the junction box cover, disconnect the light fixture wires. Then, pull the  

  cord through the conduit until it is visible in the junction box conduit. Remove the tape  

  from the cords and separate the wires.

7.  Carefully strip the outer cord jacket from the new light cord to expose six (6) inches of  

  the underlying three insulated wires.

1. Connect these three (3) wires to their corresponding junction box circuit wires and  

  secure the junction box cover in place.

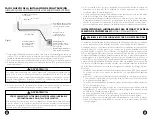
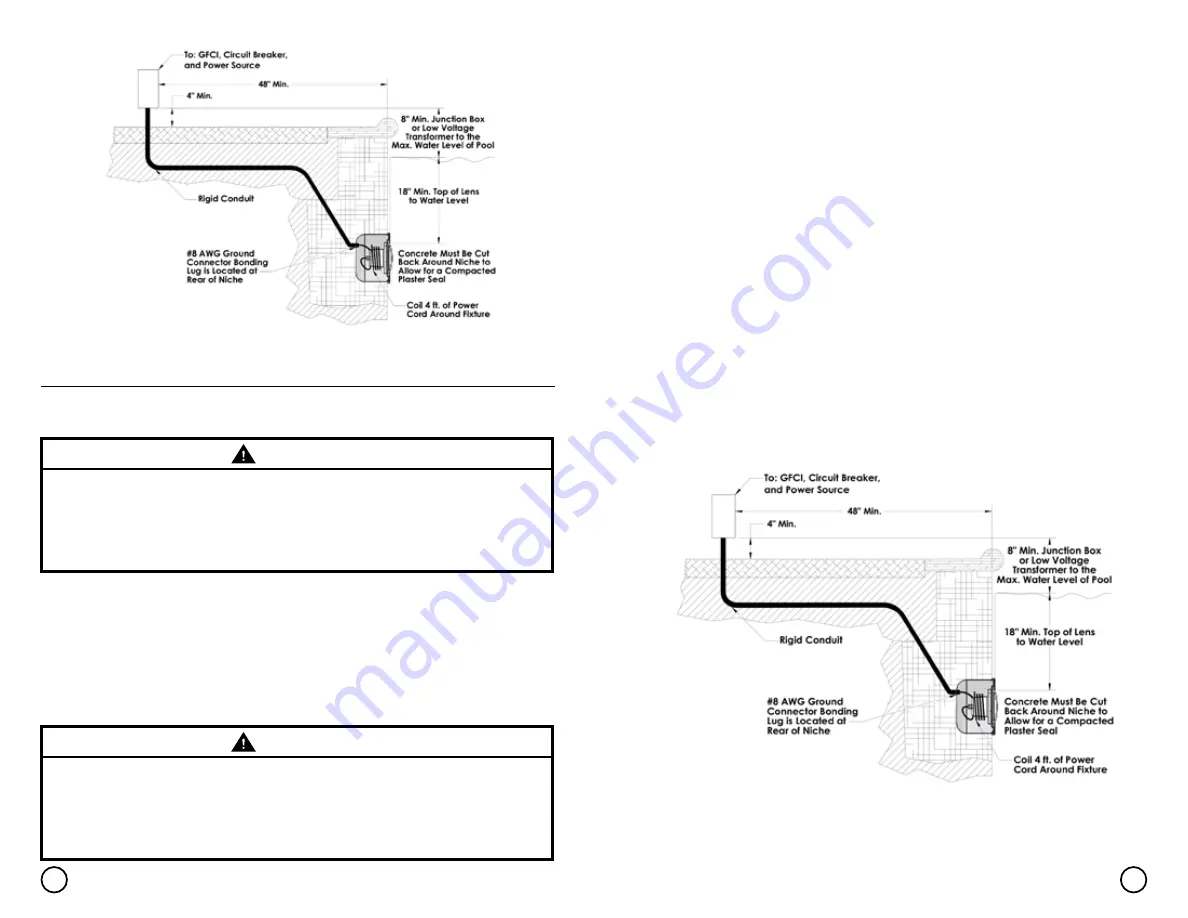
2.  Be sure to leave at least four (4) feet of cord at base of the fixture to coil around the light  

  to ensure ease of servicing; reference Figure 1.

3.  Install the ColorSplash XG LED light fixture into the niche.

4.  Using the stainless steel pilot screw provided, install the ColorSplash XG LED light fixture  

  assembly into the niche, carefully tightening the pilot screw. (Reference Figure 1)

5.  Make a final check to confirm proper light operation by switching “on” the main switch or  

  circuit breaker and the light switch. The light should illuminate when power is switched  

  “on”. If the light is not operating, go back to Step 1 to recheck each installation step for  

  proper completion.

Summary of Contents for ColorSplash XG LPL-F2C Series

Page 1: ...ights You may have other rights that vary according to the laws of your state LIMITATION OF LIABILITY THE FOREGOING SHALL CONSTITUTE THE EXCLUSIVE REMEDY OF THE PURCHASER AND IS IN LIEU OF ALL OTHER W...

Page 2: ...lash XG Series LED Pool and Spa light fixtures will not synchronize with any other manufacturer s pool or spa light fixtures COLORSPLASH XG SERIES LED ENHANCED FUNCTIONALITY WITH CERTAIN PENTAIR AND J...

Page 3: ...attempting to service the light Failure to do so could result in serious injury or death due to electrical shock Installation must be performed in accordance with all applicable federal state local i...

Page 4: ...ents prior to installation of the light This includes but is not limited to the following National Electrical Code requirements Installation of a ground fault circuit interrupter GFCI for line voltage...

Page 5: ...the deck Carefully strip the outer cord jacket to expose six 6 inches of the underlying three insulated wires 5 Tape the three existing light wires to the replacement light cord with electrical insula...

Page 6: ...xtures will not synchronize with any other manufacturer s pool or spa light fixtures COLORSPLASH XG SERIES LED ENHANCED FUNCTIONALITY WITH CERTAIN PENTAIR AND JANDY AUTOMATION SYSTEMS ColorSplash XG S...

Page 7: ...display the same light show or solid color at the same time However all of the XG light fixtures must be on the same electrical circuit for this feature to be operational ColorSplash XG LED light fixt...

Page 8: ...g and calming effect 4 Caribbean Mode 4 Tidal Wave Transitions between a variety of blues and greens 5 American Mode 5 Patriot Dream Patriotic red white and blue transition 6 California Sunset Mode 6...

Page 9: ...Usted puede tener otros derechos que var an de acuerdo con las leyes de su estado LIMITACI N DE RESPONSABILIDAD LO ANTERIOR CONSTITUIR EL RECURSO EXCLUSIVO DEL COMPRADOR Y SE ENCUENTRA EN RESPONSABIL...

Page 10: ...ntelliBrite NOTA Las luminarias LED para piscina y spa de la serie XG de ColorSplash de J J no se sincronizar n con las luminarias de piscina o spa de ning n otro fabricante LUZ LED DE LA SERIE XG DE...

Page 11: ...i n grave o la muerte debido a un choque el ctrico La instalaci n debe realizarse de acuerdo con todos los c digos de instalaci n federales del estado y locales aplicables y ordenanzas por un electric...

Page 12: ...tor debidamente clasificado Una caja de conexiones o transformador de tensi n baja se encuentra por lo menos 1 21 m encima del nivel m ximo de agua de la piscina y por lo menos 1 21 desde el borde de...

Page 13: ...s de circuito de caja de conexiones correspondientes y fije la cubierta de la caja de conexiones en su lugar 2 Aseg rese de dejar por lo menos 1 21 m de cable en la base de la luminaria para enrollar...

Page 14: ...stemas de automatizaci n establecidos en el modo IntelliBrite NOTA Las luminarias LED para piscinas y spa de la serie XG de ColorSplash de J J no se sincronizar n con las luminarias de piscina o spa d...

Page 15: ...XG no se sincronicen con otras luminarias de piscina spa Las luminarias LED ColorSplash XG se sincronizar n con las l mparas de repuesto de la serie LXG Por favor consulte a un electricista calificad...

Page 16: ...Transiciones de color lentas creando un efecto fascinante y calmante 4 Modo caribe 4 El maremoto Transiciones entre una variedad de azules y verdes 5 Modo americano 5 Sue o patriota Transici n patri t...

Page 17: ...30 31 NOTES NOTA NOTES NOTA...

Reviews: