background image

12

Lubrication

Your gravity wagon has grease fittings at all critical points.  These should be serviced before the gravity wagon is put into 

operation each season. 

HOW TO FLUSH OLD OIL OUT OF THE OIL BATH HUBS

Your gravity wagon is  equipped oil bath hubs. Follow these steps to flush the oil bath hubs once per year.

1.  Check the hub for leaks and wear.  Replace components as necessary.

2.  Roll the hub until the fill plug is on top.

3.  Drain the hub by removing the cap.

4.  After draining the old oil, use light weight motor oil to flush out remaining oil. There is no need to tilt the hub, the oil will flow 

through the bearing easily.

5.  Replace cap. Torque cap to 30-40 ft-lbs.

6.  Replace oil with 80-90WT Sta-Lube from NAPA. This oil has a rust inhibitor additive.

HOW TO ADD OIL TO OIL BATH HUBS


IMPORTANT: Use Napa STA-Lube - GL5 80/90 WT with Rust Inhibitors FL2472 for the Oil Bath Hubs. 

1.  Use a 3/4” wrench to remove breather plug.

2.  Add 80-90WT Sta-Lube oil from NAPA with an oiler hand pump. 

The recommended oil capacity in the hubs is 8 ounces.

3.  Replace breather plug. First hand tighten, then use 3/4” wrench to make a 1/4” of a turn.

Routine Maintenance

  WARNING:  Ensure all power is shut off before servicing the gravity wagon.

• 

Check the gravity wagon periodically for cracks in welds and for other structural damage.  Fix cracked welds immediately.  Failure to 

do so could result in extensive damage to the gravity wagon and greatly reduce the life of the unit.

• 

If equipped with uni-swivel auger, check all hydraulic hoses for wear and replace as necessary.

• 

Ensure all tires are properly inflated. Refer to “Initial Operation & Maintenance” on page 11 for recommended tire pressures.  It is 

important that tires are inspected before and after unit loaded.

• 

Ensure all grease fittings have proper lubrication.

• 

Properly torque all lug nuts to 350 ft-lbs.

Your local, authorized dealer can supply genuine replacement parts.  Substitute parts not provided by J&M Manufacturing may not meet 

original equipment specifications and may be dangerous.

When performing maintenance work, wear sturdy, rough-soled work shoes and protective equipment for eyes, hair, hands, hearing and 

head.  Follow instructions in this manual to ensure safe and proper maintenance and repair.

Store the gravity wagon  in a dry, protected place.  Leaving your gravity wagon outside, open to the weather will shorten its life.
Follow the procedure below when your gravity wagon is placed in storage for periods up to six months:

1.  Remove all grain from inside the grain tank.

2.  Wash or clean and completely lubricate the gravity wagon.

3.  Touch up areas where paint may have worn away.  Use a good quality primer paint, especially before re-applying graphite paint to the 

interior slopes of the grain tank.

4.  Clean the tires before storage.  Inflate the tires at regular intervals.

Storage Preparation

Summary of Contents for 655

Page 1: ...J M Manufacturing Co Inc 284 Railroad Street P O Box 547 Fort Recovery OH 45846 Ph 419 375 2376 Fax 419 375 2708 www jm inc com Rev 1 7 2021 GRAVITY WAGON O P E R A T O R S M A N U A L MODEL Manual...

Page 2: ......

Page 3: ...s and Dimensions 8 Decals 10 Bolt Torque Specifications 11 Initial Operation Maintenance 12 Lubrication 13 Bleeding the Brake Lines 15 Fenders 16 Tongue Assembly with Brakes 18 24 Ton Running Gear 20...

Page 4: ...ient maintenance or iv normal wear or tear This warranty does not cover products that are previously owned and extends solely to the original purchaser of the product Should the original purchaser sel...

Page 5: ...y When you see this symbol carefully read the message that follows and be alert to the possibility of personal injury or death DANGER WARNING CAUTION This Safety Alert symbol indicates a hazard and me...

Page 6: ...ing slopes and rough slick or muddy surfaces 5 Collision of high speed road traffic and slow moving machines can cause personal injury or death On roads use flasher lights according to local laws Keep...

Page 7: ...19 Hopper Steel 12 9 Gauge 12 9 Gauge Understructure 3 x 6 Runners 3 x 6 Runners Taillights Standard Standard Front Ladder Standard Standard Center Dump Deflector Optional Optional Capacity Running G...

Page 8: ...al JM0019223 9 655 Driver s Side Decal JM0036548 9 755 Driver s Side Decal JM0036554 10 For Farm Use Only Decal JM0018038 11 Caution Fasten Box Securely Decal JM0019228 12 Gravity Box Door Light Decal...

Page 9: ...RTS DO NOT CLIMB INTO GRAVITY TANK BEFORE HIGHWAY TRAVEL SECURE A SLOW MOVING VEHICLE EMBLEM TO THE REAR OF THE BOX IN ACCORDANCE WITH STATE AND LOCAL LAWS MAKE SURE ALL FLASHER AND TURN INDICATOR BRA...

Page 10: ...htening procedure is listed for specific application Fasteners must always be replaced with the same grade as specified in the manual parts list Always use the proper tool for tightening hardware Make...

Page 11: ...re rolls Do not exceed the tire pressure indicated below WARNING Tow loads safely Stopping distance increases with speed and weight of towed loads and on slopes Towed loads with or without brakes that...

Page 12: ...acked welds immediately Failure to do so could result in extensive damage to the gravity wagon and greatly reduce the life of the unit If equipped with uni swivel auger check all hydraulic hoses for w...

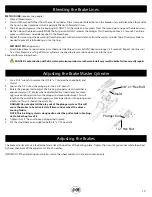
Page 13: ...roleum products or other materials may result in brake failure or costly repairs Adjusting the Brake Master Cylinder 1 Use a 9 16 wrench to remove the 2 3 8 x 1 serrated hex head bolts and shield 2 Lo...

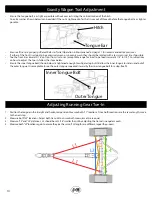
Page 14: ...1 8 to 1 4 For directions on how to adjust the toe in follow the steps below Ensure the inner tongue bolt shown below is tightened enough to mitigate slop but still allow the inner tongue to slide in...

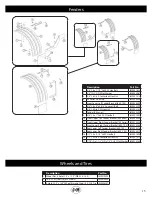
Page 15: ...002092 10 Front Upper Left Fender Bracket 55 Series JM0033395 11 Front Upper Right Fender Bracket 55 Series JM0033435 12 Front Lower Right Fender Bracket 655 755 JM0034362 13 Rear Lower Left Fender Br...

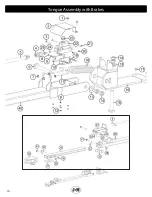
Page 16: ...16 Tongue Assembly with Brakes...

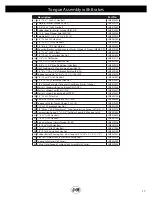
Page 17: ...5 16 18 Gr5 Z Star Washer Hex Nut JM0019361 21 1 64 Orifice Restrictor Fitting for Drum Brake Master Cylinder JM0027857 22 Master Cylinder with Spring Bracket MCA DR1 JM0019356 23 Master Cylinder Cap...

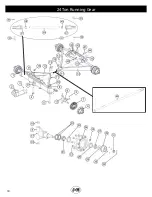
Page 18: ...18 24 Ton Running Gear 45...

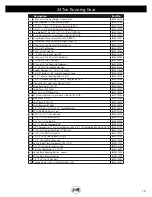
Page 19: ...ength EB 134 JM0002244 20 Oil Seal for 873 Hub G873OB 24T OB JM0035243 21 Large Bearing 4T 33275 JM0025687 22 Large Race 4T 33462 JM0025689 23 3 4 16 x 1 3 4 Wheel Stud JM0018957 24 873 Hub with Studs...

Page 20: ...0034320 8 755 Sideboard Brace JM0034321 9 3 8 16 Gr5 Z SF Hex Nut JM0002152 10 1 4 ID 3 4 OD Z Flat Washer JM0003090 11 1 4 20 x 3 4 Gr5 Z Hex Bolt JM0001507 12 1 4 20 x 1 Gr5 Z Hex Bolt JM0002095 13...

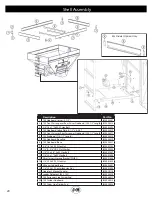
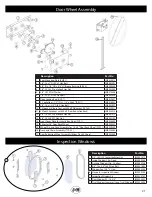
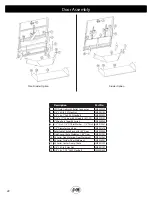
Page 21: ...3 8 16 Gr2 Z Centerlock Hex Nut JM0001512 13 3 8 16 Gr5 Z SF Hex Nut JM0002152 14 Front Cover Plate for Gravity Box Door FCP 1 JM0028409 15 55 Series 24 Door Rack Wheel JM0035347 15 Wheel Pin and Str...

Page 22: ...019107 5 1 Wide Poly Tape 55 Series JM0035980 6 1 2 ID x 2 1 4 OD Flat Washer 1 8 Thick JM0019081 7 1 4 Diameter Snap Ring JM0001870 8 Adjustable Chute Bracket for 60 Door JM0035050 9 Side Dump Chute...

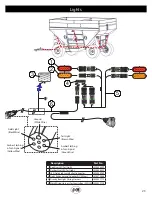
Page 23: ...r and Adapter Kit 3 Wires JM0010566 5 Gravity Box Light Wiring Harness JM0027773 6 Main Wiring Harness for Gravity Box WN 1N JM0027774 Lights A B C A B C A B C A B C LEFT A B C A B A B A B C A B A B A...

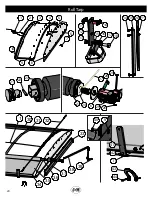
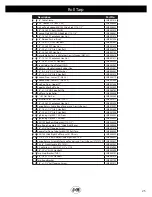
Page 24: ...24 Roll Tarp 13 15 16 17 12 18 11 14 5 3 2 1 4 6 7 9 10 8 39 30 31 33 32 1 37 38 36 35 34 43 44 41 42 11 27 24 23 26 28 29 25 6 20 19 11 14 22 23 21 9 40...

Page 25: ...Roll Tube JM0002449 22 1 4 x 1 1 4 HD Spiro Roll Pin JM0046782 23 Roll Tarp Guide Roller JM0038446 24 1 USS Flat Washer JM0003063 25 Universal Joint Roll Tarp SUJ 1 JM0001517 26 1 4 20 Gr2 Z Centerloc...

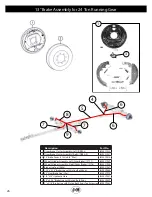
Page 26: ...el Cylinder Assembly Left Drum Brakes 9777 JM0027939 3 Wheel Cylinder Assembly Right Drum Brakes 9776 JM0027938 4 Brake Line Tee 10606 JM0027967 5 120 x 3 16 Brake Line with Nut on Both Ends JM0029565...

Reviews: