background image

Door Gaskets 

The firebox door gasket and the oven door gasket should be smoke-tight.  

To stop smoke leaks, you may need to shim the hinge side, the latch side, or 

both.    You  may  also  need  to  “thicken”  the  gasketing  by  using  additional 

(allow  4  hours  to  cure  before  closing  the  door)  RTV  silicone  between  the 

gasket  and  the  body  of  the  unit.    Paper  check  the  gasket  seal  by  placing  a 

long  strip  of  paper  between  the  gasket  and  the  unit  body  so  that  the  paper 

extends  outside  the  door.    Close  and  latch  the  door.    Pull  the  paper  toward 

you.    It  should  be  very  resistant  to  your  effort.    If  it  seems  loose,  further 

adjust the door or the gasket thickness. 

Page 12 of 43


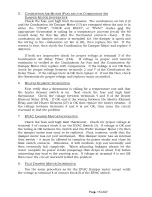
Inspect  the  interior  of  the  firebox.    Repair  as  required  any  damaged 

refractory. 


Inspect and lubricate as needed the damper linkages. 


Inspect and lubricate the combustion air linkages.  Clean the combustion 

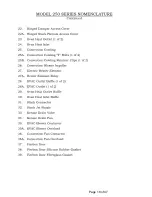
air  damper  (14),  and  the  combustion  air  inlet  elbow  (13B).    Inspect  the 
combustion air damper gasket (13C). 


Remove  the  roof  cover.    Clean  carbon  from  top  components.  Remove  the 

cover (20A) over the fresh air damper (20).  Inspect, clean and repair/replace 
as needed the fresh air inlet damper (20) and gasket. 


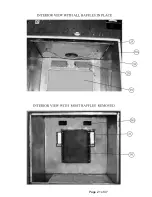
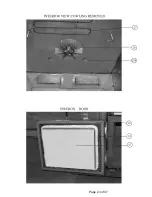
Inside the oven, remove the convection cowling (25) by removing the two 

“T”  bolts  (25A)  and  lifting  the  cowling  off  the  rear  clips.    Then  remove  the 
EVAC  outlet  baffles  (28),  the  oven  heat  outlet  baffle  (29),  and  the  oven  heat 
inlet  baffle  (30).    Inspect  and  clean  all  areas  behind  these  parts.    Reinstall 
the parts. 


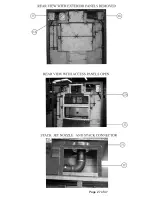
Remove  the  rear  upper  exterior  skin  panel.  Remove  the  bolts  that  secure 

the hinged access cover (22) over the rear dampers and open the cover.  For 
older  models  remove  the  rear  EVAC  and  Flue  access  plate  and  the  rear 
firebox  damper  access  plate.      Clean  all  the  exposed  cavities.    Inspect  and 
clean,  as  needed,  the  flue  beneath  the  firebox  bypass  damper  (19).    To 
inspect this flue the damper will have to be in the open position.  Either turn 
the  unit  to  the  EVAC  setting  or  disconnect  the  firebox  damper  linkage  and 
reconnect  after  inspection.    Inspect  and  repair/replace  as  needed  the 
damper  gaskets  associated  with  the  EVAC  dampers  (17),  the  flue  damper 
(18), and the firebox damper. 


ANNUALLY: 


The  interior  fan  cowling  area  should  be  cleaned.    Remove  the  convection 

cowling  (25),  clean,  and  reinstall.    Clean  the  convection  fan  impeller  (26)  at 
the same time. 


MONTHLY:


PREVENTIVE MAINTENANCE – CLEANING 

GENERAL MAINTENANCE 

Summary of Contents for 250 FSE

Page 1: ...85 0522 972 288 9488 Fax SMOKE MASTER 250R FS THE LITTLE RED SMOKEHOUSE 250FS 250 FSE OPERATIONS AND SERVICE MANUAL READ AND UNDERSTAND THIS OPERATIONS AND SERVICE MANUAL BEFORE USING THIS MACHINE FAI...

Page 2: ...ido para encender carbon gasolina grasa etc para encender 0 ayudar a prender un fuego Nunca utilizar gas natural 0 propano Utilizar unicamente lena 0 ayudas que sean solid as poco vohittles para encen...

Page 3: ...visor if applicable while continuing to observe the pit If you observe any flames or perceive any fire threat immediately contact the local fire department Disposal of Ashes Ashes should be placed in...

Page 4: ......

Page 5: ......

Page 6: ......

Page 7: ...OTING 14 MODELS 250R FS 250 FS 250 FSE 5 OPERATIONAL SEQUENCING 6 17 OPERATING PROCEDURES 7 MAINTENANCE AND CLEANING 11 COOK AND HOLD INSTRUCTIONS 13 INSTALLATION INSTRUCTIONS 2 ELECTRICAL DRAWINGS 31...

Page 8: ......

Page 9: ...Page 1 of 47...

Page 10: ...provided Supply circuit requires three conductors plus ground L1 L2 N G A two pole 30 amp breaker is required Turn the circuit breaker off and tag it whenever servicing as this is the only way to comp...

Page 11: ...trol bypass mechanisms to contain smoke spillage when the oven doors or firebox doors are opened In all cases in which combustible construction is present a factory built Type HT chimney is required r...

Page 12: ...ntilation with factory built grease ducts or properly constructed welded ducts with fire rated enclosures it also permits the exhaust hood ventilation option for our units Option Two Exhaust Hood Vent...

Page 13: ...Page 5 of 47...

Page 14: ...Page 6 of 47...

Page 15: ...Page 7 of 47...

Page 16: ...doors Page 8 of 43 combustion air system to activate regenerating the fire this reduces the potential for smoke spillage and or flash backs as the hot fuel seeks fresh oxygen using the following proce...

Page 17: ...this option c Monthly CAUTION Turn off and tag breaker to prevent the convection fan or elements from being energized d Annually Grease that collects in the bottom of the cooking chamber should be dr...

Page 18: ...CTION 11 TROUBLESHOOTING Refer first to the Service Manual and then call our Service Department at 972 289 0801 if further assistance is required b If the pit stops lights go off etc and the front doo...

Page 19: ...ys disconnect the pit electrically before servicing or cleaning c Never allow exterior of pit near the top or the top itself to get wet This will void all warranties and could severely damage the pit...

Page 20: ...clean and repair replace as needed the fresh air inlet damper 20 and gasket Inside the oven remove the convection cowling 25 by removing the two T bolts 25A and lifting the cowling off the rear clips...

Page 21: ...teady not flashing when the timer times out For these timers the factory settings are mode A time range 12 time units hours Green PWR light will remain on red Out light will illuminate when timer has...

Page 22: ...Page 14 of 47...

Page 23: ...Page 15 of 47...

Page 24: ...Page 16 of 47...

Page 25: ...Page 17 of 47...

Page 26: ...Page 18 of 47...

Page 27: ...Page 19 of 47...

Page 28: ...INTAOO NCRAVAMENTO OA REGULACAo TltMPA SELAVEl AWG 16 1 31 mm2 AWG 14 2 06 mtft2 AWG 12 3 31 mm2 A_WG 10 5 28 mlll AWG l 8 37 mm AWG 6 13 3 mm2 11 l Temoin de oecfenchemelll TRIP INOICATOR AUSLOSEANZE...

Page 29: ...Page 21 of 47...

Page 30: ...Page 22 of 47...

Page 31: ...Page 23 of 47...

Page 32: ...Page 24 of 47...

Page 33: ...Page 25 of 47...

Page 34: ...Page 26 of 47...

Page 35: ...Page 27 of 47...

Page 36: ...Page 28 of 47...

Page 37: ...Page 29 of 47...

Page 38: ...Page 30 of 47...

Page 39: ...Page 31 of 47...

Page 40: ...Page 32 of 47...

Page 41: ...Page 33 of 47...

Page 42: ...Page 34 of 47...

Page 43: ...Page 35 of 47...

Page 44: ...lJD Page 36 of 47...

Page 45: ...Page 37 of 47...

Page 46: ...Page 38 of 47...

Page 47: ...Rd ew Hartford IY 13413 USA 3lS 797 2222 FAX 315 797 0403 O UAUrY STRUMENTATIO DfS l Jllf MANUfACTURED N THE USA Form Number 3000 Published Jan 1992 Third Edition ISO 9002 REGISTERED SPICI CATIONS IN...

Page 48: ...ry Fax 847 782 5277 Applications Support Fax 800 326 6216 Sales Order Entry 800 326 6216 Applications Support Partlow West Rustrak and LFE Brands Sales Repair and Application Support 1675 Delany Rd Gu...

Page 49: ...ngs Repeat these steps if necessary SWITCH REPLACEMENT 73 SWITCH INSTALLATION Turn the power to the MF79 off Aemove the setting knob and cover See exploded view illustration page 6 and remove the two...

Page 50: ...removing screws D Figure 7 below and withdrawlno the element from the instrument body Then remove the element bulb from the medium InstaUths new element and replace screws D Insert the nsw element bu...

Page 51: ...Page 43 of 47...

Page 52: ...Page 44 of 47...

Page 53: ...ut Set to time setting knob below zero Time range selector 1 2 3 12 or 30 Time unit selector sec min hrs 10h Output indicator red LED Operation mode selector A ON delay B Repeat cycle signal OFF start...

Page 54: ...anufacturing Inc to build the finest equipment possible and to facilitate quick solutions to all problems that might arise with the lowest expense possible to the user s To help us achieve this goal p...

Page 55: ...aurants as well as throughout the U S and abroad since 1976 Cooking woods available Oak Pecan Hickory Mesquite For delivery Call 972 986 6339 Arnold Bros Forest Products Inc 201 N Beltline Road Irving...

Page 56: ......
Reviews: