Page 12
ENGLISH
Jandy
®
Variable-Speed Pumps
|
Installation & Operation Manual
WARNING
Make sure that the control switch, time clock, or
control system is installed in an accessible location,
so that in the event of an equipment failure or a loose
plumbing fitting, the equipment can be turned off. This
location must not be in the same area as the pool
pump, filter, and other equipment.
CAUTION
The pump must be permanently connected to a
dedicated electrical circuit. No other equipment,
lights, appliances, or outlets may be connected to the
pump circuit.
3.3.3
Electrical Wiring
The Jandy pump models covered in this installation and
operation manual provide separate compartments for
high voltage and low voltage wiring.
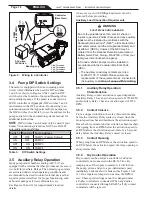
The low voltage compartment provides 2 openings:
•
RS-485 quick connect port (see Figure 8)
•
3/8" conduit port (threaded)
The high voltage compartment provides 3 conduit port
openings:
•
1/2" (threaded)
•
1/2" (threadless)
•
3/4" (threadless)
Conduit fittings are not provided.
1.
Secure the pump using the green screw provided.
Ground before attempting to connect to an electrical
power supply. Do not ground to a gas supply line.
2. Wire size must be adequate to minimize voltage
drop during the start-up and operation of the pump.
3.
Insulate all connections carefully to prevent
grounding or short-circuits. Sharp edges on
terminals require extra protection. For safety, and to
prevent entry of contaminants, reinstall all conduit
and terminal box covers. Do not force connections
into the conduit box.
NOTE:
When power alone is supplied to this pump,
it will not operate. It requires a digital command
sent to it by either a variable speed controller
(JEP-R, iQPUMP01), an automation system, or use
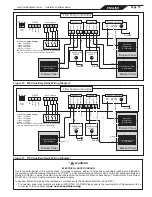
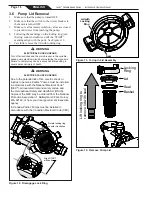
of the dry contacts (See figure 10 and 11).
3.3.4
Variable-Speed Pump Controller
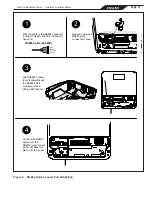
Jandy Variable-Speed pumps are compatible with all
controllers and Automation Systems made by Zodiac
Pool Systems. The variable-speed pump communicates
with the controllers via a four-wire RS-485 interface.
Please see Figure 8 for RS-485 wiring instructions.
Refer to the automation system manual for further
instructions on how to connect the pump to an
automation system.


