background image

28

J.

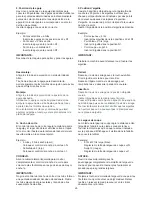
Overlock Cover or Sewing Table

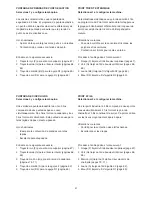
For program numbers 1-9,

 always attach the overlock

cover to the front cover.

 To attach the overlock cover

The overlock cover protects the loopers.

To attach the overlock cover, open the front cover and

place the overlock cover on the outside of the front

cover. Insert the end of the overlock cover into the slot

of the front cover. Push the overlock cover firmly until

the tab snaps into place.

q

Tab

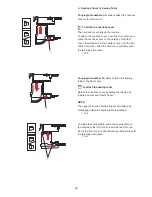
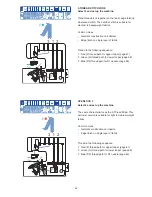
For program number 10,

 always attach the sewing

table to the front cover.

 To attach the sewing table

Detach the overlock cover by pulling the tab up and

toward you with your thumb finger.

NOTE:

The upper knife and chaining finger shall always be

disengaged when the sewing table is attached.

q

Tab

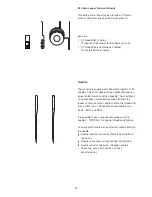
To install the sewing table, place the sewing table on

the outside of the front cover. Insert the tabs into the

slot of the front cover. Push the sewing table firmly until

the tab snaps into place.

q

q

Tab

q

q

Summary of Contents for 1200D

Page 1: ...6 7 8 9 10 11 NO 0 5 1 1 5 0 5 1 2 3 4 5 1 2 3 N 4 1 2 3 N 4 1 2 3 N 4 1 2 3 N 4 Instruction Book Instruction Book Manual de Instrucciones Manual de Instrucciones Manuale d Instructions Manuale d Ins...

Page 2: ...by the manufacturer as described in this manual 3 Never operate this machine if it has a damaged cord or plug is not working properly has been dropped or damaged or dropped into water Return the machi...

Page 3: ...io examinarla repararla o someterla a ajustes el ctricos o mec nicos 4 No utilice nunca el aparato si tiene bloqueada alguna v a de ventilaci n Mantenga las v as de ventilaci n de esta m quina y el pe...

Page 4: ...tre la machine en marche si ses a rations sont obtur es Veiller ce que les ouvertures de ventilation de la machine et de la p dale ne soient pas encombr es de r sidus de poussi res et de particules te...

Page 5: ...Spreader Device Threading 58 Threading the Needle with the Needle Threader 60 Tension Release Lever 60 DETAILED THREAD ROUTE CHARTS 62 72 SECTION IV Test Sewing Setting Foot Pressure 74 Controlling Se...

Page 6: ...Enhebrado de la aguja con el enhebrador 61 Palanca de liberaci n de tensi n 61 GR FICOS DETALLADOS DE TRAYECTO DE ENHEBRADO 63 73 SECCI N IV Cosido de prueba Ajuste de la presi n del prensatelas 75 Co...

Page 7: ...c l enfile aiguille 61 Levier de d brayage de tension 61 TABLEAUX D ENFILAGE D TAILL S 63 73 SECTION IV Essai de couture R glage de la pression du pied 75 Contr le de la vitesse de couture 75 Bac chut...

Page 8: ...7...

Page 9: ...per looper thread tension dial red 6 Lower looper thread tension dial green 7 Spool pin 8 Spool holder 9 Spool pin base 10 Machine socket 11 Power switch 12 Handwheel 13 Front cover 14 Side cover 15 C...

Page 10: ...lette de longueur de point SL 18 Panneau d affichage des programmes 19 S lecteur de programmes 1 Control de ajuste de presi n 2 Palanca de liberaci n de tensi n 3 Control de tensi n del hilo de la agu...

Page 11: ...ate release lever 7 Cutting width dial 8 Upper knife release knob 9 Spreader holder Front Cover Pull the cover to the right and open it towards you 10 Top cover lever 11 2 thread converter 12 Upper lo...

Page 12: ...uja 7 Palanca de liberaci n de la placa de la aguja 8 Control de ancho del corte 9 Perilla de liberaci n de la cuchilla superior 10 Soporte del extensor Cubierta frontal Tire de la cubierta hacia la d...

Page 13: ...ader 9 Tweezers 10 Allen screwdriver 1 5 mm 11 Assortment of needles EL x 705 Top Cover Accessories In the accessory box 12 Spreader Device top cover hook 13 Round Top Cover Guide insert into R2 needl...

Page 14: ...ara sustituir la cuchilla superior 8 Enhebrador de la aguja 9 Pinzas 10 Destornillador Allen de 1 5 mm 11 Surtido de agujas EL x 705 Accesorios de cubierta superior 12 Extensor gancho de cubierta supe...

Page 15: ...he foam pads and the spool holders The foam pads help stabilizing the spools of thread Both thread cones and spools of thread can be used q Foam pads w Spool holder 1 Thread cones For thread cones use...

Page 16: ...s de fil d coratif fils sp ciaux Disposer la bobine directement sur le disque de mousse pour emp cher le fil de glisser en dessous de la bobine SECCI N II Instalaci n de la M quina Fijaci n del Brazo...

Page 17: ...ys turn off the power switch and unplug the machine from the power supply when leaving the machine unattended when attaching or removing parts when cleaning the machine 3 Do not place anything on the...

Page 18: ...tallera une prise appropri e Ne modifier en aucune fa on la fiche Utiliser imp rativement la p dale YC 482M Le symbole O de l interrupteur indique la position Arr t Conexi n de la m quina a la aliment...

Page 19: ...nd needle eyes and hand pull threads away IMPORTANT Never press on foot control to sew out threads A Program display B Program selection dial C Program number D Differential feed ratio E Stitch length...

Page 20: ...du bouton de r glage de plaque aiguille M Position de la molette de tension du boucleur de point de cha nette marron Configuraci n de la m quina utilizando el panel del visor de programas Gire el cont...

Page 21: ...em Cover Hem Wide Cover Hem Narrow Chainstitch and 3 Top Cover Stitches B Program Selection Dial Turn the program selection dial until the desired stitch program number is shown in the program display...

Page 22: ...lac en position HAUTE signifie que le dispositif sera plac en position BASSE A Tipo de puntada Seleccione el n mero de programa que corresponda al tipo de puntada que desea emplear Hay 20 tipos de pun...

Page 23: ...empting to thread This ensures that all machine parts are correctly positioned and makes threading easier D Differential Feed DF Turn the DF dial to select the differential ratio shown on the display...

Page 24: ...et 3 rouge R gler la molette SL sur 2 5 entre 2 et 3 C N mero del programa El control de tensi n del hilo se ajusta autom ticamente a N al seleccionar el programa La tensi n se ajusta autom ticamente...

Page 25: ...insert Loosen the setscrew of the desired needle position Insert the needle with the flat side to the back Push the needle straight up as far as it will go and tighten the setscrew securely Turn the...

Page 26: ...oupe si les fils forment un point autour du doigt mailleur Retirer les fils en relevant le pied presseur et en les tirant doucement vers l arri re F Posici n de la aguja Hay cinco posiciones de la agu...

Page 27: ...pper knife up Push the upper knife release knob to the right and turn it away from you Example 5 Thread 3 Thread Wide and Overlock 3 engage upper knife up I 2 Thread Converter To engage the 2 thread c...

Page 28: ...il se bloque tout fait droite Exemple 5 fils 3 fils large et surjet 3 d sengager le convertisseur 2 fils H Cuchilla superior Para desenganchar la cuchilla superior abajo Gire el volante para elevar la...

Page 29: ...ush the overlock cover firmly until the tab snaps into place q Tab For program number 10 always attach the sewing table to the front cover To attach the sewing table Detach the overlock cover by pulli...

Page 30: ...vant Pousser fermement la table coudre jusqu ce que les languettes s encliqu tent q Languette J Cubierta de sobrehilado o mesa de coser Para los programas del 1 al 9 fije siempre la cubierta de sobreh...

Page 31: ...A Blue B 3 Thread Wide and Overlock 3 position B NOTE Replace the presser foot with the Top Cover foot R blue transparent when sewing Top Cover Stitch see page 56 L Needle Plate Setting Knob Chaining...

Page 32: ...agement position basse Pousser le bouton de r glage de la plaque aiguille vers le bas K Pie prensatelas A o B Coloque la palanca del pie prensatelas en la posici n A o B La palanca controla la acci n...

Page 33: ...er stitch formation at high speeds The scarf dent on needle back is important because it allows the looper to come near the needle to catch the thread and form a stitch EL x 705 needles are available...

Page 34: ...e assez haut en position L aiguille est mouss e ou pr sente des bavures Changer fr quemment l aiguille m me des aiguilles neuves peuvent pr senter des imperfections M Tensi n del ncora de cadeneta ma...

Page 35: ...eads such as polyester or polyester cotton blend A 100 cotton thread is too weak and will result in threads breaking IMPORTANT Locate the threading diagram for the stitch study the threading guides ca...

Page 36: ...orsad s serr s n cessitent un enfilage sp cial la fois par le trou et par l encoche SECCI N III Enhebrado Los trayectos de enhebrado cambiar n en funci n del programa seleccionado Para aprender a enhe...

Page 37: ...r use a thread that breaks easily if you pull on it Do not use fuzzy ex mohair yarn or uneven threads that can catch on thread guides Tension Release Clips Place the tension release clip into any thre...

Page 38: ...TANT En cas d utilisation de fils d coratifs coudre vitesse lente et constante pour viter des points irr guliers Despu s de enhebrar la barra gu a del hilo deslice el hilo en la primera gu a de la m q...

Page 39: ...at employs two needles The stitch stretches without breaking The second needle thread reinforces the durability and strength of the stitch but the stitch retains its elasticity Common Uses Excellent f...

Page 40: ...ajet du fil d aiguille R1 page 63 4 Bleu D3 trajet du fil d aiguille R2 page 65 Tablas de Referencia R pida para el Enhebrado Consulte las tablas de enhebrado para obtener informaci n acerca de los tr...

Page 41: ...ow B2 thread path for R1 needle page 63 4 Blue D3 thread path for R2 needle page 65 5 THREAD STITCH Select 2 and set up the machine A true 5 thread industrial stitch consists of two stitches sewn simu...

Page 42: ...70 71 4 Trayecto amarillo A para la aguja L2 p gina 62 5 Trayecto azul D2 para la aguja R1 p gina 65 POINT TRICOT EXTENSIBLE S lectionner 1 et configurer la machine Caract ristiques identiques au poi...

Page 43: ...th for upper looper page 67 2 Green G thread path for lower looper page 68 3 Blue D2 thread path for R1 needle page 65 OVERLOCK 3 Select 2 and set up the machine The same characteristics as the 3 Thre...

Page 44: ...2 Trayecto verde G para el ncora inferior p ginas 68 69 3 Trayecto azul D2 para la aguja R1 p gina 65 3 FILS LARGE S lectionner 2 et configurer la machine Trois fils se nouent ensemble sur le bord du...

Page 45: ...4 and set up the machine An edge finish that uses decorative thread in the needle The upper and lower looper threads pull the needle thread so it is visible on both the top and underside of the fabri...

Page 46: ...e desde la barra gu a del hilo hasta la zona del tirahilos FLATLOCK 3 S lectionner 3 et configurer la machine Trois fils forment un point non quilibr que l on peut ouvrir pour avoir une couture plat L...

Page 47: ...quence 1 Green G thread path for lower looper page 68 2 Yellow B2 thread path for R1 needle page 63 OVERCAST 2 Select 5 and set up the machine The needle and lower looper threads form an edge finish t...

Page 48: ...erde G para el ncora inferior p ginas 68 69 2 Trayecto amarillo B2 para la aguja R1 p gina 63 FLATLOCK 2 S lectionner 5 et configurer la machine Le fil d aiguille et le fil du boucleur inf rieur forme...

Page 49: ...ooper page 67 2 Green G thread path for lower looper page 68 3 Yellow B2 thread path for R1 needle page 63 ROLLED HEM 3 Select 7 and set up the machine Three threads form an unbalanced stitch When the...

Page 50: ...erde G para el ncora inferior p ginas 68 69 3 Trayecto amarillo B2 para la aguja R1 p gina 63 OURLET TROIT 3 S lectionner 6 et configurer la machine Trois fils forment un point quilibr qui donne une f...

Page 51: ...g sequence 1 Green G thread path for lower looper page 68 2 Yellow B2 thread path for R1 needle page 63 STRETCH WRAPPED Select 9 and set up the machine A stretch stitch that uses two needles and the l...

Page 52: ...68 69 2 Trayecto amarillo B2 para la aguja R1 p gina 63 3 Trayecto azul D3 para la aguja R2 p gina 65 OURLET ROULEAUT 2 S lectionner 8 et configurer la machine Le fil d aiguille et le fil de boucleur...

Page 53: ...w to the far left then blue and finally red Make sure to check that the upper looper is locked in the down position by turning the handwheel towards you COVER HEM WIDE Select 10 and set up the machine...

Page 54: ...uperior est bloqueada en la posici n inferior girando el volante hacia usted OURLET COUVERT TRIPLE S lectionner 10 et configurer la machine L ourlet couvert triple mesure 5 0 mm en largeur Il utilise...

Page 55: ...e upper looper is locked in the down position by turning the handwheel towards you CHAINSTITCH Select 10 and set up the machine IMPORTANT Set the needle thread tension dial yellow to 1 A 2 thread chai...

Page 56: ...ndo el volante hacia usted OURLET COUVERT TROIT S lectionner 10 et configurer la machine L ourlet couvert mesure 2 5 mm en largeur Il utilise deux aiguilles et le boucleur de point de cha nette pour f...

Page 57: ...ire a longer stitch length 5 Depending on Top Cover desired insert needles q Triple w Wide e Narrow 6 Press the lever on the back of the foot holder and remove the presser foot Place the Top Cover foo...

Page 58: ...mueve la palanca de cubierta superior con la cubierta frontal cerrada POINT DE RECOUVREMENT triple large et troit Surpiq re d corative de type industriel le recouvrement mesure 5 0 mm ou 2 5 mm en lar...

Page 59: ...nt cover Hand turn handwheel towards you to check spreader device movement and raise needles 12 Lift up the presser foot Place fabric under foot and needles Lower the presser foot 13 Bring the top cov...

Page 60: ...tornillo de palomilla 10 Tourner le volant la main vers soi pour v rifier le mouvement du dispositif tendeur Proc der l enfilage dans l ordre suivant 1 Marron I fil pour du boucleur de point de cha n...

Page 61: ...facing up Insert the thread into the Y notch of the threader from the right q Triangle mark w Y notch Slide the threader down along the needle while pushing it gently until the threader pin goes into...

Page 62: ...palanca tambi n puede utilizarse para retirar las puntadas del dedo de cadeneta Enfilage de l Aiguille avec l Enfile aiguille Tenir l enfile aiguille avec le rep re en forme de triangle tourn vers le...

Page 63: ...2 R L TABLAS DETALLADAS DE TRAYECTO DE ENHEBRADO TRAYECTO DE ENHEBRADO AMARILLO A a Important Make sure to pass the thread into the opening a of the thread take up lever Importante Aseg rese de pasar...

Page 64: ...READ ROUTE CHARTS THREAD ROUTE YELLOW B1 B2 TABLEAUX D ENFILAGE D TAILL S TRAJET DU FIL JAUNE B1 B2 B1 B2 1 2 0 1 2 R L 1 2 0 1 2 R L TABLAS DETALLADAS DE TRAYECTO DE ENHEBRADO TRAYECTO DE ENHEBRADO A...

Page 65: ...64 DETAILED THREAD ROUTE CHARTS THREAD ROUTE YELLOW C TABLEAUX D ENFILAGE D TAILL S TRAJET DU FIL JAUNE C 1 2 0 1 2 R L TABLAS DETALLADAS DE TRAYECTO DE ENHEBRADO TRAYECTO DE ENHEBRADO AMARILLO C...

Page 66: ...E CHARTS THREAD ROUTE BLUE D1 D2 D3 TABLEAUX D ENFILAGE D TAILL S TRAJET DU FIL BLEU D1 D2 D3 D1 D2 D3 1 2 0 1 2 R L 1 2 0 1 2 R L 1 2 0 1 2 R L TABLAS DETALLADAS DE TRAYECTO DE ENHEBRADO TRAYECTO DE...

Page 67: ...66 DETAILED THREAD ROUTE CHARTS THREAD ROUTE RED E TABLEAUX D ENFILAGE D TAILL S TRAJET DU FIL ROUGE E 1 2 0 1 2 R L TABLAS DETALLADAS DE TRAYECTO DE ENHEBRADO TRAYECTO DE ENHEBRADO ROJO E...

Page 68: ...67 DETAILED THREAD ROUTE CHARTS THREAD ROUTE RED F TABLEAUX D ENFILAGE D TAILL S TRAJET DU FIL ROUGE F TABLAS DETALLADAS DE TRAYECTO DE ENHEBRADO TRAYECTO DE ENHEBRADO ROJO F...

Page 69: ...G a b c Lower looper thread guide Push lever a down and hook the thread on the guide b Pass the thread from front to back through the hole c on far right end of the looper Draw the thread back to the...

Page 70: ...lo de delante atr s a trav s del orificio c en el extremo derecho del ncora Tire del hilo hacia la izquierda bajo el pie prensatelas dejando un segmento de 10 cm Guide fil de boucleur inf rieur Pousse...

Page 71: ...k the thread into the slit b from back to front Pull the thread along the looper and pass the thread from front to back through the hole c on far left end of looper Leave about 5 cm 2 of thread hangin...

Page 72: ...eneta se enganchar autom ticamente Importante Aseg rese de pasar el hilo bajo la gu a del hilo d junto a la palanca tirahilos Enfilage du boucleur de point de cha nette Tourner le volant la main de fa...

Page 73: ...n looper Hook the thread into the slit b from back to front Pull the thread along the looper and pass the thread from front to back through the hole c on far left end of looper Leave about 5 cm 2 of t...

Page 74: ...sici n m s alta el ncora de cadeneta se enganchar autom ticamente Importante No utilice la gu a del hilo d junto a la palanca tirahilos Enfilage du boucleur de point de cha nette Tourner le volant la...

Page 75: ...decrease the foot pressure depending on the type of fabric There are six positions Controlling Sewing Speed Sewing speed varies with the foot control The harder you press on the foot control the faste...

Page 76: ...estos Fije la bandeja a la cubierta frontal Esta bandeja atrapar los trozos de tela que se cortan SECTION IV Essai de Couture R glage de la Pression du Pied Le r glage standard est la position 5 On po...

Page 77: ...ually increase sewing speed Hand guide the fabric gently while sewing Check the stitch formation If the stitch has irregularities check the threading When you reach the end of the fabric continue runn...

Page 78: ...prensatelas al colocar la siguiente pieza de tela Lancement du Travail de Couture Toujours faire un essai de couture sur une chute du m me tissu que l ouvrage r aliser Placer la chute de tissu sous l...

Page 79: ...thread chain from the chaining finger Pull the thread chain to the back and then around to the front Secure the threads into the back tack device q Back tack device Place the fabric directly in front...

Page 80: ...5 hilos fest n cadeneta dobladillo ni dobladillo enrollado estrecho Dispositif pour points d arr t Le dispositif pour points d arr t permet d arr ter une couture au point de d part en enfermant une ch...

Page 81: ...ack Align the edge of the fabric with the needle plate and lower the presser foot Sew about 5 cm 2 over the seam and angle off the fabric IMPORTANT Re threading Machine After Thread Breaks If the uppe...

Page 82: ...inferior Vuelva a enhebrar los ojos de las agujas Es necesario enhebrar las agujas despu s del ncora inferior Arr t de l Extr mit de la Couture Coudre jusqu au bord du tissu et arr ter Relever les aig...

Page 83: ...ng Adjust only one tension setting at a time and then view the result before adjusting again Chainstitch Balanced Tension The chainstitch needle thread a resembles straight stitches on the topside 1 o...

Page 84: ...damente finos necesitan una menor longitud de puntada NO ajuste el control de longitud de la puntada por debajo de 2 5 SECTION V R glages Tension du Fil Il peut tre n cessaire d ajuster la tension du...

Page 85: ...r thread on the edge of the fabric The upper looper thread is too loose If the upper looper thread b is loose and pulled down to the underside of the fabric increase the upper looper thread tension re...

Page 86: ...o superior del tejido incremente la tensi n del hilo del ncora inferior verde y o reduzca la tensi n del hilo del ncora superior rojo Surjet 3 fils Tension quilibr e a Le fil d aiguille doit ressemble...

Page 87: ...the topside of the fabric increase the needle thread tension and or decrease the lower looper thread tension Cover Hem Balanced Tension The needle threads resemble parallel rows of straight stitches o...

Page 88: ...s hilos de la aguja est n demasiado tensos Si aparecen arrugas en el tejido los hilos de la aguja est n demasiado tensos Reduzca la tensi n de las agujas Surfil 2 fils Tension quilibr e Le fil d aigui...

Page 89: ...cs which tend to pucker when sewn Use the 0 5 setting for eliminating puckers There are two kinds of differential feed negative and positive Standard Feeding The front and rear feed dogs work as a sin...

Page 90: ...enen tensa la tela para eliminar las arrugas Entra nement Diff rentiel Sur une surjeteuse l entra nement diff rentiel est une griffe d entra nement en deux parties qui fait avancer le tissu diff rente...

Page 91: ...three layers of light to medium weight fabric Stitch length should be increased to 3 5 or 4 on heavy fabrics or when sewing over bulky seams while hemming Cutting Width The cutting width may be adjust...

Page 92: ...de las agujas del reloj Longueur de Point Il est possible d ajuster la longueur de point SL en fonction de l paisseur du tissu et de la densit des fibres La longueur de point peut tre r gl e entre 0...

Page 93: ...to its lowest position 2 Open the side cover 3 Use the Allen screwdriver to turn the screw clockwise until the upper knife cannot be disengaged 4 Close the side cover Sew NOTE After sewing extra heav...

Page 94: ...posible ajustar la anchura de corte con la cuchilla superior bloqueada Couture de points de surjet sur les tissus tr s pais Bloquer le couteau sup rieur de fa on disposer de la capacit de coupe maxim...

Page 95: ...g the stitching line for about 3 cm 1 1 2 before turning the fabric Make the cut to each corner before sewing begins Overlocking Inside Corners 1 Clip the inside corner approximately 4 mm 1 4 2 Pull t...

Page 96: ...o B Para las curvas hacia fuera act e de igual modo pero aplique las presiones en direcciones opuestas SECTION VI Techniques de couture Surjetage des Angles Ext rieurs Arr ter de coudre en arrivant la...

Page 97: ...will unravel Chainstitch Turning Corners Sew last stitch before turning point by hand turning the handwheel Complete the stitch Raise the needle slightly out of the fabric The needle eye will be out w...

Page 98: ...satelas y gire cuidadosamente la tela Baje el prensatelas y siga cosiendo D montage de points sur le tissu Couper le ou les fils d aiguille par endroits Tirer doucement sur les fils de boucleur Le poi...

Page 99: ...hreads Method 2 Stitch around the hem overlap the original starting point for about 13 mm 1 2 Stop the machine and turn the handwheel towards you to bring needles to the lowest position into the fabri...

Page 100: ...de que el prensatelas supere la costura aj stelo de nuevo a la presi n normal de 5 Ourlet couvert La majorit des v tements pr t porter sont assembl s par des ourlets confectionn s plat tandis que la c...

Page 101: ...nging needles to the highest position This releases the needle threads off the looper Raise the presser foot turn the fabric lower the needles into the fabric lower the presser foot and continue sewin...

Page 102: ...tela y fije el bucle hacia la esquina en el lado inferior de la tela Changement de Direction dans les Angles Coudre jusqu l endroit du changement de direction et arr ter avec les aiguilles relev es T...

Page 103: ...le Cover Hem The seam may be positioned either towards the ribbing or towards the garment fabric Topstitch by allowing the center needle to stitch in the ditch The outer needles will topstitch on the...

Page 104: ...Al tensar el hilo del ncora es posible que se arrugue la tela y disminuya su flexibilidad Ourlet Couvert Triple Surpiq re d une Couture en Surjet L ourlet couvert triple aplatit la couture en surjet...

Page 105: ...eedle plate by pushing down its release lever a Disengage the upper knife Use the brush to remove all lint and fiber accumulation Apply a drop of oil above and below the oiling arrows Oiling should be...

Page 106: ...rra del prensatelas El pie prensatelas encajar en su lugar SECTION VII Entretien Un bon nettoyage et une bonne lubrification sont indispensables pour assurer le rendement maximum de la machine Nettoya...

Page 107: ...f lint etc Lower the upper knife to its lowest position by turning the handwheel towards you At this position put a new upper knife in place making sure that the edge of the blade is approximately 0 5...

Page 108: ...nueva bombilla de 15 W en el casquillo Cierre la cubierta de la l mpara Remplacement du Couteau Sup rieur Un couteau sup rieur de rechange est fourni dans la bo te d accessoires Remplacer le couteau s...

Page 109: ...AKS Needle strikes foot or needle plate while pulling on fabric do not pull fabric gently guide it 76 Needle problems poor quality bent or dull 32 Needle s not inserted correctly 24 Needle size incorr...

Page 110: ...elo con suavidad 77 Problemas con las agujas mala calidad dobladas o romas 33 Aguja s mal introducida s 25 Tama o de la aguja incorrecto para el tejido 33 ATASCOS DE LA M QUINA Enhebrado incorrecto 3...

Page 111: ...n douceur 77 Probl mes d aiguille aiguille de mauvaise qualit tordue ou mouss e 33 Aiguilles mal ins r es 25 Taille de l aiguille inadapt e au tissu 31 LES FILS S EMM LENT SUR LA MACHINE Enfilage inco...

Page 112: ...32 O Oiling 104 Outside corners 94 OVERCAST 2 50 86 Overlock cover 30 OVERLOCK 3 46 86 P Power switch 8 16 Presser foot 10 20 30 56 76 Presser foot lever 10 76 Pressure adjustment dial 8 74 98 Progra...

Page 113: ...OBLADILLO ESTRECHO 3 53 DOBLADILLO TRIPLE 57 103 Enganche de la gu a del hilo 15 41 Engrasado 105 Enhebrador autom tico de agujas 15 61 Equilibrado de la tensi n 83 87 Exterior de las esquinas 95 F FE...

Page 114: ...Levier d ouverture de plaque aiguille 13 105 Levier de d brayage de tension 11 61 83 Levier de pied presseur 13 75 Levier de s curit de pince aiguille 13 37 75 Lubrification 105 M Molette de largeur d...

Page 115: ...770 800 XXX Printed in Japan...

Reviews: