background image

58

4

1

2

3

4

1

2

3

5

5

D

2

1

0

4

3

3

4

5

2

1

0

A

C

D

E

F

G

H

I

J

K

L

H

A

C

D

E

F

G

H

I

J

K

L

2

1

0

4

3

3

4

5

2

1

0

1

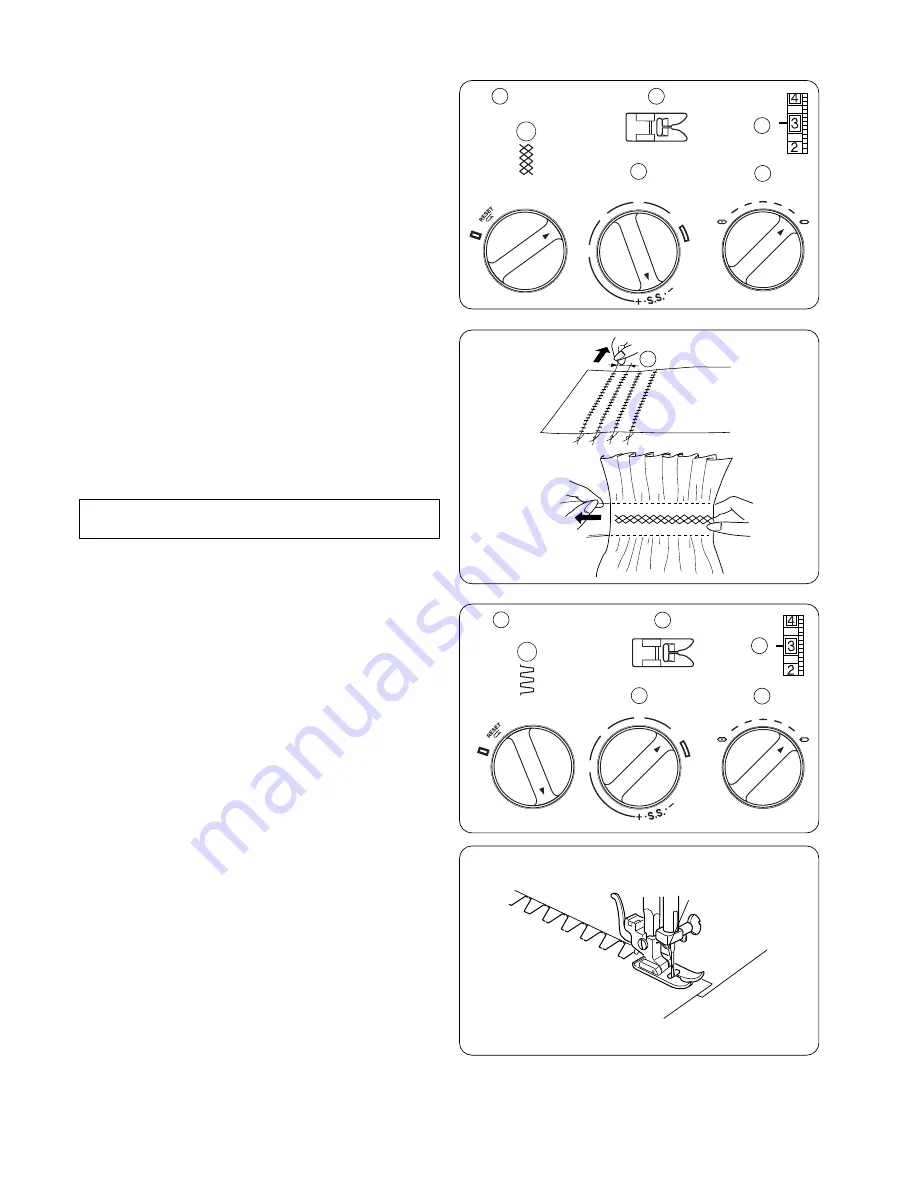
With the stitch length at “4”, sew straight stitching lines 1 cm

(3/8") apart, across the area to be smocked.

Knot the threads along one edge. Pull the bobbin threads and

distribute the gathers evenly.

Secure the threads at the other end.

Sew the decorative stitch between the gathering stitches.

Pull out the gathering stitches.

Use this stitch to join heavy weight fabrics.

Overlap two raw edges together and use this stitch to join

them.

Smocking

q

Pattern selector:

D

w

Presser foot:

Zigzag foot

e

Thread tension:

1–4

r

Stitch length:

S.S.

t

Stitch width:

5

Box Stitching

q

Pattern selector:

H

w

Presser foot:

Zigzag foot

e

Thread tension:

1–4

r

Stitch length:

0.5–2

t

Stitch width:

5

q

1 cm (3/8")

Note:

Loosen the needle thread tension to make gathering easier.

Summary of Contents for 2041

Page 1: ...SEWING MACHINE Owner s Manual MAQUINA DE COSER Manual de Instrucciones MACHINE COUDRE Manuel d instructions Models Modelos Mod les 2041 2049...

Page 2: ...I...

Page 3: ...II...

Page 4: ...III...

Page 5: ...ttern Selector Dial 28 Stitch Length Dial 28 Stitch Width Dial 28 Reverse Stitch Button 30 Dropping the Feed Dog 30 SECTION 3 BASIC SEWING 32 Straight Stitch Sewing 32 To change Sewing Direction 32 Us...

Page 6: ...ada 29 Bot n de puntada inversa 31 Descenso de los dientes transportadores 31 SECCI N 3 OPERACIONES B SICAS DE COSTURA 33 Costura de puntada recta 33 Cambio de direcci n de costura 33 Uso de las gu as...

Page 7: ...du point 29 Cadran de r glage de la largeur du point 29 Bouton point arri re 31 Abaisser la griffe d entra nement 31 SECTION 3 COUTURE DE BASE 33 Utilisation du point droit 33 Changer la direction de...

Page 8: ...per 6 Bobbin winder spindle 7 Spool pins 8 Bobbin winder thread guide 9 Thread guide 10 Thread take up lever 11 Thread tension dial 12 Face plate 13 Thread cutter 14 Needle threader optional 15 Needle...

Page 9: ...pcional 27 Elevador del prensatelas 1 Bouton point arri re 2 Cadran de s lection du point 3 Cadran de r glage de la longueur du point 4 Cadran de r glage de la largeur du point Except le Model 2041S 5...

Page 10: ...ne Advantages and uses of free arm sewing Avoid fabric bunching around the needle when bartacking to reinforce pockets plackets and waistlines For stitching sleeves waistbands pant legs or any circula...

Page 11: ...os o reas desgastadas de las prendas de ni os Extension de plateau L extension de plateau permet d agrandir la surface disponible pour coudre elle peut tre facilement d tach e pour les coutures sur br...

Page 12: ...t control Quilter bar for even foot These items are not furnished with the machine but may be ordered per instructions above Part No 102261000 639804000 302802005 731806001 611511001 737801015 6114060...

Page 13: ...s art culos no se proveen con la m quina pero pueden ser ordenados con las instrucciones arriba descritas D signation 3 x canettes Jeu d aiguille HA 14 x 3 Aiguilles jumel es Pied point droit Pied zig...

Page 14: ...ne socket 5 Machine plug 6 Foot control Caution Do not place anything on the foot control otherwise the machine will start advertently Polarized Plug This appliance has a polarized plug one blade wide...

Page 15: ...n marche ON Ceci met en route votre machine et la lumi re s allume 1 Fiche d alimentation 2 Bouton de mise en marche 3 Prise lectrique 4 Prise de la machine 5 Fiche de la machine 6 Commande p dale Com...

Page 16: ...To attach Place the presser foot so the pin on the foot lies just under the groove of the foot holder Lower the foot holder to lock the foot in place Presser Foot Lifter The presser foot lifter raise...

Page 17: ...lugar Mettre en place et enlever le pied presseur Enlever le pied presseur Tourner le volant vers soi pour faire remonter l aiguille jusqu sa position la plus lev e Soulever le pied presseur Appuyer s...

Page 18: ...dle into the clamp push it up as far as it will go and tighten the clamp screw firmly with the screwdriver Check your needles frequently for barbed or blunted points Snags and runs in knits fine silks...

Page 19: ...l aiguille du pince aiguille Placer la nouvelle aiguille dans le pince aiguille la partie plate tourn e vers l arri re Au moment de l insertion faire glisser l aiguille aussi loin que possible Bien s...

Page 20: ...often caused by damaged needles Always purchase a good quality thread It should be strong smooth and consistent in thickness Heavy Denim Sailcloth Ticking Denim 16 100 Double Faced Wool Heavy Coating...

Page 21: ...encia para comprobar que no est n embotadas o despuntadas Las agujas da adas suelen causar enganches y carrer as irreparables en tejidos de punto sedas finas y imitaci n de seda Adquiera siempre hilo...

Page 22: ...icots les soies fines et les toff es semblables la soie sont d finitifs et sont souvent provoqu s par des aiguilles ab m es Achetez toujours du fil de bonne qualit II doit tre solide lisse et d paiss...

Page 23: ...17 blank page p gina blanca page blanche...

Page 24: ...obbin case place the horn into the recess of the hook race 3 Horn Setting Spool Pins The spool pins are used for holding the spool of thread in order to feed thread to the machine To use pull up the s...

Page 25: ...dans la machine Lors de l utilisation sortir la broche porte bobines en la tirant L enfoncer pour le rangement 1 Fil de dessus 2 Oeillet 3 Nid de fils Pour replacer la bo te canettes positionner le do...

Page 26: ...s and cut the thread close to the hole in the bobbin 6 Depress the foot control again When the bobbin is fully wound stop the machine Return the bobbin winder spindle to its original position by movin...

Page 27: ...el poste del enrollador de la bobina en su posici n original moviendo el huso a la izquierda y corte el hilo 7 Mueva el volante a la izquierda posici n original 3 Tirer le fil sous le ressort de tens...

Page 28: ...5 Draw the thread down and slip it into needle bar thread guide on the left 6 Thread the needle eye from front to back Refer to page 24 for the built in needle threader Note You may want to cut the en...

Page 29: ...abajo dentro del rea de tensi n y despu s alrededor del soporte del resorte de freno Pr parer la machine coudre Lever le levier tendeur son point le plus haut en tournant le volant vers soi Soulever l...

Page 30: ...nd under the presser foot Needle Threader Models 2041NX 2049LX exclusive 1 Raise the needle to its highest position Pull down the needle threader knob as far as it will go 2 Turn the knob in the direc...

Page 31: ...l Janome Blue El hilo de tama o 50 a 100 tambi n debe trabajar bien Faire remonter le fil de canette 1 Soulever le pied presseur et maintenir doucement le fil de l aiguille dans la main gauche 2 Tourn...

Page 32: ...ow detail For an ideal zigzag stitch the bobbin thread does not show on the right side top side of the fabric and the needle thread shows slightly on the wrong side bottomside of the fabric 1 Needle t...

Page 33: ...inferior de la tela Aumente la tensi n del hilo de la aguja girando la perilla a un n mero m s alto R gler la tension du fil de la canette Pour une couture ordinaire il n est pas n cessaire de r gler...

Page 34: ...e stitching Adjust the dial in the 0 5 4 range when you sew the zigzag stitch Set the dial at S S to sew the stretch stitch pattern sewing If the stretch stitch pattern is not uneven turn the stitch l...

Page 35: ...oint et placer le rep re en face du symbole correspondant au point d sir 1 Rep re Perilla de longitud de puntada Gire la perilla de longitud de puntada para colocar la marca indicadora en la longitud...

Page 36: ...ook cover q Hook cover 2 To drop the feed dog pull down the drop lever and move it to the right as illustrated w Drop lever 3 To raise the feed dog pull down the drop lever and move it to the left as...

Page 37: ...ntes transportadores regresar n a la posici n superior cuando la m quina comience a funcionar Abaisser la griffe d entra nement 1 Ouvrir le couvercle du bo tier q Couvercle du bo tier 2 Pour abaisser...

Page 38: ...and position the fabric with its edge lining up with a seam guide line on the needle plate Lower the needle into the fabric Lower the presser foot and smooth the threads toward the back Depress the f...

Page 39: ...los al cortahilos Los hilos se cortan al largo adecuado para iniciar la pr xima costura Changer la direction de la couture Arr ter la machine et tourner le volant vers soi de fa on faire descendre l a...

Page 40: ...le by turning the handwheel towards you Raise the presser foot and turn the fabric to line the edge with the 1 6 cm 5 8 seam guide Lower the presser foot and begin stitching in the new direction w Cor...

Page 41: ...os indican la distancia entre la posici n central de la aguja y la l nea gu a Utiliser les guides de couture de la plaque aiguille Les guides de couture de la plaque aiguille vous permettront de mesur...

Page 42: ...tension 1 4 r Stitch length 1 2 t Stitch width 5 The zigzag stitch is used on the seam allowance to prevent fabric from fraying at raw edges Zigzag Stitching q Pattern selector C w Presser foot Zigzag...

Page 43: ...de patr n C w Prensatelas Prensatelas de zigzag e Tensi n del hilo 2 5 r Longitud de puntada 0 5 4 t Anchura de puntada 5 Le point zigzag q Cadran de s lection du point C w Pied presseur Pied zigzag...

Page 44: ...allow a 1 6 cm 5 8 seam Trim the seam allowance after sewing Tricot Stitch q Pattern selector D w Presser foot Zigzag foot e Thread tension 1 4 r Stitch length 0 5 4 t Stitch width 5 It is also handy...

Page 45: ...5 4 t Anchura de puntada 5 Le point tricot q Cadran de s lection du point D w Pied presseur Pied zigzag e Tension du fil 1 4 r Longueur du point 0 5 4 t Largeur du point 5 Ce point est utilis pour la...

Page 46: ...2 3 4 5 The stitch is sewn with two stitches forward and one stitch backward forming a seam that does not rip easily Straight Stretch Stitch q Pattern selector A w Presser foot Zigzag foot e Thread t...

Page 47: ...rensatelas de zigzag e Tensi n del hilo 2 6 r Longitud de puntada S S t Anchura de puntada 0 o 5 Le point droit extensible q Cadran de s lection du point A w Pied presseur Pied zigzag e Tension du fil...

Page 48: ...ck if the needle enters into both holes on the button Sew about 10 stitches and cut the needle and bobbin threads leaving 20 cm 8 tail v Bring the needle thread between the button and fabric through t...

Page 49: ...derecho de la tela Enrede los hilos en la espiga y telos b Suba los dientes transportador despu s de coser Coudre les boutons q Cadran de s lection du point C w Pied presseur Pied zigzag e Tension du...

Page 50: ...eady selected reset the dial once according to the procedure in 2 c Attach the automatic buttonhole foot v Pull the button holder to the back and place the button in it Push back the button holder tow...

Page 51: ...nte tal como se muestra La taille de la boutonni re est mesur e automatiquement d s que le bouton est plac dans le pied pour boutonni re automatique Le support bouton du pied convient des boutons d un...

Page 52: ...by pulling the bobbin thread Then knot the threads 1 Insert a pin inside the bartack Then cut the opening with seam ripper Take care not to cut the stitches 2 To repeat buttonhole sewing turn the sti...

Page 53: ...ur r gler la densit du point de boutonni re Pour r gler la densit du point de boutonni re r gler le cadran de r glage de la longueur du point entre 0 5 et 1 0 3 Lorsque les boutonni res sont termin es...

Page 54: ...Bring the ends toward you under the buttonhole foot clearing the front end Hook the filler cord into the forks on the front of the automatic buttonhole foot to hold them tight Lower the needle into t...

Page 55: ...a y corte Para cortar la abertura del ojal consulte las instrucciones en la p gina 47 Les boutonni res gans es Exclusivit des Mod les 2041SX 2041NX 2049SX 2049LX q Cadran de s lection du point BH w Pi...

Page 56: ...wing at a left stitch 4 Set the pattern selector dial at Sew 5 stitches Stop sewing at a right stitch 5 Set the pattern selector dial at Sew until you reach the back marking of the buttonhole Stop sew...

Page 57: ...puntadas Termine cosiendo con una puntada derecha b Ajuste el selector de puntada a Cosa hasta que alcance la marca trasera del ojal Termine cosiendo con una puntada derecha n Ajuste el selector de pu...

Page 58: ...er the foot To sew the left side of the zipper guide the zipper teeth along the edge of the foot and stitch through the garment and zipper tape Turn the fabric and sew the other side of the zipper in...

Page 59: ...telas Prensatelas para cremalleras e Tensi n del hilo 3 6 r Longitud de puntada 1 5 4 t Anchura de puntada 0 Installation des fermetures clair q Cadran de s lection du point A w Pied presseur Pied pou...

Page 60: ...0 4 to 0 7 cm 1 4 A Heavy weight fabrics B Fine or medium weight fabrics x Position the fabric so that the needle just pierces the edge of the fold when the needle swings to the extreme right Lower t...

Page 61: ...dobladillo invisible e Tensi n del hilo 2 4 r Longitud de puntada 1 3 t Anchura de puntada 5 L ourlet invisible q Cadran de s lection du point E ou F w Pied presseur Pied pour ourlet invisible e Tens...

Page 62: ...toward If patterns are drawn turn the dial toward See page 28 SECTION 5 DECORATIVE STITCHING Shell Tuck q Pattern selector G w Presser foot Zigzag foot e Thread tension 6 8 r Stitch length 2 3 t Stitc...

Page 63: ...H Modelo 2041 A L Modelo 2049 w Prensatelas Prensatelas para zigzag e Tensi n del hilo 1 4 r Longitud de puntada S S t Anchura de puntada 5 Si l entra nement avant ou arri re est d s quilibr du fait...

Page 64: ...at the other end Sew the decorative stitch between the gathering stitches Pull out the gathering stitches Use this stitch to join heavy weight fabrics Overlap two raw edges together and use this stit...

Page 65: ...4 r Longitud de puntada 0 5 2 t Anchura de puntada 5 q 1 cm 3 8 Nota Afloje la tensi n del hilo de la aguja para hacer el fruncido Le point smocks q Cadran de s lection du point D w Pied presseur Pied...

Page 66: ...corners lower the needle down into the fabric Raise the presser foot and pivot fabric to the right or left For a delicate appearance on fabric such as chiffon use a single layer with a tear away back...

Page 67: ...las para zigzag e Tensi n del hilo 1 4 r Longitud de puntada 0 5 1 t Anchura de puntada 5 Le point pour appliques q Cadran de s lection du point C w Pied presseur Pied zigzag e Tension du fil 1 4 r Lo...

Page 68: ...d turn the fabric Twin Needle Sewing Except Model 2041S q Pattern selector D G Models 2041SX 2041NX D L Models 2049SX 2049LX w Presser foot Zigzag foot e Thread tension 1 4 r Stitch length 0 5 1 Satin...

Page 69: ...da a m s de 3 o la aguja golpear a placa de agujas y se romper Coudre avec des aiguilles jumel es Except Model 2041S q Cadran de s lection du point D G ExclusivoMod le2041SX 2041NX D L ExclusivoMod le...

Page 70: ...d presser foot c Loosen the setscrew and remove the foot holder v Attach even foot to the presser bar with the lever above the needle cramp and secure it with the setscrew NOTE Sew at low to medium sp...

Page 71: ...ant les tissus gr ce des griffes d entra nement sup rieures et inf rieures Le pied griffes est particuli rement appropri pour les tissus fins les tricots le cuir et le tissu cossais z Mettre le bouton...

Page 72: ...ove the hook race ring Remove the hook Clean the hook race with a brush and a soft dry cloth To assemble hook race unit Hold the hook by the center pin and fit it carefully back into the hook race for...

Page 73: ...pague el interruptor o desconecte la m quina Nota Apague el interruptor o desconecte la m quina antes de limpiar las garras transportadoras Pour d monter la coursi re Relever l aiguille jusqu son poin...

Page 74: ...face plate off the sewing machine by removing the setscrew Unplug the power supply before changing the bulb Do not dismantle the machine other than explained in this manual To remove Turn to the left...

Page 75: ...La bombilla puede estar CALIENTE Proteja sus dedos cuando lo manipule Lampe de couture La lampe de couture est situ e derri re la plaque frontale Pour changer l ampoule enlever la plaque frontale de l...

Page 76: ...o fine for the fabric being sewn 7 The pattern selector dial had been turned while the needle was in the material 1 The needle is incorrectly inserted 2 The needle is bent or blunt 3 The needle and or...

Page 77: ...ser puntadas el sticas telas muy finas o telas sint ticas 5 La tela no es llevada atr s al terminar de coser 6 La aguja es demasiado fina para la tela que est cosiendo 7 La perilla de selecci n de pat...

Page 78: ...du fil de l aiguille El hilo de la bobina se rompe La aguja se rompe Se omiten puntadas Costuras fruncidas Las puntadas forman bucles debajo del trabajo La tela no se alimenta de manera uniforme La m...

Page 79: ...e en usine Assurez vous que vous essuyez soigneusement la r gion autour de la plaque d aiguille le pla teau et la navette avant de coudre un v tement Faites un essai sur une chute de tissu pour absorb...

Page 80: ...hilo Utilice el tipo de hilo y tama o de aguja recomendados en el manual de instrucciones El hilo debe desprenderse de la parte posterior de la bobina tal como se muestra FIL SUP RIEUR V rifiez que l...

Page 81: ...telas REMONTE DU FIL DE DESSOUS Retenez lefil sortant de l aiguille de la main gauche et tournez le bouton de mouvement vers vous Passez les deux fils sous le pied de biche en les tirant vers l arri r...

Page 82: ...Prensatelas para zigzag Pied zigzag 0 5 4 2 STITCH WIDTH 2 ANCHURA DE PUNTADA 2 LARGEUR DU POINT 0 5 or o ou 2 5 5 1 2 5 1 4 0 5 4 5 1 4 S S 5 1 4 S S 0 5 or o ou 2 6 Any Cualquiera Au choix Adjust a...

Reviews: