background image

www.toews.com

73

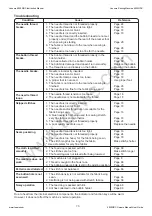
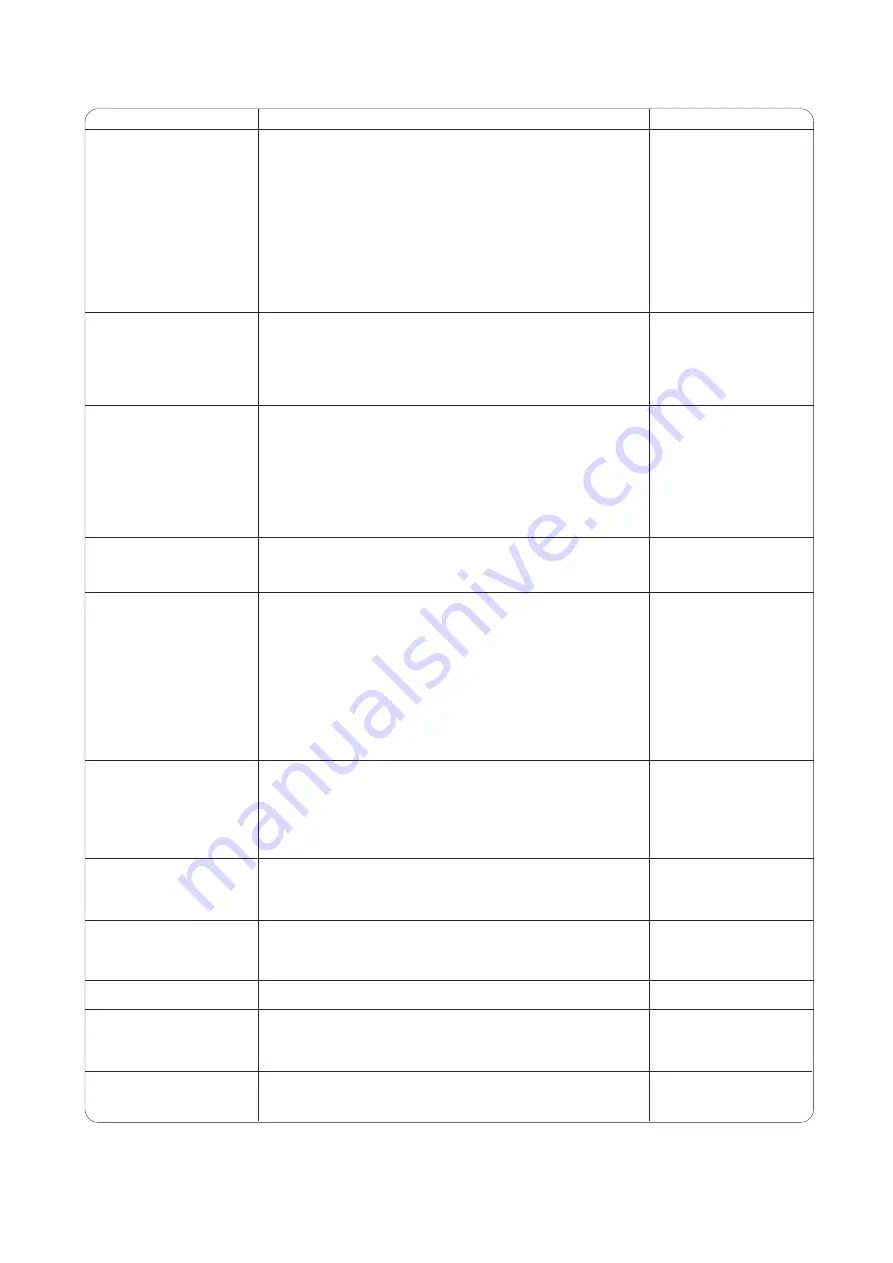
Condition

Cause

Reference

The needle breaks.

Skipped stitches

Seam puckering

The cloth is not fed
smoothly.

The needle thread
breaks.

The bobbin thread
breaks.

1. The needle thread is not threaded properly.
2. The needle thread tension is too tight.
3. The needle is bent or blunt.
4. The needle is incorrectly inserted.
5. The needle thread and the bobbin thread are not set

properly under (drawn to the rear of) the presser foot
when sewing is starting.

6. The fabric is not drawn to the rear when sewing is

finished.

7. The thread is too heavy or too fine for the needle.

1. The bobbin thread is not threaded properly in the

bobbin holder.

2. Lint has collected in the bobbin holder.
3. The bobbin is damaged and doesn’t turn smoothly.
4. The thread is wound loosely on the bobbin.

1. Needle is incorrectly inserted.
2. The needle is bent or blunt.
3. The needle clamp screw is too loose.
4. A proper foot is not used.
5. The fabric is not drawn to the rear when sewing is

finished.

6. The needle is too fine for the fabric being sewn.

1. The needle is incorrectly inserted.
2. The needle is bent or blunt.
3. The needle and/or thread are not suitable for the

fabric being sewn.

4. A blue needle is not being used for sewing stretch,

very fine fabrics and synthetics.

5. The needle thread is not threaded properly.
6. A poor quality needle is used.

1. The needle thread tension is too tight.
2. The needle thread is not threaded properly.
3. The needle is too heavy for the fabric being sewn.
4. The stitch length is too long for the fabric.
* Use a stabilizer for very fine fabrics.

1. The feed dog is packed with lint.
2. The stitches are too fine.
3. The feed dog was not raised after being lowered.

Page 24
Page 16
Page 18
Page 18

Page 28

Page 28
Page 18

Page 22
Page 68
Replace the bobbin
Re-wind the bobbin.

Page 18
Page 18
Page 18
Use proper foot.

Page 28
Page 18

Page 18
Page 18

Page 18

Page 18
Page 24
Replace the needle

Page 16
Page 24
Page 18
Make stitch shorter

Page 68
Make stitch longer
Page 14

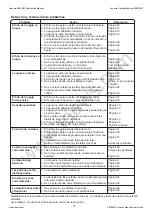
The buttonhole is not
sewn well.

The machine does not
work.

Patterns are distorted.

1. The machine is not plugged in.
2. Thread is caught in the hook race.
3. The bobbin winder spindle is still in the winding position.

1. The stitch is not balanced.

1. The stitch density is not suitable for the fabric being

sewn.

2. Interfacing is not being used with stretch fabrics.

Page 8
Page 68
Page 20

Page 66

Page 44
Page 38

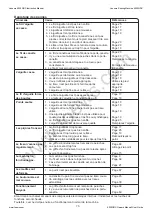
Troubleshooting

The needle thread
loops.

1. The needle thread tension is too loose.
2. The needle size is not suitable for the thread.

Page 16
Page 18

Noisy operation

1. The feed dog is packed with lint.
2. Lint has collected in the bobbin holder.

Page 68
Page 68

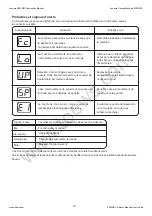
Due to heat from the internal electronic components, the indicator and function keys will be warm.
However, it does not affect the machine’s normal operation.

Janome 4030QDC Instruction Manual 

Janome Sewing Machine 4030QDC

www.toews.com

4030QDC Owners Manual/ User Guide

Summary of Contents for 4030QDC

Page 1: ...t o e w s c o m Janome 4030QDC Instruction Manual MANUAL DE INSTRUCCIONES MANUEL D INSTRUCTIONS Janome 4030QDC Instruction Manual Janome Sewing Machine 4030QDC www toews com 4030QDC Owners Manual User...

Page 2: ...lines 32 To sew from the edge of thick fabric 32 Zigzag Stitch 34 Altering the stitch width 34 Altering the stitch length 34 Variety of Overcasting Stitches 36 Overcasting with zigzag stitch 36 Multip...

Page 3: ...a de costura 33 Para coser desde el borde de una tela gruesa 33 Puntadas en zigzag 35 Modificaci n del ancho de la puntada 35 Modificaci n de la longitud de la puntada 35 Variedad de puntadas de cobe...

Page 4: ...on du positionnement de l aiguille 31 Utilisation des lignes guides de couture 33 Pour coudre pr s du bord d un tissu pais 33 Point zigzag 35 Modification de la largeur de point 35 Modification de la...

Page 5: ...ccessory storage 16 Hook cover plate 17 Hook cover plate release button 18 Stitch balance adjusting dial 19 Start Stop button 20 Reverse button 21 Auto lock button 22 Up down needle button 23 Speed co...

Page 6: ...n 40 Manual de instrucciones FAMILIARISATION AVEC LA MACHINE D nomination des composants 1 Boutons de s lection des modes 2 Bouton Moins 3 Bouton Plus 4 Fen tre indicatrice 5 Disque fixe bobine grand...

Page 7: ...pool Holder Small 11 Spool stand 12 Felt Extension table The extension table provides an added sewing surface and can be easily removed for free arm sewing Attaching extension table Push the extension...

Page 8: ...ampliaci n hasta que encaje en la m quina q Pasador w Orificio Accessoires standard Les accessoires standard sont rang s dans la table rallonge q Table rallonge w Accessoires standard Table rallonge L...

Page 9: ...indicates the off position of a switch For U S A and Canada only To reduce the risk of electric shock this plug is intended to fit in a polarized outlet only one way If it does not fit fully in the o...

Page 10: ...ement de la machine au secteur Mettez l interrupteur d alimentation en position d arr t Introduisez la fiche de la p dale dans la prise de la machine Introduisez la fiche de la machine dans la prise d...

Page 11: ...ss the reverse button when sewing any other stitches the machine will immediately sew locking stitches and automatically stop r Up Down needle button Press this button to bring the needle up or down T...

Page 12: ...e fija el deslizador de control de la velocidad NOTA El bot n de inicio parada no se puede usar mientras este conectado el pedal a la m quina e Bouton d arr t automatique Pour les motifs n 01 02 08 ou...

Page 13: ...The stitch length of the selected pattern will be indicated To alter the stitch length press the key r Mode key Each time you press this key the mode will change in the following order 1 Pattern selec...

Page 14: ...del patr n seleccionado Para cambiar la longitud de la puntada pulse la tecla t Touche mode Chaque fois que vous appuyez sur cette touche vous modifiez le mode dans l ordre suivant 1 Mode de s lection...

Page 15: ...he foot holder To detach Raise the presser bar and turn the setscrew counterclockwise to remove the foot holder q Setscrew w Foot holder To attach Align the hole in the foot holder with the threaded h...

Page 16: ...la griffe d entra nement La griffe d entra nement peut tre abaiss e l aide du curseur d escamotage pour coudre des boutons etc Poussez le curseur d escamotage vers la droite pour abaisser la griffe d...

Page 17: ...wing materials layers of fabric and other sewing conditions Needle thread tension is too tight if the bobbin thread appears on the right side of the fabric Loosen the needle thread tension by moving t...

Page 18: ...niendo el indicador en un n mero m s alto Relevage et abaissement du pied presseur Le rel ve presseur sert relever et abaisser le pied presseur Vous pouvez relever le pied presseur environ 6 mm de plu...

Page 19: ...Pure Silk Crepe de Chine Sheer Crepe Chambray Handkerchief Linen Gingham Challis Percale Wool Crepe Peau de Soie Taffeta Satin Silk Surah Satin backed Crepe Qiana Single Knits Jersey Swimwear and Tric...

Page 20: ...hangement d aiguille ATTENTION Veillez toujours mettre la machine hors tension et d brancher le cordon d alimentation de la prise secteur avant de changer l aiguille Relevez l aiguille en appuyant sur...

Page 21: ...place a spool of thread on it as shown q Additional spool pin w Felt e Hole r Spool stand Threading for bobbin winding 1 Set the speed control slider at Guide the thread around the thread guide q Thr...

Page 22: ...e Retrait de la canette 1 Faites glisser le bouton d ouverture de la plaque de recouvrement du crochet vers la droite puis retirez celle ci q Bouton d ouverture de la plaque de recouvrement du crochet...

Page 23: ...h on the front 3 Draw the thread to the left sliding it between the tension spring blades r Spring blades 4 Continue to draw the thread lightly until the thread slips into the notch on the side t Notc...

Page 24: ...ncia y Gr fico de enhebrado Introduction de la canette 1 Placez la canette dans le porte canette avec le fil tournant dans le sens contraire des aiguilles d une montre q Fil w Porte canette 2 Guidez l...

Page 25: ...isks w Thread guide e Right channel r Tension disks 3 Then draw the thread around the bottom of the thread guide plate t Thread guide plate 4 Firmly draw the thread up along the left channel to the ta...

Page 26: ...la machine Relevez le pied presseur Appuyez sur le bouton de position d aiguille Haute Basse afin de relever le bras de relevage du fil sa position la plus lev e 1 Tirez le fil de la bobine Tenez le...

Page 27: ...urning the hand wheel toward you Turn the power switch off Lower the presser foot Depress the needle threader knob as far as it will go The hook comes out through the needle eye from behind q Needle t...

Page 28: ...pie prensatelas Enfile aiguille int gr 1 Relevez l aiguille sa position la plus lev e en tournant le volant vers vous Mettez l interrupteur d alimentation en position d arr t Abaissez le pied presseur...

Page 29: ...sing the reverse button once BASIC STITCHES Straight Stitch To sew Raise the presser foot and position the fabric next to a seam guide line on the needle plate Lower the needle into the fabric where y...

Page 30: ...al de la costura POINTS DE BASE Point droit R glages de la machine q Motif 01 w Pied presseur Pied de point zigzag A e Tension du fil 2 6 Pour coudre Relevez le pied puis positionnez le tissu c t d un...

Page 31: ...the needle drop to the right Press the minus key to move the needle drop to the left Altering the stitch length The stitch length can be altered between 0 0 and 5 0 Press the mode key to activate stit...

Page 32: ...jada de la aguja a la derecha Pulse la tecla menos para mover la posici n de bajada de la aguja a la izquierda ndern der Stichl nge Die Stichl nge kann von 0 0 bis 5 0 eingestellt werden Dr cken Sie d...

Page 33: ...ton The foot will be locked in the horizontal position to avoid slipping The foot will be unlocked after sewing a few stitches q Black button 15 20 4 8 5 8 6 8 1 5 2 0 4 8 5 8 6 8 Number Distance cm D...

Page 34: ...telas se desbloquear tras unas cuantas puntadas q Bot n negro Utilisation des lignes guides de couture Les guides de couture trac s sur la plaque aiguille et le couvercle du crochet vous facilitent la...

Page 35: ...tch width can be altered between 0 0 and 7 0 Press the mode key to activate stitch width adjustment the middle green light lights up The preset value 5 0 will be indicated Press the plus key to increa...

Page 36: ...ante el trabajo de costura Configuraci n de la m quina q Patr n n 08 w Pie Prensatelas Pie A para zigzag e Tenci n de hilo 3 7 Zickzackstich Maschineneinstellungen q Muster 08 w N hfu Zick Zack Fu A e...

Page 37: ...fabrics Use this stitch when you do not need to open seams flat Carefully guide the fabric so the needle falls off the edge when it swings to the right Overcasting with zigzag stitch Carefully guide t...

Page 38: ...a m quina q Patr n n 10 w Pie Prensatelas Pie A para zigzag e Tenci n de hilo 3 7 Diff rents points de surfilage Surfilage avec le point zigzag R glages de la machine q Motif 08 w Pied presseu Pied de...

Page 39: ...buttonhole NOTES The size of a buttonhole is automatically set by placing a button in the rear of automatic buttonhole foot R The button holder of the foot takes a button size of 0 5 cm 3 16 to 2 5 cm...

Page 40: ...Divers types de boutonni re N 16 Boutonni res carr es Cette boutonni re carr e est tr s utilis e sur les tissus moyennement pais pais La taille de la boutonni re est automatiquement d termin e en pla...

Page 41: ...he length of the buttonhole will be increased e Button Holder r Extra gap 3 Pull the buttonhole lever down as far as it will go t Buttonhole Lever 4 Insert the corner of the fabric under the foot Pres...

Page 42: ...ura Pour coudre 1 Appuyez sur le bouton de position d aiguille Haute Basse afin de relever celle ci Installez le pied de boutonni re automatique R en enclenchant la charni re dans l chancrure du porte...

Page 43: ...be sewn then lower the foot and start the machine 6 Remove the fabric and place a pin just below the bartack at each end to prevent accidentally cutting stitches Cut the opening with the seam ripper U...

Page 44: ...D marrez la machine pour coudre la boutonni re La couture de la boutonni re se fait automatiquement tape 1 La machine commence par coudre l arr t de devant et la rang e de gauche Elle revient ensuite...

Page 45: ...ile sewing When the buttonhole is completed the indicator will show the pattern number Double layer buttonhole To make a solid and sturdy buttonhole sew another layer of buttonhole over the previous s...

Page 46: ...de la largeur de boutonni re Appuyez sur la touche mode pour activer le r glage de largeur de point Appuyez sur la touche plus pour accro tre la largeur de boutonni re Appuyez sur la touche moins pour...

Page 47: ...s the plus key to increase the buttonhole width Press the minus key to decrease the buttonhole width q Narrower buttonhole w Wider buttonhole The width can be altered between 5 0 and 7 0 See page 44 f...

Page 48: ...5 Boutonni res arrondies et illet R glages de la machine q Motif de point N 17 ou 18 w Pied presseur Pied de boutonni re automatique R e Tension du fil 1 5 La technique de couture est la m me que cell...

Page 49: ...le foot clearing the front end Hook the ends of the filler cord into the forks on the front of the buttonhole foot to hold them tight q Spur w Forks e Cord 3 Lower the needle into the garment where th...

Page 50: ...ilo 1 5 Boutonni re cordonnet R glages de la machine q Motif 16 w Pied presseur Pied de boutonni re automatique R e Tension du fil 1 5 Pour coudre une boutonni re cordonnet suivez les m mes tapes que...

Page 51: ...the button Adjust the stitch width if necessary Rethread the machine and sew about 10 stitches at a slow speed set the speed control slider at Raise the presser foot and remove the fabric Trim both ne...

Page 52: ...arrastre cuando haya terminado de coser Couture des boutons R glages de la machine q Motif 08 w Pied presseur Pied de point pass F e Tension du fil 3 7 r Griffe d entra nement Position abaiss e Retir...

Page 53: ...orter darning To sew a darning shorter than 2 cm 3 4 first stop the machine after sewing the required length then press the reverse button The required length has been determined Restart the machine a...

Page 54: ...hilo 1 5 Reprise R glages de la machine q Motif 22 w Pied presseur Pied de boutonni re automatique R e Tension du fil 1 5 Tirez le porte bouton vers l arri re Placez le v tement sous le pied Appuyez...

Page 55: ...reverse stitching Increase the stitch length manually to 5 mm 3 16 and loosen the tension to 1 to sew the zipper opening with basting stitches 0 2 cm 13 16 seam allowance 1 Basting stitches 2 Reverse...

Page 56: ...eture glissi re R glages de la machine q Motif 01 w Pied presseur Pied semelle troite E e Tension du fil 2 6 ATTENTION Lorsque vous utilisez le pied semelle troite veillez bien utiliser le motif 01 po...

Page 57: ...2 Basting Stitches 7 Move the slider behind the presser foot Lower the presser foot and stitch the remainder of the seam After finishing remove the basting stitches 0 Basting stitches 2 Set the stitch...

Page 58: ...R glez la longueur de point de nouveau sur 2 2 et la tension du fil sur A Installez le pied semelle troite E sur le c t droit de la charni re Traversez le pli et le ruban de la fermeture glissi re en...

Page 59: ...swings to the left Lower the presser foot 3 Sew guiding the folded edge 4 Open the fabric after sewing e Right side of fabric If the needle pierces too far left the stitches will show on the right sid...

Page 60: ...rde del pliegue Configuraci n de la m quina q Patr n n 14 w Pie Prensatelas Pie A para zigzag e Tenci n de hilo 3 6 Ourlet invisible R glages de la machine q Motif de point 14 w Pied presseur Pied de...

Page 61: ...stitch foot F e Thread tension 1 4 DECORATIVE STITCHES Shell Tucking Machine Settings q Pattern 15 w Presser foot Satin stitch foot F e Thread tension 6 8 Increase the needle thread tension to 6 8 Fol...

Page 62: ...a se detendr autom ticamente al terminarlo POINTS D CORATIFS Point coquille R glages de la machine q Motif 15 w Pied presseur Pied de point pass F e Tension du fil 6 8 Augmentez la tension du fil d ai...

Page 63: ...ve lower the needle into the applique at the left swing and turn the fabric to a new direction Sew the seam with straight stitch and press seam allowance to open Sew pattern 34 or 38 on the right side...

Page 64: ...satelas Pie F de puntadas de realce e Tensi n del hilo 1 4 Appliqu s R glages de la machine q Motif 28 w Pied presseur Pied de point pass F e Tension du fil 1 4 Placez l appliqu sur le tissu et cousez...

Page 65: ...top automatically when the second unit is completed q Auto lock button 2 Select pattern 30 Press the auto lock button and start sewing 3 Machine will sew one unit of pattern 30 and stop automatically...

Page 66: ...F de puntadas de realce e Tensi n del hilo 1 4 Combinaison de motifs R glages de la machine q Motif 25 et 30 exemple w Pied presseur Pied de point pass F e Tension du fil 1 4 Pour allier 2 unit s du m...

Page 67: ...nd attach the cap NOTE Replace the bulb with the same type rated 12V 5W part number 000026002 Correcting Distorted Stretch Patterns The sewing results of the stretch patterns may vary depending upon t...

Page 68: ...de estar CALIENTE Si es as espere hasta que se enfr e antes de tocarla Correction de motifs stretch d form s Les r sultats obtenus avec les motifs stretch peuvent varier selon les conditions de coutur...

Page 69: ...lint brush t Lint brush 4 Clean the feed dog and hook race with the lint brush y Feed dog u Hook race 5 Clean the hook race with a soft dry cloth You may also use a vacuum cleaner Inserting the bobbin...

Page 70: ...rensatelas Nettoyage du logement du crochet AVERTISSEMENT Coupez l alimentation et d branchez la machine avant de proc der son nettoyage REMARQUE Ne d montez pas la machine en outrepassant les instruc...

Page 71: ...5 seconds to restart If threads are jamming remove jammed threads The machine is malfunctioning due to a problem in the electronic components Contact the service center or the store from where the mac...

Page 72: ...vante la palanca de ojales y vuelva a seleccionar el patr n El huso de la bobinadora se mueve a la derecha para el bobinado Vuelva a poner la bobinadora a la izquierda La m quina no funciona correctam...

Page 73: ...l d alerte S lection d un motif apr s avoir termin la couture d une boutonni re alors que le levier de boutonni re est toujours abaiss L axe d enroulement de canette est pouss vers la droite pour le b...

Page 74: ...tension is too tight 2 The needle thread is not threaded properly 3 The needle is too heavy for the fabric being sewn 4 The stitch length is too long for the fabric Use a stabilizer for very fine fabr...

Page 75: ...o est insertada correctamente 2 La aguja est doblada o da ada 3 La aguja y o los hilos no son adecuados para la tela que se va a coser 4 No se est usando una aguja azul para coser telas el sticas muy...

Page 76: ...enfil 3 L aiguille est trop lourde pour le tissu 4 Le point est trop long pour le tissu Utilisez un tissu stabilisant pour les tissus tr s fins 1 La griffe d entra nement est remplie de peluches 2 Les...

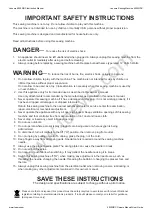
Page 77: ...rical or mechanical adjustment 4 Never operate the appliance with any air opening blocked Keep ventilation openings of this sewing machine and foot controller free from accumulation of lint dust and l...

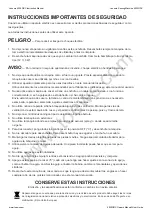
Page 78: ...quina de coser y el pedal de control libres de pelusa polvo y trozos de tela 5 No deje caer ni introduzca ning n tipo de objeto en ninguna abertura 6 No utilice la m quina en exteriores 7 No utilice...

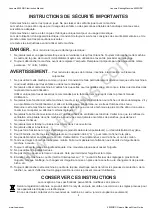
Page 79: ...e technique le plus proche afin qu on puisse l examiner la r parer ou effectuer certains r glages 4 Ne jamais faire fonctionner la machine si l un des orifices de ventilation est obstru Veiller ce que...

Page 80: ...w t o e w s c o m 843 800 692 En Sp Fr Printed in Taiwan Impreso en Taiwan Imprem en Taiwan Janome 4030QDC Instruction Manual Janome Sewing Machine 4030QDC www toews com 4030QDC Owners Manual User Gu...

Reviews: