16
mEChaniCal adjustmEnt
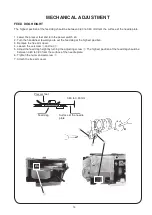
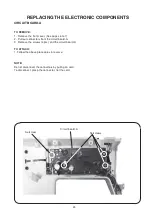
strEtCh stitCh FEEd balanCE
to check:
1. Enter the self-diagnostic mode (see below).
Attach the Satin stitch foot F. Place a fabric under the presser foot. Lower the presser foot.
2. Press the locking stitch button to start test sew, and check the results (the standard figure length of 5
pieces of figure 8 is 33 to 39 mm).
3. If stretch patterns are distorted, correct them with the feed balancing dial.
If stretch patterns are too deformed and cannot be corrected with the feed balancing dial, adjust as follows.
to adjust:
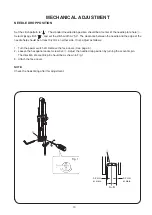
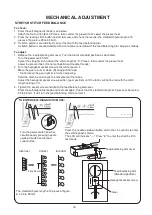
1. Remove the feed balancing dial cover. Turn the dial at standard position as illustrated.
Turn the power switch ON.
Select the straight stitch and set the stitch length at “0”. Place a fabric under the presser foot.
Lower the presser foot. (Do not set bobbin and needle threads)
2. Turn the hexagonal socket screw to the left to loosen it.
Move the gear up (A) or down (B) to adjust the feed.
* Do not move the gear right or left when adjusting.
Start the machine and check the movement of the fabric.
Adjust the hexagonal socket screw position (gear position) until the fabric will not be fed with the stitch
length setting at “0”.
3. Tighten the socket screw and attach the feed balancing dial cover.
Enter the self-diagnostic mode and test sew again. Check that the standard length of 5 pieces of figure 8 is
33 to 39 mm. If not, turn the feed balancing dial to correct it.
Correct
Incorrect
Incorrect
Feed balancing dial
(Standard position)
Hexagonal socket screw
Feed balancing dial cover
(A)
(B)
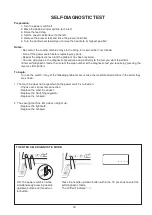
to EntEr sElF-diagnostiC modE:
Turn the power switch on while
simultaneously pressing needle
up/down button and thread
cutter button.
33 to 39 mm
Press the needle up/down button within the 1.5 seconds to enter
the self-diagnostic mode.
The LCD will indicate "----". Press “8” to enter the stretch stitch
test mode.
Gear
The standard figure length of 5 pieces of figure
8 is 33 to 39 mm

