20
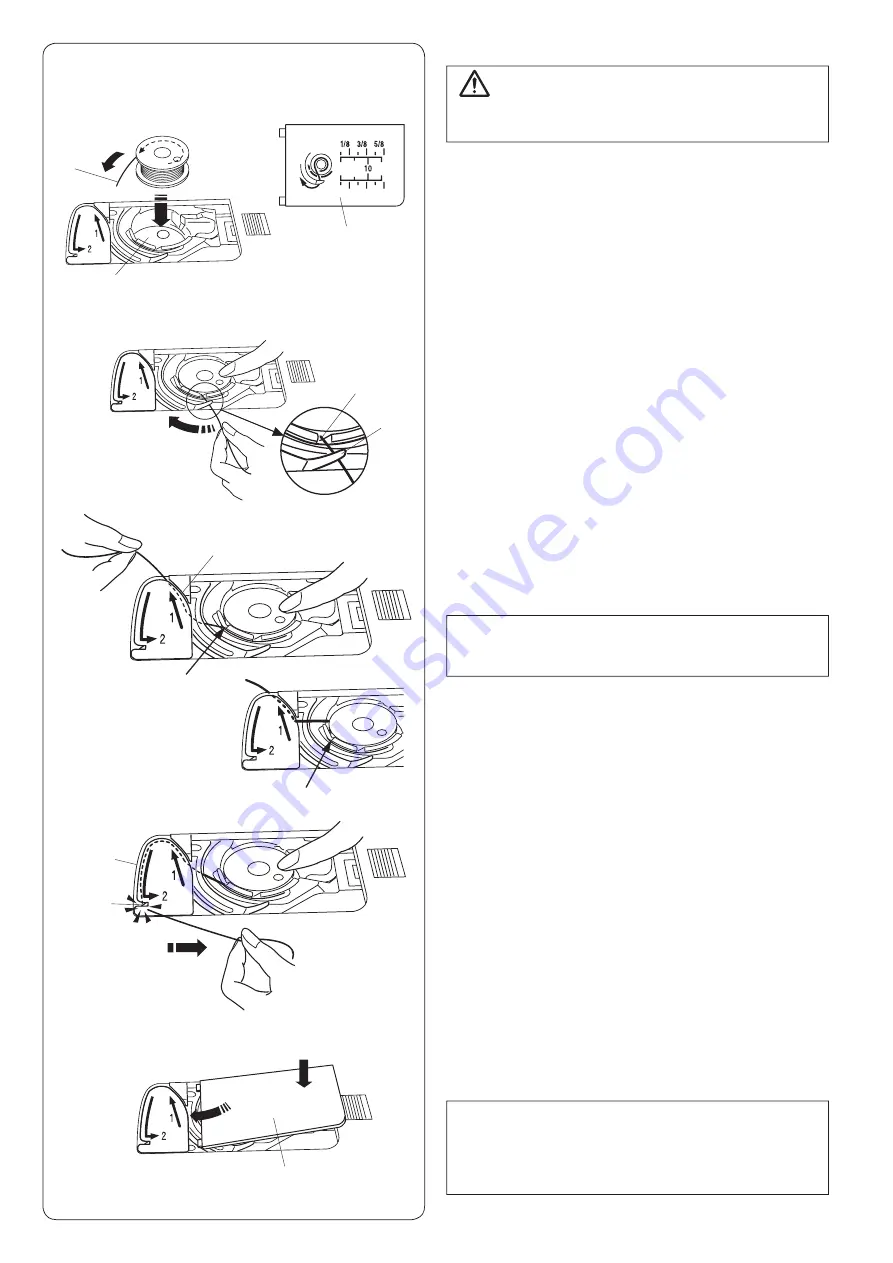
Inserting the bobbin
CAUTION:
Turn OFF the power switch before inserting the bobbin
and threading the bobbin holder.
z
Place a bobbin in the bobbin holder with the thread
running off counterclockwise as shown on the hook
cover plate.
q
End of thread
w
Bobbin holder
e
Hook cover plate
x
+ROGWKHEREELQZLWK\RXUÀQJHUWLSVRLWGRHVQRW
rotate.
*XLGHWKHWKUHDGLQWRWKHIURQWQRWFKRIWKHEREELQ
holder.
Pull the thread to the left to pass it under the guide.
r
Front notch
t
*XLGH
c
Draw the thread to the left to pass it into the guide
path marked “1”.
0DNHVXUHWKDWWKHWKUHDGFRPHVRXWIURPWKHVLGH
notch of the bobbin holder.
y
*XLGHSDWK
u
6LGHQRWFK
NOTE:
If the thread does not come out from the side notch,
rethread from step
z
.
v
Continue to draw the thread along the guide path
marked “2” and pull the thread to the right through the
slit. The thread will be cut to a proper length and held
in place.
i
*XLGHSDWK
o
6OLW7KUHDGFXWWHU
b
6HWWKHOHIWHGJHRIWKHKRRNFRYHUSODWHLQWRRSHQLQJ
3XVKGRZQWKHKRRNFRYHUSODWHWRÀWLQSODFH
!0
Hook cover plate
NOTE:
Unless otherwise noted, you can start sewing without
drawing up the bobbin thread.
Refer to page 23 for how to draw up the bobbin
thread.
z
x
c
v
b
t
y
u
i
o
!0
r
e
w
q
u
Summary of Contents for 5300QDC
Page 1: ...Instruction Book...
Page 79: ...77 Stitch Chart...
Page 80: ...78 Stitch Chart...
Page 81: ......
Page 82: ...Version 1 00 3 12 2019...
Page 83: ......
Page 84: ...809 851 223 EN...


