background image

Second Edition: 18 March 2020

SERVICE MANUAL


MODEL: 5300QDC

Summary of Contents for 5300QDC

Page 1: ...Second Edition 18 March 2020 SERVICE MANUAL MODEL 5300QDC...

Page 2: ...18 REPLACING AND ADJUSTING THE PRESSER FOOT LIFTER SWITCH UNIT 19 REPLACING AND ADJUSTING THE KNEE LIFTER WIRE UNIT 20 to 21 REPLACING AND ADJUSTING THE NEEDLE THREADER HOLDER 22 to 23 THREAD CUTTER...

Page 3: ...eedle Rethread Use the recommended sewing needle and thread Use a HA x 11 blue tip needle See mechanical adjustment Adjustment of needle bar height See mechanical adjustment Adjustment of hook timing...

Page 4: ...1 Bobbin holder is incorrectly threaded 2 Too much thread is wound on the bobbin 3 Lint is stuck inside the bobbin holder 4 Thread quality is too low 5 Thread is jamming around the bobbin holder Set...

Page 5: ...on 4 Not enough oil 5 Upper shaft gear is loose Eliminate the backlash Eliminate the looseness See part removal and replacement Driving motor DC motor Oil all moving parts Eliminate the looseness P 33...

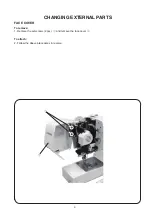
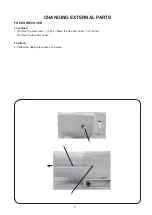
Page 6: ...4 CHANGING EXTERNAL PARTS FACE COVER To remove 1 Remove the setscrews 2 pcs q and remove the face cover w To attach 2 Follow the above procedures in reverse q w...

Page 7: ...FREE ARM COVER To remove 1 Remove the setscrews q 2 pcs Move the free arm cover w to the left Remove the free arm cover To attach 2 Follow the above procedures in reverse CHANGING EXTERNAL PARTS q q...

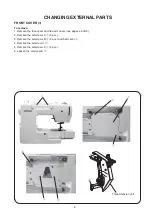
Page 8: ...e the face cover and free arm cover see pages 4 and 5 2 Remove the setscrews A q 2 pcs 3 Remove the setscrews B w 2 pcs and bed cover e 4 Remove the setscrew C r 5 Remove the setscrews D t 2 pcs 6 Loo...

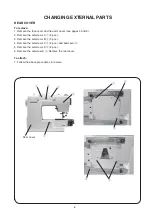
Page 9: ...over and rear cover hooks 8 Disconnect all the connectors from the circuit board A NOTE Do not disconnect the connectors by pulling on cord To disconnect grasp the connector not the cord 9 Remove the...

Page 10: ...pages 4 and 5 2 Remove the setscrews A q 2 pcs 3 Remove the setscrews B w 3 pcs 4 Remove the setscrews C e 2 pcs and bed cover r 5 Remove the setscrews D t 2 pcs 6 Remove the setscrew E y Remove the...

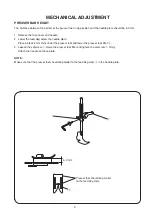
Page 11: ...he feed dog below the needle plate Place a block 6 mm thick under the presser foot and lower the presser foot lifter w 3 Loosen the setscrew q Raise the presser foot lifter and tighten the setscrew q...

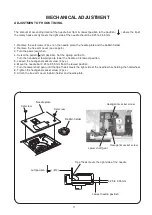
Page 12: ...nd the edge of the needle plate hole should be at least 0 2 mm on either side If not adjust as follows 1 Turn the power switch off Remove the face cover see page 4 2 Loosen the hexagonal socket screw...

Page 13: ...ward you to lower the needle at its lowest position 5 Loosen the hexagonal socket screw 2 pcs 6 Move the needle bar 3 25 to 3 55 mm from the lowest position 7 Turn the lower shaft gear until the tip o...

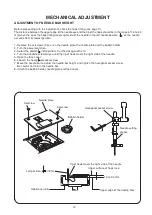
Page 14: ...left position Set the zigzag width at 0 4 Turn the handwheel toward you until the tip of hook meets the right side of the needle 5 Open the face cover 6 Loosen the hexagonal socket screw 7 Move the n...

Page 15: ...djusting plate up or down to within 0 10 to 0 05 mm at the left and right needle position 6 Tighten the setscrews B 2 pcs 7 Attach the face cover Remove the master needle Attach the bobbin holder and...

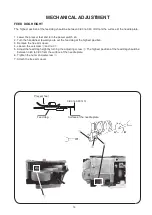
Page 16: ...highest position 3 Remove the free arm cover 4 Loosen the setscrew q and nut w 5 Adjust the feed dog height by turning the adjusting screw e The highest position of the feed dog should be between 0 80...

Page 17: ...rew 4x6 q Insert the hexagonal socket screw 4x6 to the hole w Tighten the hexagonal socket screw 4x6 as far as it goes 2 Loosen the setscrew e left screw 3 Turn hexagonal socket screw 4x6 to adjust th...

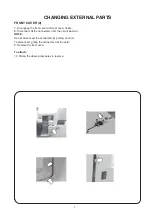
Page 18: ...bove limit adjust as follows 1 Set the tension dial 4 2 Remove the front cover see pages 6 to 7 3 Lower the presser foot If the top tension is too loose turn the lead screw in the direction A If the t...

Page 19: ...w to the left to loosen it Move the gear up A or down B to adjust the feed Do not move the gear right or left when adjusting Start the machine and check the movement of the fabric Adjust the hexagonal...

Page 20: ...position and open a 1 6 mm gap between the slider and the buttonhole foot 6 Turn the adjusting screw t to the left until the LCD display BH symbol 7 Next turn the adjusting screw to the right until t...

Page 21: ...and lower the presser foot lifter to check if buzzer sounds 6 Check if the the LCD display the presser foot symbol when the presser foot lifter is lowered see FIG 1 If not go back to the procedure 1...

Page 22: ...O REPLACE KNEE LIFTER WIRE To remove 1 Remove the free arm cover base plate front cover and rear cover see pages 5 to 8 2 Remove snap rings 2 pcs 3 Loosen nuts 3 pcs 4 Remove the wire unit To attach 5...

Page 23: ...arm and presser bar supporter is too small less than 0 1 mm loosen nuts 2 pcs and make part A shorter to adjust the clearance Use the adjustment method NO 2 if the clearance cannot be adjusted to 0 1...

Page 24: ...09 Link plate 2 w 862627108 Hook holder unit e 862626026 Threader plate unit r 858265008 Link plate 1 t 000230403 Setscrew t 3 Assemle the parts q w and r as shown in FIG 1 4 Attach the part e to the...

Page 25: ...dle eye loosen the hexagonal socket screw Adjust the rotation pin stopper position so that the hook enters into the needle eye Tighten the hexagonal socket screw 3 If the threader hook is not aligned...

Page 26: ...ialized and moving cutter moves to its home position automatically 4 The distance between the edge of moving cutter and the end of thread cutter plate slit should be 0 9 to 1 3 mm If not follow the pr...

Page 27: ...st you want to perform Enter self diagnostic mode then select the step number of the diagnostic test you require by pressing the reverse stitch button To begin Turn on the switch if any of the followi...

Page 28: ...D DISPLAYS F3 WHEN BUTTON 4 IS PRESSED LCD displays 03 When the buttonhole lever is pulled buzzer sounds and LCD displays BH symbol BH symbol Bobbin symbol Press the buttons 1 to 4 If the result is co...

Page 29: ...result is correct condition press the start stop button to proceed the next step If the result is defective condition press the reverse stitch button to proceed the next step LCD displays 06 Turn the...

Page 30: ...hed Buzzer sounds when the foot control is deeply depressed Buzzer sounds when the foot control is released LCD displays 09 10 DC MOTOR Buzzer sounds at rightmost or leftmost position LCD displays 10...

Page 31: ...the result is correct condition press the start stop button to proceed the next step If the result is defective condition press the reverse stitch button to proceed the next step DEFECTIVE CONDITION T...

Page 32: ...and fix the defective part The defective part number See pages 26 to 29 Steps and items section Turn the power switch off when the self diagnostic test is finished TO DISPLAY THE VERSION OF THE PROGRA...

Page 33: ...inted circuit board F white w Printed circuit board L white e Program black r Bobbin winding switch blue t Thread cutter motor white y Touch panel white u Feed motor white i Printed circuit board P bl...

Page 34: ...ted circuit board A 3 Remove the setscrews 4 pcs and the printed circuit board A To attach 4 Follow the above procedures in reverse NOTE Do not disconnect the connectors by pulling on cord To disconne...

Page 35: ...belt Tighten them with setscrews 2 pcs lightly 4 Move the motor up or down to adjust the motor belt tension The belt should deflect 7 to 9 mm when applying 300 grams force of load to the middle of th...

Page 36: ...cover see pages 6 to 8 2 Remove the setscrews A 3 pcs and the switching regulator 3 Remove the setscrews B 4 pcs To attach 4 Follow the above procedures in reverse REPLACING THE ELECTRONIC COMPONENTS...

Page 37: ...he lower shaft gear as follow 1 Remove the free arm cover see page 5 2 Clean the area of the thread cutter and the lower shaft gear 3 After cleaning attach the free arm cover CLEANING AREA OF THREAD C...

Page 38: ...zer sounds after the t on the touch panel has been pushed 4 Turn off the power switch You can adjust the key position when the key sensor is off from the actual key position Printed the touch panel ke...

Page 39: ...37 TOUCH PANEL KEY POSITION ADJUSTMENT GUIDE Print this illustration guide to its actual size...

Reviews: