


20
Mechanical Adjustment
MODEL: AirThread 2000D
To adjust:
1. Open the looper cover and the side cover.
2. While pressing the upper knife release knob, turn it
clockwise by half a rotation to deactivate the upper
knife.
3. Remove the presser foot (unit).
4. Remove the setscrew A and remove the needle plate.
5. Remove the setscrews B (2 pcs.) and remove the
looper cover guide.
6. Remove the bolt and remove the upper knife.
7. Set the lower looper to the rightmost position by
turning the handwheel toward you.
8. Place the U groove of the lower looper height gauge
down on the lower looper crank shaft and hold it.
9. Loosen the setscrew C and move the lower looper
vertically until the tip of the lower looper points at the
guide line of the lower looper height gauge.
10. Tighten the setscrew C.
11. Check the clearance between the needle and the
lower looper, the timing of the needle and the lower
looper, the timing of the upper looper and the lower
looper and the clearance between the upper looper
and the lower looper (Refer to pages 21, 22, 24, 27
and 28.)
12. Tighten the bolt to fix the upper knife.
13. Tighten the setscrews B (2 pcs.) to fix the looper
cover guide.
14. Tighten the setscrew A to fix the needle plate.
15. Attach the presser foot (unit).
16. While pressing the upper knife release knob, turn it
clockwise by half a rotation to activate the upper knife.
17. Close the looper cover and the side cover.
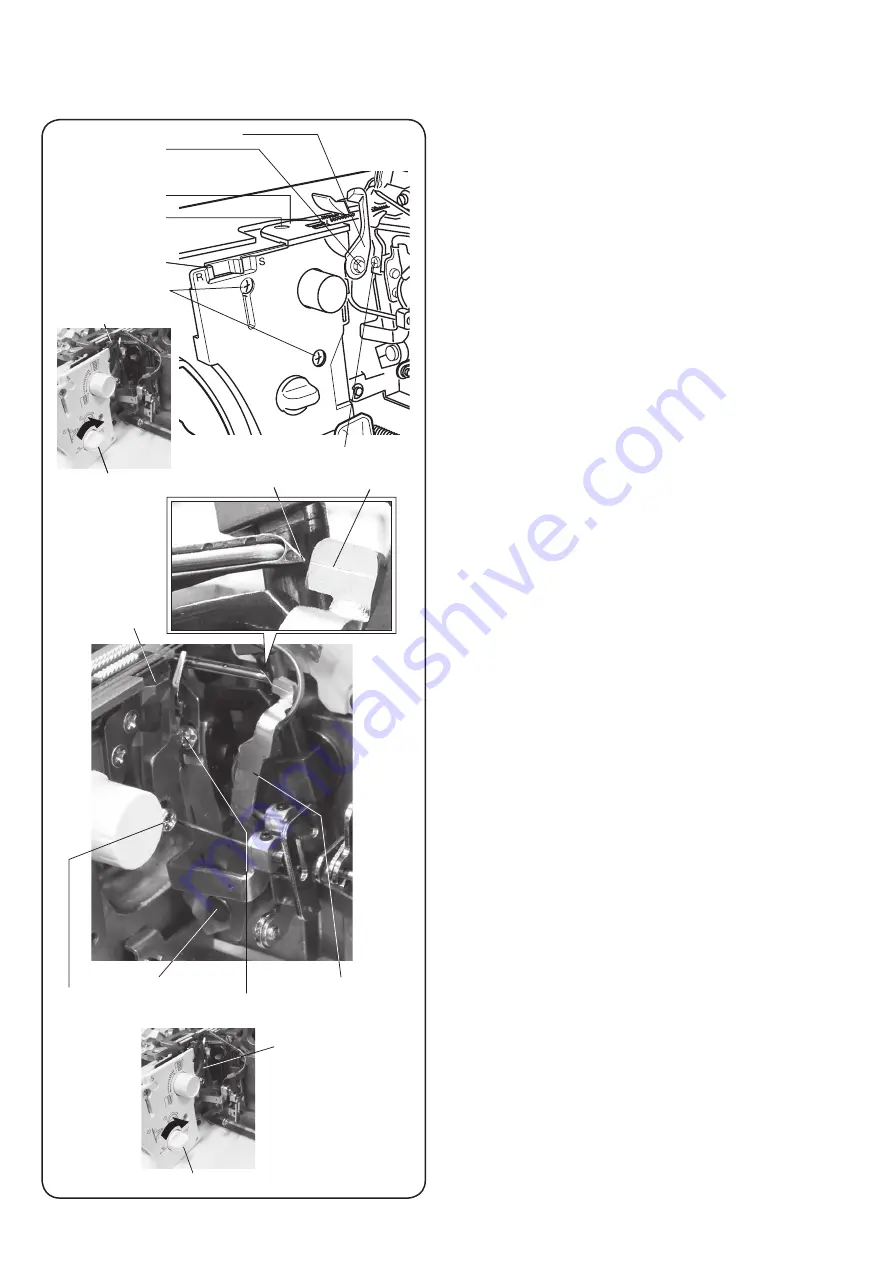
To adjust the position of the lower looper (2)
Setscrew A
Needle plate
Lower looper
crank shaft
Lower looper
height gauge
Bolt
Setscrew C
Looper cover
guide
Setscrew B
Bolt
Setscrew C
Upper knife
Upper knife
Upper knife release knob
Upper knife release knob
Upper knife
Tip of the
lower looper
Upper knife
Guide line


