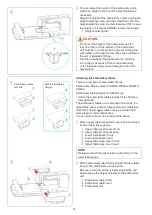
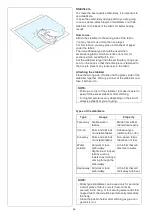
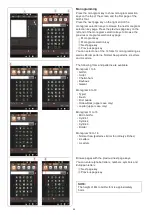
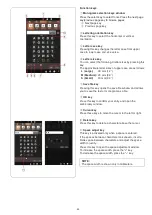
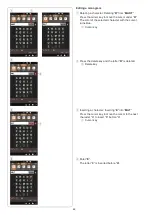
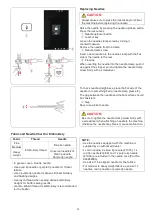
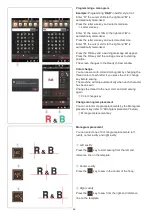
background image

35

Embroidery Hoops

There are 5 embroidery hoops included in the standard 

accessories.

q

Embroidery hoop SQ10d

A square embroidery hoop with a 10 cm (3.9˝) square 

embroidery area.

w

Embroidery hoop RE20d

A rectangle embroidery hoop with a 14 cm by 20 cm (5.5˝ 

x 7.9˝) embroidery area.

e

Embroidery hoop SQ28d

A large square embroidery hoop with a 28 cm (11˝) 

square embroidery area.

r

Embroidery hoop RE46d

An extra large embroidery hoop with a 28 cm by 

46 cm (11˝ by 18.1˝) rectangular embroidery area.

t

Embroidery hoop ASQ27d (Embroidery Quilting 

Kit)

A large embroidery hoop with a 27 cm (10.6˝) square 

embroidery area.
The embroidery hoop ASQ27d is used for embroidering 

quilt patterns on quilt layers.
There is no inner hoop but the quilt layers are held in the 

hoop by means of the magnetic clamps (refer to page 94).

y

Magnetic clamp (RE46d and SQ28d)

A short magnetic clamp for holding the fabric to the 

embroidery hoops RE46d and SQ28d. 

u

Magnetic clamp (ASQ27d)

A long magnetic clamp for holding the fabric to the 

embroidery hoop ASQ27d. 

y

u

q

w

r

t

e

Summary of Contents for Continental M17

Page 1: ...Instruction Book Continental M17 Embroidery...

Page 2: ...compartment does not close securely stop using the product remove the batteries and keep it away from children If you think batteries might have been swallowed or placed inside any part of the body s...

Page 3: ...ug from outlet 9 Do not unplug by pulling on cord To unplug grasp the plug not the cord 10 needle and or cutting blade 11 Always use the proper needle plate The wrong plate can cause the needle to bre...

Page 4: ...ned by turning the equipment off and on the user is encouraged to try to correct the interference by one or more of the following measures Reorient or relocate the receiving antenna Increase the separ...

Page 5: ...ng a monogram 46 Monogram placement 46 2 Letter monogram 47 Editing a monogram 48 Ready to Sew Window 49 55 Function keys 49 Pattern information 49 Stitch back forward keys 50 Jump key 50 Cross key 50...

Page 6: ...e or Folder 111 Opening a File 112 Opening a File on a USB Flash Drive 113 Changing the Name of a File or Folder 113 Direct PC Mac Link 114 CARE AND MAINTENANCE Cleaning the Hook Area 115 Cleaning the...

Page 7: ...dial cap Right touch screen Middle touch screen Needle up down button Thread cutter button Presser foot lifter button Reverse button Auto lock button Needle threader button Start stop button Speed con...

Page 8: ...cap Carrying handle upper q w e r t y u i o 0 1 2 3 Standard Accessories No Part Name Part No 1 Semi hard fabric cover 868822000 2 Accessory case 868820008 q w Embroidery unit Hoop socket Carriage Em...

Page 9: ...2 865522008 23 Dual feed holder single 859833017 24 Dual feed foot VD single 859835101 25 Dual feed zipper foot ED single 859838001 26 Free motion quilting closed toe foot QC 859836009 27 Free motion...

Page 10: ...ed toe foot ASR QC 868837008 13 ASR clear view foot ASR QV 868837204 14 ASR open toe foot ASR QO 868837101 15 ASR ruler work foot ASR QR 868837307 16 Positioning marker embroidery foot PM 868825003 17...

Page 11: ...h template 868816001 4 Embroidery hoop RE20d with template 868817002 5 Embroidery hoop SQ10d with template 868818003 6 Magnetic clamps x 8 for RE46d and SQ28d 859821001 7 Special bobbin holder for emb...

Page 12: ...side Do not insert your finger in the carrying handle too deeply Accessory Case To store the other accessories open the accessory case and store in the appropriate places Optional accessories can als...

Page 13: ...ly z First make sure the power switch q is off x Insert the machine plug w of the power supply cable into the machine socket e c Insert the power supply plug r into the wall outlet t and turn the powe...

Page 14: ...d control slider according to your sewing needs To increase the sewing speed move the slider to the right To decrease the sewing speed move the slider to the left The sewing speed can be changed while...

Page 15: ...plate if the thread is 30 or thicker w Reverse button This button is not used in embroidery mode e Auto lock button This button is not used in embroidery mode r Needle up down button Press this button...

Page 16: ...the top cover press the cover down with your hand Pop Up Spool Pins Lever q Pop up spool pins lever Move the pop up spool pins lever to the right to raise spool pins Push the spool pins down with your...

Page 17: ...h drive y Set mode key refer to page 97 Press this key to enter the setting mode You can customize the machine settings to your preference The settings for Machine Settings Sewing Settings Embroidery...

Page 18: ...ion topics Select the help topic by pressing the arrow and the step by step instruction will open q Help key w Arrow To view the next page press the next page key To view the previous page press the p...

Page 19: ...This helps you when replacing the embroidery hoop with thick fabrics q Presser foot lifter button w Presser foot lifter e Presser foot r Up position t Extra lifted position y Down position CAUTION Do...

Page 20: ...ION Always make sure to press the lockout key to lockout the machine before replacing the foot holder z Raise the needle by pressing the needle up down button Press the lockout key and raise the press...

Page 21: ...key e Presser foot lifter x Loosen the thumbscrew with the screwdriver and remove the foot holder r Thumbscrew t Foot holder c Attach embroidery foot P to the presser bar from behind Tighten the thum...

Page 22: ...q Positioning marker embroidery foot PM x Tighten the thumbscrew securely with the screwdriver Connecting positioning marker embroidery foot PM z Attach the positioning marker embroidery foot PM to th...

Page 23: ...the LED pointer brightness key Press or key or slide the slide bar up or down to adjust the settings Press the default key to recover the original setting Press the close key to close the window e LED...

Page 24: ...is indicated inside the bobbin holder q Part number indicated here z Remove the needle foot holder and needle plate refer to pages 21 16 and 22 Take out the standard bobbin holder w Standard bobbin ho...

Page 25: ...Use the needles equipped with the machine or supplied by an authorized dealer 1 x twin needle 2 x blue tip needle 11 75 1 x red tip needle 14 90 and 1 x purple tip needle 14 90 are included in the nee...

Page 26: ...the handwheel slowly and make sure that the needle does not hit the needle plate Press the lockout key to unlock the machine CAUTION Always make sure to press the lockout key to lockout the machine b...

Page 27: ...the spool rest and the spool net for thread cones Attach the spool rests on the spool pin Place the spool cone on the spool pin Cover the thread cone with the spool net if the thread is shaky or kinky...

Page 28: ...spool of thread or thread cone special size Use the spool holder special to hold the specific size of the spool of threads as shown The sizes of the spools of thread are as follows The hole diameter...

Page 29: ...r Bobbin t Bobbin winder spindle NOTE You can adjust the bobbin winding speed refer to page 99 n Insert the thread into one of the slits of the flange plate and pull the thread to cut y Slit u Flange...

Page 30: ...d to the left to pass it into the guide path marked 1 Make sure that the thread comes out from the side notch of the bobbin holder u Guide path 1 i Side notch v Continue to draw the thread along the g...

Page 31: ...aise the thread guide bar until it snaps Pass the thread through the guide on the thread guide bar from behind t Thread guide bar c Pass the thread through the left thread guide y Left thread guide v...

Page 32: ...ke up lever Draw the thread forward to draw it into the eye of the take up lever 1 Eye of the take up lever Then pull the thread down along the left channel and through the lower thread guide 2 Lower...

Page 33: ...TE The needle threader can be used with a 11 to 16 needle Thread size 50 to 90 is recommended Do not use thread size 30 or thicker The needle threader cannot be used with the twin needle z Press the n...

Page 34: ...ions on page 26 but leave a 10 cm 4 tail of bobbin thread as shown q Bobbin thread x Raise the presser foot Hold the needle thread lightly with your left hand e Needle thread c Press the needle up dow...

Page 35: ...to allow the hoop to move freely Movable range for the embroidery unit with the largest hoop RE46d attached is as shown Do not place anything inside the area shown on the left Embroidery hoop RE46d e...

Page 36: ...nt w Upper table small cover rear e Lower table boxes front r Lower table boxes rear t Upper table large cover front y Upper table large cover rear v You can adjust the height of the embroidery unit t...

Page 37: ...You can replace attach or remove the upper table covers without removing the lower embroidery tables You can store accessories in lower table boxes z Remove the upper table covers as shown Upper tabl...

Page 38: ...our fingers to the embroidery unit release lever at the left carrying handle of the embroidery unit Pull the embroidery unit release lever and slide the embroidery unit gently to the left to remove it...

Page 39: ...dery hoop with a 28 cm by 46 cm 11 by 18 1 rectangular embroidery area t Embroidery hoop ASQ27d Embroidery Quilting Kit A large embroidery hoop with a 27 cm 10 6 square embroidery area The embroidery...

Page 40: ...e stabilizer and fuse it with an iron Types of the stabilizers NOTE Sticky type stabilizers can be used only for securing a small piece of fabric or work that cannot be secured in the hoop or for secu...

Page 41: ...als Apply layers of water soluble stabilizers to the brushed fabrics such as towel velour and corduroys for better sewing results z After sewing trim away the water soluble stabilizer cutting approxim...

Page 42: ...fabric with the template r Inner hoop t Template Setting the Fabric in an Embroidery Hoop z Prepare a fabric and attach a stabilizer to the wrong side of the fabric The fabric and stabilizer should b...

Page 43: ...en threads and needles Avoid sewing on layers thicker than 3 mm 1 8 n Clamp the fabric to the hoop with the magnetic clamps Use the magnetic clamps for RE46d and SQ28d hoops only Set short magnetic cl...

Page 44: ...e Thread Holder To avoid sewing over a tail of the needle thread place the thread end on the thread holder Pass the needle thread through the hole in the embroidery foot and draw it up to the thread h...

Page 45: ...Embroidery Designs 7 Dressmaking Designs 8 Buttonhole Patterns 9 Buttonhole Decorations 10 World Designs Category 11 to 15 11 Combination Designs 12 Floral and Garden Designs 13 Favorite Designs 14 B...

Page 46: ...s 33 Alphabet Designs Flourish 34 Alphabet Designs Cross Stitch 35 Alphabet Designs Hana Category 36 to 40 36 Alphabet Designs Motif 37 Alphabet Designs Floral 38 Alphabet Designs Curly 39 Alphabet De...

Page 47: ...and the first page of the pattern list Select the same hoop as the one attached to the machine Browse the pattern list with the previous next page keys and select the desired pattern by pressing the...

Page 48: ...the 14 fonts for monogramming as well as Border patterns Normal Sew patterns 2 Letters and 3 Letters The following fonts and patterns are available Monogram 1 to 5 Gothic Script Cheltenham Bauhaus Gal...

Page 49: ...0 8 S Small 10 mm 0 4 u Save file key Pressing this key opens the save file window and allows you to save the text or monogram as a file i OK key Press this key to confirm your entry and open the emb...

Page 50: ...hifts to the right and is automatically memorized Press the letter size key and select medium size Enter B the cursor shifts to the right and B is automatically memorized Press the OK key and a warnin...

Page 51: ...r to page 40 Press the edit key and select the hoop in the editing window when changing the hoop refer to page 77 2 Letter monogram Example 2 Letter in an octagon z Press the next page key in the mono...

Page 52: ...the selected character with the cursor turns blue q Cursor key x Press the delete key and the letter R is deleted w Delete key c Inserting a character Inserting E into MAT Press the cursor key to move...

Page 53: ...design 3 Horizontal dimension of the design Ready to Sew Window The Ready to Sew window shows embroidery function keys and information on the selected pattern Function keys q Stitch forward key w Stit...

Page 54: ...p moves to the sewing point you entered y Jump key u Numeric keypad window i Clear key Cross key Press the cross key to display the current sewing point as a cross mark Press the cross key again to hi...

Page 55: ...tching Press the key w to open the trace without stitching window Press the trace key to start tracing or press one of the keys to move the hoop to a corner 2 Trace and baste single Press the key e to...

Page 56: ...r right corner of the tracing and basting area Press the key t to open the custom trace and baste window The size of the tracing and basting area is displayed in the center of the window y Press the k...

Page 57: ...age 102 Press the or key to adjust the tail length of jump thread t Embroidery foot height Press one of the fabric icon keys y or u to select the recommended height or press the or key to fine tune th...

Page 58: ...he down position Press the hoop back key and hoop back option window will open q Hoop back key Press the key and the confirmation window will open Press the OK key to move the carriage back to the hom...

Page 59: ...nts to the angle of the embroidery design Press the key e to rotate the design 0 5 degrees clockwise Press the key r to rotate the design 0 5 degrees counterclockwise The angle value is displayed in t...

Page 60: ...the next color and sew the next section Sewing results The embroidery pattern is sewn against the centerlines on the fabric as shown r Centerlines on the fabric Starting to Sew Embroidery z Select th...

Page 61: ...v Cut the bobbin threads on the wrong side of the fabric along the red broken line as shown When the bobbin threads are too narrow b Pull the needle threads up and bring the loop ends to the right sid...

Page 62: ...ll the needle threads up and bring the loop ends to the right side of the fabric to make the fringe Fringe designs RE20d 274 Fringe designs RE20d 275 NOTE When the bobbin threads are too narrow to see...

Page 63: ...immed fabric Hold the 4 corners of the stabilizer with tape as shown Be careful the tape will not interfere with the embroidery design v Attach the hoop to the machine again Sew the remaining sections...

Page 64: ...e hoop to the machine and sew the first color section v Set the background fabric to the hoop attach the hoop to the machine then sew the second color section to the background fabric w Background fab...

Page 65: ...page 10 Set the water soluble stabilizer in the hoop Be sure that the stabilizer is stretched tightly in the hoop Select the desired bracelet design pattern and sew Remove the water soluble stabilizer...

Page 66: ...op on the carriage refer to page 40 q Fabric 1 w Stabilizer NOTE Do not remove the fabric from the embroidery hoop until the sewing project is finished x Embroider the following parts both arms cut of...

Page 67: ...s Warm up the stabilizer with an iron to remove the stabilizer move easily Cover the stabilizer with a cloth when ironing to prevent sticking on the iron u Cut off line i Fabric 1 wrong side m Cut sli...

Page 68: ...ake your own flag garland c The Ready to Sew window will open Set the fabric in the hoop and attach the hoop to the carriage Press the start stop button to sew v Remove the hoop from the carriage when...

Page 69: ...24 Designs for water soluble stabilizer page 2 2 and sew q Next page key c Attach the background fabric to the carriage Select 25 Designs for fabric Press the next page key Select design 2 in the 25 D...

Page 70: ...r v b t w NOTE Press the key in the Ready to Sew window Press one of the keys to move the carriage to a standby position refer to page 54 n Sew the third section color over the design The butterfly wi...

Page 71: ...e piece The placement guides and their sewing orders are indicated below Place the desired lace piece on the placement guide and hold it with tape Sew over the lace piece with the next section to hold...

Page 72: ...oluble stabilizer with tailor s chalk Set the water soluble stabilizer in hoop SQ28d and attach the hoop to the carriage c Select the SQ28d 164 design Designs for water soluble stabilizer c NOTE Do no...

Page 73: ...water n Connecting lace design SQ28d 164 Designs for water soluble stabilizer You can connect large lace design SQ28d 164 vertically or horizontally Example Connecting Lace Design SQ28d 164 vertically...

Page 74: ...p to the carriage Select design SQ28d 164 Designs for water soluble stabilizer c Press the start stop button and sew Remove the hoop from the carriage and the stabilizer from the hoop The cross marks...

Page 75: ...points will be copied on the water soluble stabilizer Remove the design template sheet w Cross marks e Design template sheet r Cross marks of the design template sheet t Points b Connect the copied p...

Page 76: ...n angle adjustment key if necessary refer to pages 50 and 55 Press the start stop button to sew the rest of the patterns u Hoop i Template m Remove the stabilizer from the hoop Trim away the water sol...

Page 77: ...uching foot PC 2 c Attach the selected couching foot to the machine To attach the couching foot refer to page 17 v Turn the handwheel toward you Be sure that the needle passes through the center of th...

Page 78: ...stick m Pass the yarn through the sub thread guide stick i Sub thread guide stick Thread the yarn by passing it through the slit on the mouth Thread the yarn through the left mouth for couching foot P...

Page 79: ...the yarn jumps to the next couching design 0 Set the fabric to the hoop Attach the hoop to the carriage Test sew to check sewing results before the actual sewing CAUTION Knots may appear at some point...

Page 80: ...be attached is completely dried out after removing from water NOTE Do not rub or scratch the Designs for water soluble stabilizer Refer to page 37 for how to use a water soluble stabilizer z x Sewing...

Page 81: ...gns monogram and designs in a USB flash drive Press the design category key to browse the design list by design category or press the design selection key to browse the designs by hoop size Select the...

Page 82: ...ewing order key 1 Single color sewing key 2 Save file key 3 Corner layout key 4 Delete key 5 Horizontal mirror image key 6 Vertical mirror image key 7 Center position key 8 Custom color key 9 Color gr...

Page 83: ...e w or e key until the red frame surrounds the pattern you want to select Press the key r to select the desired pattern Zooming in the editing window Select the view size from normal large or largest...

Page 84: ...ed over the original pattern Move the duplicate to show the original pattern Monogramming in an arc In the editing mode you can make a monogram in an upper or lower arc z Enter the characters and pres...

Page 85: ...press the or key To change the size quickly press and hold the or key The scale of a resized pattern is displayed as a percentage Press the OK key to confirm the new size w key e key r Pattern size c...

Page 86: ...n 1 degree clockwise Press the key e to rotate the selected pattern 1 degree counterclockwise Press the key r to rotate the selected pattern 45 degrees clockwise Press the key t to rotate the selected...

Page 87: ...selected patterns only press the group select key Select the desired patterns by pressing on the pattern images Press the selected pattern again to unselect the pattern Press the OK key to group the...

Page 88: ...vious screen q Sewing order key Single color sewing If you want to sew a pattern or a pattern combination in one color only press the single color sewing key The machine will not stop until the entire...

Page 89: ...The pattern will automatically be copied and placed symmetrically into 4 corners Press the OK key v The Ready to Sew window will open Save file key You can save original embroidery designs as files i...

Page 90: ...orizontal mirror image key w Vertical mirror image key x Press the key to create the horizontal mirror image of a selected pattern q Horizontal mirror image key c Press the key to create the vertical...

Page 91: ...e 14 color tiles To change the shade of the selected color press or key or drag the slider to the left or right u Background color key Customizing the display colors You can simulate the colors of the...

Page 92: ...rouping z For example the combined design pattern created on page 85 has 25 color sections x Press the color group key and the color grouping window will open Press the OK key to unite all color secti...

Page 93: ...r to pages 92 93 q Design template sheet x Place the design template sheet on the fabric and mark the end points of the centerlines with tailor s chalk Draw centerlines on the fabric The horizontal li...

Page 94: ...nd pattern t Marking points y Vertical centerline m Set the fabric in the hoop and adjust the fabric position to match the centerlines for the second pattern and template Attach the hoop to the carria...

Page 95: ...ng points will not appear but marking points will be sewn x Press the view size key to enlarge the pattern image Drag the editing screen to show the marking points w View size key c Press the jog keys...

Page 96: ...e t r e z x q w c r Printing the design template sheet Save the built in embroidery pattern to a USB flash drive and print the design template sheet using the printing function in Artistic Digitizer J...

Page 97: ...e sewing machine and embroidery hoop refer to the QUICK START GUIDE that comes with Artistic Digitizer Jr or Help of the Artistic Digitizer Jr software b Click the Print icon on the standard bar to pr...

Page 98: ...n the extension of the centerlines of the design template sheet Mark the centerlines for each section on the quilt top q Design template sheet w Centerlines Setting quilt layers in hoop ASQ27d Positio...

Page 99: ...st then neighboring sections one by one outward NOTE Use the same thread for the bobbin as the needle thread Adjust the foot height w if necessary Be sure that the Bobbin thread remaining sensor funct...

Page 100: ...ition key and the confirmation window will open Press the OK key to move the carriage back to the home position w Home position key Machine information You can see the software version of the machine...

Page 101: ...refer to the Instruction book for Ordinary Sewing Sewing Application r Embroidery setting mode key In this mode you can customize the machine settings and options for embroidery refer to pages 101 104...

Page 102: ...2 hour clock 3 AM PM t Inch mm Option You can set your machine s dimensional unit to either inches or millimeters by pressing the inch or mm icon key The default unit is millimeters Press the next pag...

Page 103: ...od set by this timer The Auto off Time Setting can be set from 1 to 12 hours If you wish to turn off the timer press and hold the key until OFF shows in the timer window To turn on the machine again t...

Page 104: ...Press the OK key to format To format a USB flash drive press one of the USB icons and the confirmation window will open Press the OK key to format CAUTION Do not turn off the power or disconnect the U...

Page 105: ...be set from 400 to 1200 spm in 100 spm intervals by pressing the or key Sewing speed can be varied with the speed control slider even while running the machine NOTE Reduce the sewing speed when sewing...

Page 106: ...ode and the selected brand are also shown by pressing the color list key If you use imported embroidery stitch data containing proper thread information press the Retain Orig Color key to retain this...

Page 107: ...Design Positioning During Embroidery you can re position the embroidery design with the jog key 8 Hoop Calibration You can calibrate the center position of the hoops You need to enter embroidery mode...

Page 108: ...tch sewn before turning the power off will resume when you turn the power on again When you turn the power on the confirmation window opens Press the OK key to resume the last stitch of the sewn patte...

Page 109: ...ns for Continental M17 when you are using several Janome sewing machines at the same time turn OFF the wireless LAN settings or the power switches of the machines that are not currently in use Then co...

Page 110: ...thin 2 minutes NOTE If you cannot find the wireless LAN access point you are looking for press the refresh key u to search for the wireless LAN access point again w Wireless LAN settings PIN method If...

Page 111: ...yption key and press the OK key to establish the network Press show hide key i to show or hide the entry r Manual method Press Manual r Enter the network name you would like to connect with Press the...

Page 112: ...K key t to confirm the network settings Press the X key y to cancel the settings NOTE You do not need to turn off the DHCP option and configure the network settings manually unless you know the approp...

Page 113: ...109 Language Setting Mode Select the desired language and press the OK key The right touch screen shows messages in the selected language...

Page 114: ...If you wish to use the QWERTY layout keyboard press the keyboard key Pressing the letter case key changes the letter case from upper case to lower case and vice versa r Keyboard key t Letter case key...

Page 115: ...A new folder is created under the assigned name Deleting a File or Folder Press the delete key and select the file or folder to delete A confirmation message appears Press the OK key to delete the fil...

Page 116: ...size Press the next page key to turn the page w Next page key In the embroidery mode file attributes can be shown on the file icon To show the file attribute press the large icon key e Large icon key...

Page 117: ...f you enter a name that already exists the message The same name exists will appear Press the X key and enter another name q Opening a File on a USB Flash Drive To open the embroidery data file on a U...

Page 118: ...ess the following URL URL https www janome co jp e e_downloads CM17_ softwares html To import design patterns from your PC Mac refer to instructional movie Export Design in the Artistic Digitizer Jr s...

Page 119: ...ad detecting sensor with the lint brush r Feed dog t Auto thread cutter device y Bobbin thread detecting sensor v Clean the hook race with a soft cloth e Soft cloth CARE AND MAINTENANCE b Insert the b...

Page 120: ...e thread guide plate by pulling it up q Thread guide plate x Clean the area around and under the pre tension leaf with the lint brush Hold the tip of the pre tension leaf softly and brush out the dust...

Page 121: ...on to lower the presser foot q Home key w Ordinary Sewing Mode key e Presser foot lifter button x Raise the presser foot with the presser foot lifter r Presser foot lifter v Turn the power switch off...

Page 122: ...c Install the CR2032 battery with the mark facing up WARNING Battery may explode if mistreated Do not recharge disassemble or dispose of by fire Turn off the power switch before replacing the battery...

Page 123: ...replace the needle plate using the needle plate release dial q Needle plate release key z Raise the needle by turning the handwheel toward you Press the presser foot lifter button to raise the presse...

Page 124: ...ed on the right touch screen Replace the twin needle with a single needle and press the OK key The machine is started with the feed dogs lowered Raise the feed dogs unless you want to sew with the fee...

Page 125: ...rly Page 98 Skipped stitches 1 The needle is inserted incorrectly 2 The needle is bent or blunt 3 The needle and or threads are not suitable for the fabric being sewn 4 A blue needle is not being used...

Page 126: ...123 The machine cannot connect to the wireless LAN access point 1 The wireless router device does not comply with IEEE802 11b g n wireless standard 2 The wireless router device using WEP security and...

Page 127: ...away from you or toward you to move the needle up a little The automatic needle threader will return to the up position automatically If the automatic needle threader still does not return to the up...

Page 128: ...q Format x Format dialogue will be displayed Select FAT16 or FAT32 from file system w File system NOTE Do not check the quick Format r Quick Format v Click the start key t Start key z x c v e r t c Fr...

Page 129: ...After the start key is clicked the confirmation message will be displayed NOTE If there is any important data remaining on the USB flash drive click the cancel key After saving the data elsewhere beg...

Page 130: ...SIGN CHART Embroidery Noriko Nozawa N NOZAWA RE46d SQ28d RE20d SQ28d RE46d RE20d SQ28d Pattern images are not to scale Nicola Elliott Nicola Elliott Nina Matsumoto Nina Matsumoto GANAHA Collections Y...

Page 131: ...27 SQ10d RE20d RE20d SQ28d RE46d SQ10d GANAHA Collections Y GANAHA GANAHA by Redwork Designs Y GANAHA GANAHA by White Embroidery Designs Y GANAHA DESIGN CHART Embroidery Pattern images are not to scal...

Page 132: ...128 SQ10d RE20d SQ28d RE46d SQ10d SQ28d GANAHA by White Embroidery Designs Y GANAHA Dressmaking Designs Buttonhole Patterns DESIGN CHART Embroidery Pattern images are not to scale...

Page 133: ...129 SQ10d RE20d SQ28d RE46d SQ10d RE20d Buttonhole Decorations Combination Designs DESIGN CHART Embroidery Pattern images are not to scale World Designs...

Page 134: ...130 SQ28d SQ10d RE46d RE20d SQ28d Combination Designs Floral and Garden Designs DESIGN CHART Embroidery Pattern images are not to scale...

Page 135: ...131 RE20d SQ10d RE46d RE20d SQ10d SQ10d SQ28d SQ28d Floral and Garden Designs Baby Children Designs DESIGN CHART Embroidery Pattern images are not to scale Favorite Designs...

Page 136: ...132 DESIGN CHART Embroidery Pattern images are not to scale RE20d RE46d SQ10d SQ28d RE20d SQ28d SQ10d Decorative Designs Pantry Designs...

Page 137: ...rn images are not to scale RE20d RE46d SQ10d SQ28d SQ10d SQ28d RE46d RE20d SQ28d RE46d SQ10d Seasons and Special Occasions Designs Wedding Seasons and Special Occasions Designs Birthday Seasons and Sp...

Page 138: ...134 DESIGN CHART Embroidery Pattern images are not to scale RE20d RE46d SQ28d RE20d SQ10d SQ10d Seasons and Special Occasions Designs Others In The Hoop Designs Quilting Designs...

Page 139: ...135 DESIGN CHART Embroidery Pattern images are not to scale ASQ27d RE20d SQ10d SQ28d SQ28d SQ10d Cross stitch designs Quilting Designs Embroidery Lace Designs Designs for water soluble stabilizer...

Page 140: ...N CHART Embroidery Pattern images are not to scale RE46d RE20d SQ10d SQ28d SQ28d SQ10d RE20d SQ28d RE20d RE20d SQ10d Embroidery Lace Designs Designs for fabric Couching Designs Bracelet Designs Fringe...

Page 141: ...137 DESIGN CHART Embroidery Pattern images are not to scale RE46d SQ28d SQ10d RE20d RE20d SQ28d Sashiko Designs Border Designs...

Page 142: ...138 DESIGN CHART Embroidery Pattern images are not to scale SQ10d SQ28d SQ10d RE20d RE20d SQ28d Word Designs Monochrome Designs...

Page 143: ...139 SQ10d SQ10d RE20d Alphabet Designs Cross Stitch Alphabet Designs Flourish Alphabet Designs Hana DESIGN CHART Embroidery Pattern images are not to scale...

Page 144: ...140 SQ10d SQ28d SQ10d Alphabet Design Floral Alphabet Designs Motif Alphabet Designs Curly DESIGN CHART Embroidery Pattern images are not to scale...

Page 145: ...141 SQ10d RE20d Calibration Pattern Alphabet Designs American Applique DESIGN CHART Embroidery Pattern images are not to scale...

Page 146: ...142 DESIGN CHART Embroidery Monogram Gothic Script Cheltenham Bauhaus Galant Typist...

Page 147: ...143 DESIGN CHART Embroidery Monogram Brush First Grade Hollowblock Jupiter Micro Gothic Cyrillic 1 Cyrillic 2 Cyrillic 3...

Page 148: ...144 2 Letters 3 Letters DESIGN CHART Embroidery Monogram Border Normal Sew Version 1 04 07 03 2022...

Page 149: ...This page is left intentionally blank...

Page 150: ...868 800 013 e EN...

Reviews: