15
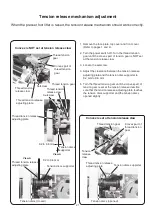
Needle bar height adjustment
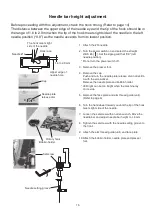
1. Attach the #14 needle.
2. Turn the power switch on and select the straight
stitch #4 ( ). Set the zigzag width at “0.0” (left
needle position).
* Do not turn the power switch off.
3. Remove the presser foot.
4. Remove the cap.
Push and turn the needle plate release dial in direction
A with the screwdriver.
Remove the needle plate and bobbin holder.
* LED light can be too bright when the machine lay
on its side.
5. Remove the face plate and arm thread guide (unit).
(Refer to page 6)
6. Turn the handwheel toward you until the tip of the hook
meets right side of the needle.
7. Loosen the setscrew with an allen wrench. Move the
needle bar and adjust needle bar height to 1.8 mm.
8. Tighten the setscrew with the needle setting groove to
the front.
9. Attach the arm thread guide (unit) and face plate.
10. Attach the bobbin holder, needle plate and presser
foot.
Needle setting groove
The hook meets right
side of the needle
Hook race
1.6 to 2.0 mm
Upper edge of
needle hole
Before proceeding with this adjustment, check the hook timing. (Refer to page 14)
The distance between the upper edge of the needle eye and the tip of the hook should be in
the range of 1.6 to 2.0mm when the tip of the hook meets right side of the needle in the left
needle position (“0.0”) as the needle ascends from its lowest position.
Setscrew
Needle #14
Bobbin holder
Rotary hook
A
B
Needle plate
release dial
Cap


