background image

www.toews.com

9 1

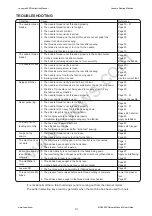
Cause

1. The needle thread is not threaded properly.

2. The needle thread tension is too tight.

3. The needle is bent or blunt.

4. The needle is incorrectly inserted.

5. The needle thread and the bobbin thread are not set under the

presser foot when start sewing.

6. The threads were not drawn to the rear after sewing.

7. The thread is too heavy or too fine for the needle.

8. The thread is tangled around a spool.

1. The bobbin thread is not threaded properly in the bobbin holder.

2. Lint has collected in the bobbin holder.

3. The bobbin is damaged and does not turn smoothly.

1. The needle is incorrectly inserted.

2. The needle clamp screw is loose.

3. The threads were not drawn to the rear after sewing.

4. The needle is too fine for the fabric being used.

5. A wrong presser foot is used.

1. The needle is incorrectly inserted, bent or blunt.

2. The needle and/or threads are not suitable for the work being sewn.

3. The Blue Tip needle is not being used for sewing stretch, very

fine fabrics and synthetics.

4. The needle thread is not threaded properly.

5. The poor quality needle is used.

1. The needle thread tension is too tight.

2. The needle thread is not threaded properly.

3. The needle is too heavy for the fabric being sewn.

4. The stitch length is too long for the fabric.

5. The foot pressure is not adjusted properly.

A stabilizer is not used when sewing very fine fabrics.

1. The feed dog is packed with lint.

2. The stitches are too fine.

3. The feed dog is not raised after ”drop feed” sewing.

1. The needle thread tension is too loose.

2. The needle is too thick or too fine for the fabric.

1. The machine is not plugged in or foot control is not connected.

2. Thread has been caught in the hook race.

3. The presser foot is not lowered.

1. The stitch density is not suitable for the fabric being sewn.

2. The interfacing has not been used for the stretch or synthetic fabric.

3. The buttonhole lever is not lowered.

1. Thread has been caught in the hook race.

2. Lint has built up in the hook race or bobbin holder.

1. The foot pressure is not suitable for fabrics being sewn.

1. The presser foot is raised before auto thread cutting is complete.

2. Thread have been caught in the thread cutter mechanism.

Condition

The needle thread

breaks

The bobbin thread

breaks

The needle breaks

Skipped stitches

Seam puckering

The cloth is not

feeding smoothly

Loops on the

seams

The machine does

not work

Buttonhole sewing

is not sewn

properly

The machine is

noisy

Layers shift

Thread cutter LED

blinks

Reference

Page 19 - 21

Page 24

Page 23

Page 23

Page 30

Page 30

Page 23

Page 16

Page 18

Page 87

Change the bobbin.

Page 23

Page 23

Page 30

Page 23

Use the correct foot.

Page 23

Page 23

Page 30

Page 19 - 21

Change the needle.

Page 24

Page 19 - 21

Page 23

Make stitch shorter.

Page 25

Apply a stabilizer.

Page 87

Make stitch longer.

Page 25

Page 24

Page 23

Page 5

Page 87

Page 11

Page 47

Apply an interfacing.

Page 51

Page 87

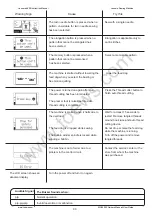
It is not abnormal that a faint humming sound is coming out from the internal motors.

The pattern selection key area may get warm when the machine has been used for hours.

Page 87

Page 25

Lower the presser

foot.

Page 87

TROUBLESHOOTING

Janome 6600 Instruction Manual

Janome Sewing Machine 

www.toews.com

MC6600P Owners Manual/ User Guide

Summary of Contents for Craft 6600P

Page 1: ...w w w t o e w s c o m Janome Memory Craft 6600P Instruction Manual Janome 6600 Instruction Manual Janome Sewing Machine www toews com MC6600P Owners Manual User Guide...

Page 2: ...stment 4 Never operate the appliance with any air opening blocked Keep ventilation openings of this sewing machine and foot controller free from accumulation of lint dust and loose cloth 5 Never drop...

Page 3: ...Tension 24 Adjusting the tension 24 Adjusting the Foot Pressure 25 Dropping the Feed Dog 25 Selecting the Sewing Mode 26 The Help Button 27 Selecting the Pattern 27 Customizing Machine Settings 28 29...

Page 4: ...tern from the beginning 71 Shell Tuc 72 Scallop Stitch 72 Cording 73 MONOGRAMMING 74 76 Selecting a Letter Style 74 Programming a Monogram 75 76 EDITING 1 77 78 Viewing a Long Text 77 Editing a Monogr...

Page 5: ...te Release Button 22 Hook Cover Plate 23 Needle Plate 24 Needle Threader 25 Thread Cutter 26 Face Plate 27 Zigzag Foot A 28 Foot Holder 29 Thumb Screw 30 Buttonhole Lever 31 Upper Feed Mechanism 32 Ne...

Page 6: ...ic Buttonhole Foot R 10 Screwdriver 11 Screwdriver 12 Set of Needles 13 Lint Brush 14 Seam Ripper 15 Spool Holder Large 16 Spool Holder Small 17 Bobbins 18 Quilting Bar 19 Basting Darning Foot P 2 20...

Page 7: ...pply plug into the wall outlet in this order Turn on the power switch 1 Power Switch 2 Machine Plug 3 Machine Socket 4 Foot Control Plug 5 Power Supply Plug 6 Wall Outlet 7 Foot Control socket CAUTION...

Page 8: ...ider when the foot control is fully depressed Operating Instructions The symbol O on a switch indicates the off position of a switch For appliances with a polarized plug one blade wider than the other...

Page 9: ...page 11 for the presser lifter position 2 Reverse stitch button When stitches D1 D2 8 9 Mode 1 D01 D02 08 09 Mode 2 and 01 02 Mode 3 are selected the machine will sew in reverse while the reverse stit...

Page 10: ...d or thick threads if the auto thread cutter does not work well When starting the next seam pull the needle thread to pick the bobbin thread up and draw them to the back and under the foot Clean the a...

Page 11: ...inding button See page 17 Press this button to wind the bobbin Stitch width adjusting button See pages 38 75 Press this button to alter the stitch width In the monogram mode pressing the button will r...

Page 12: ...memorize a pattern in mirror image Memory button See pages 66 68 71 75 78 Press this button to memorize the desired patterns Up to 50 patterns can be memorized Locking stitch button See page 67 Press...

Page 13: ...at the extra lifted position the LCD screen advise you to lower the foot A Attaching the Knee Lifter The Knee Lifter is extremely helpful when sewing applique patchwork and quilting since it allows yo...

Page 14: ...er the groove of the foot holder Lower the foot holder to lock the foot in place Each foot is marked with a letter for identification 4 Groove 5 Pin 6 Identification Letter Detaching and Attaching the...

Page 15: ...al feed foot To engage the dual feed device When you use the Dual feed attach the Dual feed as follows See page 27 Setting for Dual Feed Sewing Raise the needle and presser foot 1 Presser foot lifter...

Page 16: ...edle and the presser foot lifter to its extra lift position 1 Presser foot lifter Loosen the thumb screw and remove the Dual feed foot Attach the foot holder to the pressure bar and tighten thumb scre...

Page 17: ...hemming The guide on the foot helps feed the fabric and sew a straight and nearly invisible blind hem 8 Cording foot H This foot is specially designed to hold one or three strands of cording to creat...

Page 18: ...Setting the spool of thread Place the spool of thread on the spool pin with the thread coming off the spool as shown Attach the spool holder and press it firmly against the spool of thread 1 Spool of...

Page 19: ...pushing the bobbin winder stopper to the left the following screen is displayed Hold the free end of the thread in your hand and press the bobbin winding button Press the bobbin winding button again...

Page 20: ...tension spring blades Continue to draw the thread lightly until the thread slips into side notch B The bobbin should turn counterclockwise when pulling the bobbin thread If not reverse the bobbin and...

Page 21: ...e thread through the right thread guide 2 Right Thread Guide Hold the upper thread with both hands as shown and slip it under the thread guide plate 3 Thread Guide Plate Draw the thread toward you and...

Page 22: ...ly draw the thread up to the take up lever and down into its eye from the right to the left while holding the thread at the spool 8 Eye of the Thread Take up Lever Draw the thread down through the low...

Page 23: ...ader Guide Release the threader knob slowly while holding the thread end with your hand A loop of the thread is pulled up through the needle eye 5 Loop of Thread Remove the loop from the threader and...

Page 24: ...wn needle button twice to pick up the bobbin thread 1 Needle Thread 2 Needle Up Down Button Draw up the needle thread to bring up a loop of the bobbin thread 3 Bobbin Thread Slide 10 cm 4 of both thre...

Page 25: ...ilk Crepe de Chine Sheer Crepe Chambray Handkerchief Linen Gingham Challis Percale Wool Crepe Peau de Soie Taffeta Satin Silk Surah Satin backed Crepe Qiana Single Knits Jersey Swim wear and Tricot Le...

Page 26: ...ng materials layers of fabric and other sewing conditions Turn the tension control dial to set the desired number at the setting mark Consult information on the LCD screen for the recommended tension...

Page 27: ...feed lever to the right to lower the feed dog Shift the lever to the left to raise the feed dog it will return to the up position when starting the machine 1 Drop Feed Lever 2 Down position 3 Up posit...

Page 28: ...ommended Foot 6 Recommended Foot Pressure The following 3 sewing modes are available Mode 1 Direct The 10 most commonly used stitches can be selected directly Mode 2 Quilting The patterns for patchwor...

Page 29: ...The zipper foot for zipper sewing will be shown Step by step instructions how to engage and disengage the dual feed device Selecting the Pattern Mode 1 Press one of the numeral buttons corresponding...

Page 30: ...ess the button number 1 and the LCD screen shows normal resumption setting display 2 Press the editing or help button to select either Normal or Resumption setting 3 Press the memory button to confirm...

Page 31: ...ening window shows the customized settings that you have made Window duration time setting A window will appear when selecting patterns altering stitch length or width The duration of window displayed...

Page 32: ...Lower the foot while pushing the black button in The foot is locked in the horizontal position to avoid slipping 1 Thick Fabrics 2 Black Button Securing seam For fastening the ends of seams press the...

Page 33: ...lly after pressing the reverse button Using the cloth guide Attach the cloth guide on the needle plate with a screw Adjust the position of the cloth guide and tighten the screw Place the fabric with i...

Page 34: ...f the button sign to move the needle bar to the left Adjusting the stitch length The stitch length can be altered by pressing the stitch length adjusting button The stitch length indication will chang...

Page 35: ...preset values for the stitch length and width The preset value of the stitch length and width are optimized for the selected pattern However you can change the preset value of the following patterns t...

Page 36: ...sewing automatically This unique stitch is used where an invisible locking stitch is needed Lower the needle close to the front edge of the fabric The machine will sew several locking stitches in plac...

Page 37: ...atin Stitch foot F Foot pressure 2 3 Machine Setting Pattern 13 16 Thread tension 2 6 Presser foot Zigzag foot A Foot pressure 3 This stitch is ideal for patchwork piecing French knots Straight stitch...

Page 38: ...s extremely effective for sewing with hard to feed materials such as viynl or leather It also eliminates layer slippage NOTE See page 13 for how to attach the Dual Feed foot and to engage the Dual Fee...

Page 39: ...ighten the thumbscrew firmly with the screwdriver 1 Thumb screw 2 Pin 3 Needle clamp screw To sew Draw both needle and bobbin thread to the back Depress the foot control The machine will take one stit...

Page 40: ...right needle drop position will be changed 2 Fixed left needle position Pattern 02 is fixed right needle position 3 Fixed right needle position Adjusting the stitch length Press the right side of the...

Page 41: ...width at 5 0 or wider to prevent the needle from hitting the wires on the foot This stitch can be used to simultaneously seam and overcast edges of fabrics Use this stitch when you do not need to ope...

Page 42: ...gabardines Two rows of zigzag stitches are simultaneously sewn over the edge to insure that fabric will not ravel Place the fabric edge next to the guide of the foot and then sew CAUTION When you use...

Page 43: ...bric preparation Add 1 cm 3 8 to the zipper size This is the overall opening size 1 Right Sides of the Fabric 2 1 cm 3 8 3 Opening Size 4 Zipper Size 5 Slider 6 Zipper Teeth 7 Zipper Tape 8 Wrong Side...

Page 44: ...8 Fold Attach zipper foot E with the pin on the right hand side Lower the foot onto the topside at the bottom of the zipper so that the needle pierces the fabric next to the fold and the zipper tape...

Page 45: ...rough the garment and zipper tape guiding the zipper teeth along the side edge on the foot Stop about 5 cm 2 from the top of the zipper Unfasten the basting stitches 13 Basting Stitches 14 End of Open...

Page 46: ...3 16 3 0 8 cm 1 4 4 Curl of the Foot Place the fabric aligning the edge of hem with the guide on the foot Lower the foot and sew to 1 2 cm 1 2 1 while pulling both thread to the back Stop the machine...

Page 47: ...Lock a Matic stitch pattern 03 and auto lock stitch pattern 04 in the Mode 1 are ideal for seaming patchwork pieces together Machine Setting Pattern 11 Mode 2 Thread tension 2 6 Presser foot 1 4 Seam...

Page 48: ...of the Seams 4 Dual feed foot To sew Sew while tracing the previous seam with the quilting bar Baste or pin the quilt layers Draw a quilt design on the top fabric with a washable maker Move the quilt...

Page 49: ...unit of the pattern Raise the presser foot and move the fabric to the next position Machine Setting Pattern 73 Mode 2 Thread tension 3 6 Presser foot Satin Stitch foot F Foot pressure 2 3 Machine Sett...

Page 50: ...mory button 4 Select pattern 12 5 Press the memory button 6 Lower the foot and start sewing 1 Pattern 19 2 Pattern 12 NOTE The sewing speed is limited to the maximum speed of the pattern with the lowe...

Page 51: ...H This buttonhole is used on fine to medium weight fabrics especially for blouses and children s clothes 17 Fine Fabric BH This buttonhole is rounded at both ends and is used on fine delicate fabrics...

Page 52: ...hole Machine Setting Pattern 14 Mode 3 Thread tension 1 5 Presser foot Automatic Buttonhole foot R Foot pressure 3 Sensor buttonholes To sew Press the up down needle button to raise the needle Attach...

Page 53: ...t lengths will be different 6 Slider 7 Front stopper 8 Sewing gap 9 Starting mark 5 8 6 7 3 4 2 4 5 3 1 Insert the corner of the fabric under the foot Press the up down needle button twice Remove the...

Page 54: ...be sewn then lower the foot and start the machine NOTE After selecting the buttonhole press the thread cutter memory button LED lights on The thread will be cutt off automatically after finishing sew...

Page 55: ...and buttonhole foot Start the machine and sew the buttonhole over the filler cord The machine stops automatically when finished Remove the fabric from the machine and cut the sewing threads Pull the...

Page 56: ...itch less dense Press on to make the buttonhole stitch denser 4 Stitch Length Adjusting Button 5 Denser Buttonhole 6 Coarser Buttonhole NOTES To alter the buttonhole width and density while sewing a t...

Page 57: ...point Then lower the automatic buttonhole foot R 1 Button Holder 2 Needle Thread 3 Bobbin Thread NOTES You do not need to pull down the buttonhole lever If you wish to change the buttonhole width and...

Page 58: ...ot control depressed The machine will sew a bartack lock the stitches and automatically stop when the buttonhole is completed To make the next buttonhole position the fabric and step down on the foot...

Page 59: ...n 0 3 to 0 8 Use an Eyelet punch to open a keyhol buttonhole The sewing procedue is same as buttonhole 14 Adjusting buttonhole width on stitch pattern 16 Press the stitch width adjustment key the adju...

Page 60: ...p when buttonhole sewing is finished NOTE If the last few stitches of the right row extend beyond the bartack make the stitch length shorter to correct it Knit buttonhole 19 Knit buttonhole 20 z Sew t...

Page 61: ...ton in place Turn the handwheel to lower the needle into the right hole in the button Adjust the stitch width if necessary Rethread the machine and sew about 10 stitches NOTE The LCD screen shows a wa...

Page 62: ...hreads under the foot and place the fabric back under the foot Lower the needle at the starting point then lower the foot 1 Button Holder 2 Starting Point Depress the foot control and the machine will...

Page 63: ...he darning at a different size Press the memory button and start sewing from the beginning To adjust the evenness of darning The evenness of darning may vary depending on the sewing condition such as...

Page 64: ...k shorter than 1 5 cm 9 16 first stop the machine after sewing the required length and then press the reverse button The required length has been determined Start the machine and continue sewing until...

Page 65: ...ed Open the eyelet with an awl punch or pointed scissors Adjusting the shape of an eyelet Correct the shape of the eyelet as follows If the eyelet gap opens press on the stitch length adjusting button...

Page 66: ...of Fabric 5 Wrong Side of Fabric To sew Position the fabric so that the fold comes to the left side of the guide on the foot Lower the presser foot Adjust the position of the needle swing with the sti...

Page 67: ...ombination of patterns 06 and pattern 17 or 18 in the Mode 3 Two straight stitches will be added to the blind hem stitch when combining with the pattern 06 Four stitches will be added with the pattern...

Page 68: ...tch count indicates that the needle drop position will follow that of the previous pattern The stitch length and needle drop position of patterns 11 13 14 15 and 20 are independent from those of the c...

Page 69: ...ther patterns can be memorized after pressing the auto lock button Depress the foot control to sew The machine will lock the stitch and sew single unit of the pattern then stop automatically after loc...

Page 70: ...lock button in the middle of sewing a programmed pattern the machine will stop automatically after the current pattern is completed 1 Auto Lock Button Pattern combination with auto thread cutting Sel...

Page 71: ...a pattern combination with an elongated pattern Example Programming pattern 27 and its elongated image Select pattern 27 in the mode 3 Press the memory key Select pattern 27 in mode 3 Press the elong...

Page 72: ...hine will sew the pattern combination repeatedly NOTE If you press the Auto lock button in the middle of sewing a programmed pattern the machine will stop automatically after the current pattern is co...

Page 73: ...the pattern combination from the beginning Sewing the current pattern from the beginning If you have to stop sewing the pattern combination and wish to sew from the incomplete pattern press the turn...

Page 74: ...oot Zigzag foot A Foot pressure 3 Use a light weight fabric tricot for example Fold the fabric as shown and stitch on the fold Allow the needle to just clear the folded edge to create a shelled edge Y...

Page 75: ...essure 3 Machine Setting Pattern 8 Mode 1 Thread tension 3 7 Presser foot Cording foot H Foot pressure 3 Cording Insert 3 strands of cording under the spring of the foot and draw them under the foot t...

Page 76: ...Stitch foot F Foot pressure 3 Needle Blue Tip needle Press the letter style button to choose one of the following 1 Block 2 Block European accented letters 3 Script 4 Script European accented letters...

Page 77: ...s the stitch width adjusting button The letter size will be reduced to 2 3 of the original size The reduced pattern will be memorized Press the memory button Select letter B pattern 12 Press the memor...

Page 78: ...ram then stop automatically and trim the threads Press the auto thread cutter button after programming a monogram The LED signal will turn on and the cutter mark will appear after the monogram Janome...

Page 79: ...under a character indicate that there are remaining characters in that direction Editing the programmed patterns Deleting a letter character Example To delete C from ABCD Press the edit key to shift...

Page 80: ...ter Example To insert a space in ABCD Press the Edit button to shift the cursor under the letter C Duplicating a pattern Press the edit button to shift the cursor under the pattern 28 Press the memory...

Page 81: ...patterns will be sewn in the uniform width 1 Default Width 2 Uniformly Altered Width Unified needle drop position The needle drop position of the programmed patterns will vary depending on the patter...

Page 82: ...nd 41 in the Mode 3 Press the stitch width adjustment key The stitch width will be applied to all memorized patterns NOTE You cannot adjust the stitch length setting when you combine satin stitches an...

Page 83: ...ting button to reduce the width to 5 0 NOTES To view the stitch setting of each pattern shift the cursor under the desired pattern then press the stitch width or length adjusting button The settings w...

Page 84: ...een while the machine is saving the stitch pattern combination Do not turn the power switch off while the machine is beeping You can access other memory address M2 to M5 by pressing the stock call key...

Page 85: ...mory address Press the turnover memory key to recall the stored combination Deleting a stored combination Press the stock call key to select the desired memory address Press the clear key to delete th...

Page 86: ...two spools of thread on the spool stand Draw both threads from the spools and pass them through the points from 1 to 9 Make sure that the two strands of thread do not get tangled Slip one of the threa...

Page 87: ...d on a 2 mm wide twin needle Sew at a medium speed When changing the sewing direction raise the needle from the fabric You can sew patterns shown on the left with the twin needle NOTES If the selected...

Page 88: ...ction of If the pattern is drawn out turn the feed balancing dial in the direction of Letters and numbers Example Pattern 08 Monogram If the pattern is compressed turn the feed balancing dial in the d...

Page 89: ...hook race with the lint brush Clean the hook race with a dry cloth You may also use a vacuum cleaner 1 Screwdriver 2 Setscrew 3 Needle Plate 4 Bobbin Holder 5 Lint Brush 6 Feed Dog 7 Hook Race 8 Soft...

Page 90: ...ginal position Attach the faceplate with the setscrew 1 Setscrew 2 Faceplate 3 Lamp Socket 4 Light Bulb Replace a bulb with the same type rated 12 V 5 W Replacing the light bulb on the underside of th...

Page 91: ...is still initializing after turning the power on Pressing the thread cutter button 4 times in a row Press the start stop button with the foot control being connected The foot control is disconnected...

Page 92: ...in The twin needle button is pressed when a pattern unsuitable for twin needle sewing has been selected The memory button is pressed when a pattern that cannot be memorized has been selected The machi...

Page 93: ...d tension is too loose 2 The needle is too thick or too fine for the fabric 1 The machine is not plugged in or foot control is not connected 2 Thread has been caught in the hook race 3 The presser foo...

Reviews: