background image

75

Combinación de patrones

Configuración de la máquina

q

Patrón

w

Pantalla

e

Prensatelas

F: Prensatelas para puntadas

Combinaison de points

Réglage de la machine

q

Point

w

Affichage électronique

e

Pied

F:Pied pour points satin

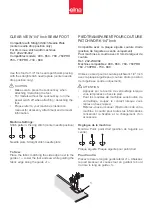
Usted puede coser combinaciones de patrones decorativos

con la ayuda del botón de bloqueo automático.

Ejemplo:

 Para coser una combinación de dos unidades del

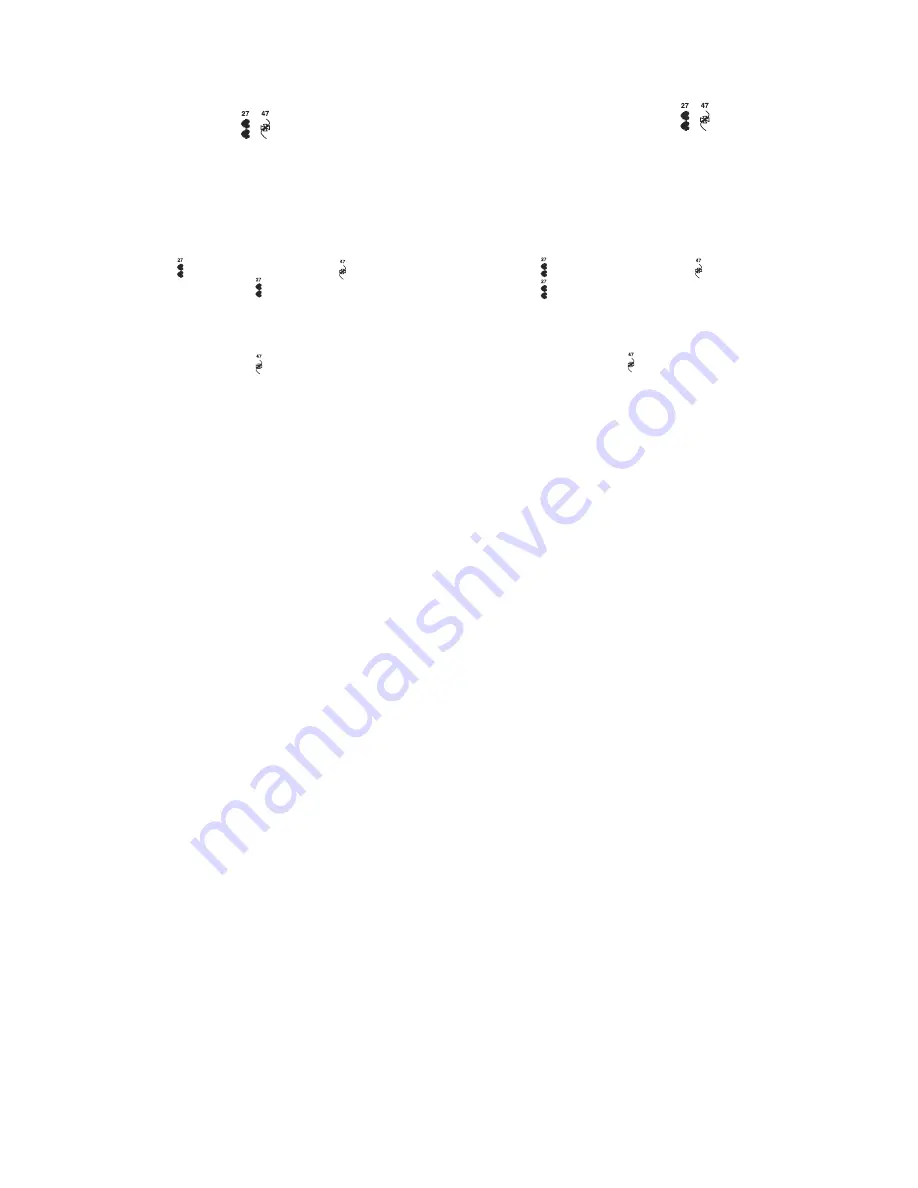
patrón 27    y una unidad del patrón 47   .

Seleccione el patrón 27    y cosa. Oprima el botón de

bloqueo automático al coser la segunda unidad. La máquina

se detendrá automáticamente al terminar la segunda

unidad.

Seleccione el patrón 47    y oprima el botón de bloqueo

automático.

Oprima el pedal de control. La máquina coserá una unidad

del patrón y se detendrá automáticamente.

Repita los pasos anteriores para coser una línea de la

combinación de patrones.

Il est possible de coudre une combinaison de points

décoratifs en utilisant le bouton d’arrêt automatique.

Exemple:

 pour coudre une combinaison de deux points du

motif N.27    et un point du motif N.47     , sélectionner le

point N.27    et coudre. Appuyer sur le bouton d’arrêt

automatique pendant que l’on coud le deuxième point. La

machine s’arrêtera automatiquement lorsque le second

point est terminé.

Sélectionner le motif N.47    et appuyer sur le bouton d’arrêt

automatique.

Appuyer sur la commande à pédale et la machine coudra un

seul point du motif et s’arrêtera automatiquement.

Répéter cette procédure pour coudre une ligne de points

combinés.

Summary of Contents for DC2010

Page 1: ...Instruction Book Manual de instrucciones Manuel d instructions DC2010...

Page 2: ...er needle plate The wrong plate can cause the needle to break 12 Do not use bent needles 13 Do not pull or push fabric while stitching It may deflect the needle causing it to break 14 Switch this sewi...

Page 3: ...agua Env e esta m quina de coser al distribuidor autorizado m s cercano si es necesario examinarla repararla o someterla a ajustes el ctricos o mec nicos 4 No utilice nunca el aparato si tiene bloque...

Page 4: ...ation d oxyg ne 8 Pour la d brancher tournez le commutateur la position OFF O puis retirez la prise de ladouille 9 Ne d branchez pas la machine en tirant sur le c ble Pour la d brancher saisissez la p...

Page 5: ...ng the needle thread tension for zigzag stitch 28 SECTION 3 BASIC SEWING Straight Stitch Sewing 30 Starting to sew 30 Changing sewing direction 30 Fastening the seam 30 Adjusting the Stitch Length 32...

Page 6: ...suelto 29 Ajuste de la tensi n del hilo de la aguja para puntada zigzag 29 SECCION 3 COSTURA BASICA Puntada recta 31 Para comenzar a coser 31 Cambios de direcci n de costura 31 Sujeci n de la costura...

Page 7: ...fil de l aiguille n est pas assez lev e 29 R glage de la tension du fil de l aiguille pour le point zig zag 29 PARTIE 3 COUTURE DE BASE Le point droit 31 Commencer coudre 31 Changer la direction de la...

Page 8: ...ce adjusting dial 9 Reverse stitch button 0 Auto lock button 1 Up Down needle position button 2 Speed control lever 3 Needle clamp screw 4 Needle 5 Presser foot 6 Foot holder 7 Carrying handle 8 Bobbi...

Page 9: ...te de carrete adicional NOTA Las especificaciones est n sujetas a cambio sin previo aviso Nom des pi ces q Touche de s lection du mode w Touche e Touche r Affichage lectronique t Porte bobine grand y...

Page 10: ...t C Blind hem foot G Seam ripper Buttonhole opener Screwdriver Lint brush Quilter bar Foot control Additional spool pin Spool pin felt Spool stand Spool holder large Spool holder small Instruction boo...

Page 11: ...porta carretes Base de carrete Tapa carretes grande Tapa carretes peque ol Manual de instrucciones Cable de alimentaci n Canettes Jeu d aiguille Pied point lance F Pied pour fermetures clair E Pied po...

Page 12: ...ide the extension table along the free arm inserting the pin into the hole to attach qExtension table wPin eHole q e w Free arm sewing The free arm sewing is useful for stitching sleeves waistbands pa...

Page 13: ...ines o remendar rodillas codos o ropa de ni os Plateau extensible et couture en bras libre Retirer le plateau Tirer le plateau vers la gauche Remettre le plateau en place Faire glisser le plateau le l...

Page 14: ...ace anything on the foot control when the machine is not in use q w e r t y q w Polarized Plug This appliance has a polarized plug one blade wider than the other To reduce the risk of an electric shoc...

Page 15: ...vija de ninguna forma Prise polaris e Pour les appareils ayant une prise polaris e une lame plus large que l autre Afin de r duire les risques de choc lectrique cette prise de branchement est con ue p...

Page 16: ...matically when the Auto lock button is pressed while sewing the pattern 01 02 10 or 11 The machine willl sew to the end of pattern being sewn and lock stitches to stop automatically when other pattern...

Page 17: ...o autom tico antes de comenzar a coser Touches et boutons fonctionnels q Le bouton de marche arri re Lorsque le bouton de marche arri re est enclench la machine coud en sens inverse Il faut galement q...

Page 18: ...er one of the following modes r z x c c Stitch length adjusting mode Press the Up key to increase the stitch length or Down key to decrease NOTE You can adjust the stitch length while the machine is r...

Page 19: ...ta que aparezca en la pantalla el n mero de patr n de la puntada que quiere r Touche de s lection du mode Appuyer sur ce bouton pour utiliser un des modes suivants c Mode de r glage de la longueur du...

Page 20: ...p position for normal sewing Turn the handwheel toward you to check if the feed dog comes up after setting the lever in the up position q Down position w Up position e Feed dog r Handwheel q w e r w e...

Page 21: ...sser le levier vers gauche Il reviendra la position lev e lorsque la machine commencera fonctionner REMARQUE La griffe d entra nement doit se trouver en position lev e pour la couture normale Pour v r...

Page 22: ...ARNING Turn OFF the power switch before detaching or attaching the foot holder To detach Raise the presser bar and turn the setscrew counterclockwise to remove it Remove the foot holder q Setscrew w F...

Page 23: ...atelas Montaje Alinee el agujero del soporte con el agujero roscado de la barra del prensatelas e introduzca el tornillo en el agujero Apriete el tornillo gir ndolo en sentido horario Cambio del prens...

Page 24: ...red Polyester 50 silk 50 to 80 Cotton 50 to 60 Synthetic Cotton Covered Polyester 50 silk 40 to 50 Cotton 40 to 50 Synthetic Cotton Covered Polyester Needle Size 9 or 11 11 or 14 14 or 16 In general f...

Page 25: ...su lastique Cette aiguille vite effectivement les sauts de points En cousant les tissus tr s l gers utilisez un morceau de papier plac au dessous pour pr venir la d formation du tissu Comprobar con un...

Page 26: ...Additional spool pin e Felt r Spool stand t Hole for the additional spool pin Winding the bobbin NOTE Set the speed control lever at for bobbin winding z Guide the thread around the bobbin winder thre...

Page 27: ...el soporte para carretes peque os w Soporte de carrete peque o Remplir la canette Retirer la canette Faire glisser le bouton d ouverture du couvercle vers la droite et retirer le couvercle Sortir la c...

Page 28: ...cover y Bobbin thread u Align left edge of the hook cover v Draw the thread to the back The bobbin should turn counterclockwise when pulling the thread c Continue to draw the thread lightly through t...

Page 29: ...ta que entre en la muesca B r Hojas de tensi n t Muesca B x Gu e el hilo a la muesca A de la parte delantera del soporte de la bobina Extraiga el hilo hacia la izquierda pas ndolo entre las hojas del...

Page 30: ...o the eye of the thread take up lever from the right to left i Thread take up lever x Draw the end of the thread down around the thread guide plate and draw it up to the left Make sure the thread slip...

Page 31: ...e del extremo del hilo con la mano izquierda y eng nchelo alrededor del gu ahilos superior mientras sostiene el hilo en la bobina con la mano derecha Pase el hilo hacia abajo por la ranura r Gu ahilos...

Page 32: ...ead loop through the needle v Pull the thread through the needle eye NOTE The needle threader can be used with a 11 to 16 Thread size 50 to 90 should also work well Drawing Up Bobbin Thread z Raise th...

Page 33: ...ction de la fl che comme sur l illustration en faisant passer la boucle du fil dans l aiguille v Enfiler le fil dans l aiguille REMARQUE Pour un fonctionnement optimal du dispositif d enfilage automat...

Page 34: ...eedle thread shows through on the wrong side Bottom side of the fabric and the stitch feels bumpy turn the dial to a higher tension setting number to tighten the needle thread tension 4 4 4 q w e r t...

Page 35: ...la canette Fil du inf rieur e Pour augmenter la tension r Endroit du tissu t Envers du tissu Le fil de l aiguille appara t sur l envers du tissu Augmenter la tension du fil de l aiguille en positionn...

Page 36: ...utton w to fasten the end of seam w Reverse stitch button NOTE If you use pattern 03 Lock a Matic stitch press the reverse stitch w button once and the machine will sew in reverse and stop automatical...

Page 37: ...nte x Levante el prensatelas y mueva la tela hacia atr s c Levante los hilos hasta el cortahilos Los hilos se cortar n a la longitud apropiada para iniciar la siguiente costura e Cortahilos Cambios de...

Page 38: ...tches longer than approximately 2 5 mm q w e 1 0 2 2 5 0 0 0 3 5 7 0 Changing the Needle Drop Position You can change the needle drop position of straight stitching for patterns 01 04 and 18 21 Press...

Page 39: ...la posici n de descenso de la aguja para la puntada normal es decir para los patrones 01 a 04 y 18 a 21 Oprima la tecla de selecci n de modalidad para cambiar a la modalidad de ajuste de anchura de pu...

Page 40: ...across the hem z Lower the needle into the fabric at the point to start sewing x Lower the foot while pushing the black button in The foot is locked in the horizontal position c The foot will be unlo...

Page 41: ...autom ticamente despu s de coser varias puntadas q Bot n negro Coudre depuis le bord d un tissu pais Le bouton noir maintient en place le pied zigzag de fa on viter de glisser lorsqu on effectue des c...

Page 42: ...reinforce q Pattern Stretch stitch w Foot A Zigzag foot For seaming stretch fabrics that tend to pucker The seam can be opened flat q Pattern Locking stitch w Foot A Zigzag foot Seaming with auto lock...

Page 43: ...una vez el bot n de puntada inversa la m quina sujetar las puntadas y se detendr autom ticamente q Patr n Puntada Lock a Matic w Prensatelas A Prensatelas de zigzag Costuras con puntadas inversas auto...

Page 44: ...ncrease stitch width q Stitch width Zigzag stitch is one of the most useful and versatile stitches It is used for overcasting mending appliqu also used as a decorative stitch NOTE Use an interface whe...

Page 45: ...du mode et choisir le mode de r glage de la longueur du point La d finition par d faut du r glage s lectionn appara t sur l affichage lectronique Pour r duire la longueur du point appuyer sur la touc...

Page 46: ...This stitch is used to finish a raw edge of synthetics and other stretch fabrics that tend to pucker Sew along the fabric edge leaving enough seam allowance After sewing trim off the seam allowance c...

Page 47: ...ed Placer le bord non fini du tissu c t du guide du pied et commencer coudre q Guied ATENCI N No ajuste la anchura de puntada a menos de 5 si utiliza el prensatelas de sobrehilado para evitar que la a...

Page 48: ...from hitting the wires on the foot This stitch is used for finishing the raw edges of stretch fabrics that tend to unravel q w e This stitch is recommended for finishing the edge of knit fabrics Sew...

Page 49: ...uille risquerait de frapper les fils du pied On utilise ce point pour finir les bords non finis des tissus extensibles ayant tendance se d faire Punta de tejido Configuraci n de la m quina q Patr n w...

Page 50: ...ear of the automatic buttonhole foot R The button holder of the foot takes a button size up to 2 5 cm 1 in diameter Make a test buttonhole on a scrap fabric of the actual garment Use interfacing on st...

Page 51: ...antiles Ojal cuadrado 06 Se utiliza para telas medianas y gruesas Boutonni res carr es R glage de la machine q Point w Affichage lectronique e Pied R Pied pour boutonni res automatique REMARQUES La ta...

Page 52: ...Starting point i Slider o No gap 0 Spring holder 1 Sewing gap NOTE Make sure there is no gap between the slider and spring holder otherwise the left and right length of the buttonhole will be differen...

Page 53: ...ot n en el portabotones Mueva el portabotones hacia usted B para sujetar el bot n e Portabotones NOTA Si el bot n es muy grueso haga un ojal de prueba Si es dif cil pasar el bot n por el ojal de prueb...

Page 54: ...a a a s s s s s d d d d d f f f f f 2 3 n m 5 6 7 8 m After the buttonhole sewing is finished push the buttonhole lever upward as far as it will go 8 Buttonhole lever n Remove the fabric and place a...

Page 55: ...de los remates en los extremos para evitar que corte los remates Corte la abertura con el abrecosturas Use un punz n para abrir el ojal de bocallave 5 Poste 6 Abrecosturas 7 Punz n m Al terminar de c...

Page 56: ...nhole is finished simply depress the foot control again z Do not raise the foot or reselect the pattern The machine will sew another buttonhole in the following order and stop automatically x Straight...

Page 57: ...xtremo s s s s s Ajuste de la densidad de puntada del ojal Oprima la tecla de selecci n de modalidad para cambiar a la modalidad de ajuste de longitud de puntada Oprima la tecla Menos para aumentar la...

Page 58: ...e width Press the Up key to increase buttonhole width The width of round end buttonhole can be varied from 2 5 to 5 5 q Narrow buttonhole 2 5mm wide w Wide buttonhole 5 5mm wide The width of keyhole b...

Page 59: ...r la densidad de puntada R gler la largeur des boutonni res Appuyer sur la touche de s lection du mode et choisir le mode de r glage de la largeur du point Pour r duire la largeur de la boutonni re ap...

Page 60: ...ttonhole foot raised hook the filler cord on the cord spur on the back of the buttonhole foot Bring the ends toward you under the foot and hook the filler cord ends into the forks on the front of the...

Page 61: ...para ojales enganche el cord n de relleno en el gancho para cord n localizado en la parte trasera del prensatelas para ojales Tire de los extremos hacia usted por debajo del prensatelas y enganche el...

Page 62: ...d the button in place c Turn the handwheel toward you to check if the needle enters both left and right holes on the button v Set the speed control lever at mark b Depress the foot control to sew 10 s...

Page 63: ...recorte los hilos de la aguja y la bobina donde comienzan las puntadas pero dejando colas de 20 cm 8 en los extremos Tire del hilo de la bobina para sacar el hilo de la aguja por el reverso de la tela...

Page 64: ...Button holder w Starting point e Maximum length 2 cm r Maximum width 0 7 cm t Blinking dot q w e z x c q w e r v a a a a a y u s s s s s A B s s s s s Adjusting the evenness of the darning Press the m...

Page 65: ...sus la premi re dans la direction appropri e q Pince boutons w Point de d part e Longueur maximale 2 cm r Largeur maximale 0 7 cm s s s s s Ajuste de la uniformidad del zurcido Oprima la tecla de sele...

Page 66: ...position Sew in reverse a few stitches to lock Increase the stitch length to 5 0 set the needle thread tension to 0 and baste the entire length of the zipper opening o Bottom seam 0 Zipper bottom sto...

Page 67: ...e sur toute la longueur du ruban de la fermeture clair en enlevant les pingles au fur et mesure q Couche sup rieure w Couche inf rieure e Pli de 0 3 cm 1 8 r C t du pli t Extr mit de l ouverture y Lon...

Page 68: ...removing the pins as you go Stop the machine about 2 5cm before the zipper foot reaches the pull tab Lower the needle slightly into the fabric Raise the zipper foot and unzip a few inches to clear a...

Page 69: ...e Parte de abajo de la tela superior r Hilvanado t Parte de arriba de la tela y Cinta de la cremallera n Abaissez le pied et piquez le reste de la couture en vous assurant que le pli est r gulier la...

Page 70: ...with the folded edge Sew guiding the folded edge along the guide e Guide screw r Guide t Folded edge x Place the fabric so that the needle just pierces the folded edge when the needle comes over the e...

Page 71: ...RQUE Si l aiguille pique le tissu trop gauche les points appara tront sur l endroit du tissu c Tourner la vis de guidage et r gler la position du guide pour qu il se trouve contre le bord pli Coudre e...

Page 72: ...s use an adhesive type stabilizer or a piece of paper on the wrong side of the fabric to prevent puckering NOTE Press the auto lock button while sewing the last unit of the pattern so the machine will...

Page 73: ...das de raso r Tensi n del hilo 6 a 8 Pour les tissus fins et extensibles il convient de stabiliser le tissu l aide de ruban adh sif ou d un papier gomm appliqu sur l envers du tissu Ceci vitera que le...

Page 74: ...applique making sure the needle falls along the outer edge of the applique When turning corners lower the needle down into the outer edge of the appliqu and raise the presser foot to pivot the fabric...

Page 75: ...orde exterior de la aplicaci n Al dar vuelta en las esquinas baje la aguja a trav s del borde externo de la aplicaci n y levante el prensatelas para girar la tela Coudre deux couches de tissu en joign...

Page 76: ...straight seams Pull out the gathering stitches q 1 cm 3 8 Fold under 1 5 cm 1 2 on each fabric edge and press Pin the two edges to a piece of paper 0 3 cm 1 8 apart Sew guiding the fabric so the needl...

Page 77: ...la aguja y la bobina a lo largo de un borde w Tire del hilo de la bobina e y distribuya el fruncido de manera uniforme Cosa l neas del patr n decorativo entre las costuras rectas Extraiga las puntada...

Page 78: ...wer the foot Turn the guide screw and move the guide next to the folded edge Sew guiding the folded edge along the guide Open the fabric and press the tucks to one side q Guide screw w Guide e Folded...

Page 79: ...de pour l amener c t du bord pli Coudre en guidant le bord pli le long du guide Ouvrir le tissu et repousser les nervures sur un c t au moyen d un fer repasser q Vis de guidage w Guide e Bord pli Les...

Page 80: ...the pattern 27 and one unit of 47 Select the pattern 27 and sew Press the auto lock button q while sewing the second unit The machine will stop automatically when the second unit is completed Select...

Page 81: ...e bloqueo autom tico Oprima el pedal de control La m quina coser una unidad del patr n y se detendr autom ticamente Repita los pasos anteriores para coser una l nea de la combinaci n de patrones Il es...

Page 82: ...g dial in the direction of NOTE In normal sewing set the dial to the neutral position i e the groove on the dial is centered with the standard setting mark q w e A B C WARNINGS Turn OFF the power befo...

Page 83: ...sible w Rep re de r glage standard e Rainure A Si le point est trop serr tourner le cadran d quilibre du point extensible vers le C Si le point est trop l che tourner le cadran d quilibre du point ext...

Page 84: ...ot m Replacing Bobbin Holder and Needle Plate Insert the bobbin holder Make sure to fit the knob next to the stopper in the hook race t Guide pins y Knob u Stopper n Wipe inside of the hook race with...

Page 85: ...les trous avec les tiges guides i Trou 0 Bien serrer les vis de serrage o Vis de serrage REMARQUE Une fois le nettoyage de la machine termin fixer l aiguille et le pied presseur n Limpie el interior d...

Page 86: ...alts due to the overload Wait for at least 15 seconds to recover If thread jamming causes overload remove the tangled threads The Up or Down key is pressed after buttonhole is finished but the foot is...

Page 87: ...sobrecarga Espera al menos 15 segundos para que la m quina se restablezca Si la sobrecarga se debe a hilos atorados quite los hilos enredados Oprimi la tecla M s o Menos despu s de terminar un ojal p...

Page 88: ...surcharge Attendre au moins 15 secondes avant de r parer Si la surcharge est caus e par un emm lement de fils retirer les fils emm l s La touche ou est enclench e une fois que la boutonni re est termi...

Page 89: ...itches are too fine 3 The feed dog is not raised after drop feed sewing 1 The needle thread tension is too loose 2 The needle is either too heavy or too fine for the thread 1 The machine is not plugge...

Page 90: ...evada atr s al terminar de coser 4 El hilo de la aguja no est enhebrado correctamente 1 La aguja est insertada incorrectamente 2 El tornillo de la abrazadera de la aguja est suelto 3 La tela no es lle...

Page 91: ...Vous utilisez une mauvaise aiguille 1 L aiguille n est pas install e correctement 2 La vis de blocage de l aiguille est desserr e 3 Le tissu n est pas tir vers l arri re la fin de la couture 4 L aigui...

Page 92: ...843 800 980 E S F Printed in Taiwan...

Reviews: